how to remove silicone caulk
Silicone caulk is an essential sealant used in countless applications around the home, particularly in areas prone to moisture like bathrooms and kitchens. It creates a waterproof, flexible barrier that prevents water damage, drafts, and pest intrusion. However, over time, even the best silicone caulk can degrade. It might become moldy, discolored, cracked, peel away from the surface, or simply reach the end of its effective lifespan. When this happens, learning how to remove silicone caulk becomes a necessary skill for any homeowner or DIY enthusiast. Replacing old, failing caulk is crucial not only for aesthetic reasons but also to maintain the integrity of the seal and prevent potential underlying damage. The process of silicone caulk removal might seem daunting, especially if the caulk is old, stubborn, or applied in a tricky spot, but with the right tools, techniques, and a bit of patience, it’s a manageable task. This comprehensive guide will walk you through everything you need to know about removing silicone caulk effectively and safely, covering various methods, tools, surfaces, and challenges. Whether you’re dealing with caulk silicone removal in your shower, around windows, or on countertops, understanding the proper steps ensures a clean result, ready for a fresh application. We will explore mechanical methods using tools, chemical approaches, natural alternatives, and provide tips for dealing with specific situations, ensuring you know exactly how to get rid of silicone caulk and prepare the surface for a new, lasting seal. Mastering silicone removal is key to maintaining a clean, functional, and well-protected home environment. This guide addresses numerous related queries, including how to remove caulk from surfaces, how to remove sealant, and specific techniques for removing silicone from bathroom fixtures.
Essential Tools and Materials for Silicone Caulk Removal
Before you begin the task of removing silicone caulk, gathering the right tools and materials is paramount. Having everything on hand will make the process smoother, faster, and safer. The specific items needed might vary slightly depending on the type of caulk, the surface it’s applied to, and the method you choose, but a core set of tools is generally required for effective caulk removal. Proper preparation, including tool selection, is the first step towards successfully learning how to remove silicone.
Using a Utility Knife or Scraper for Caulk Removal
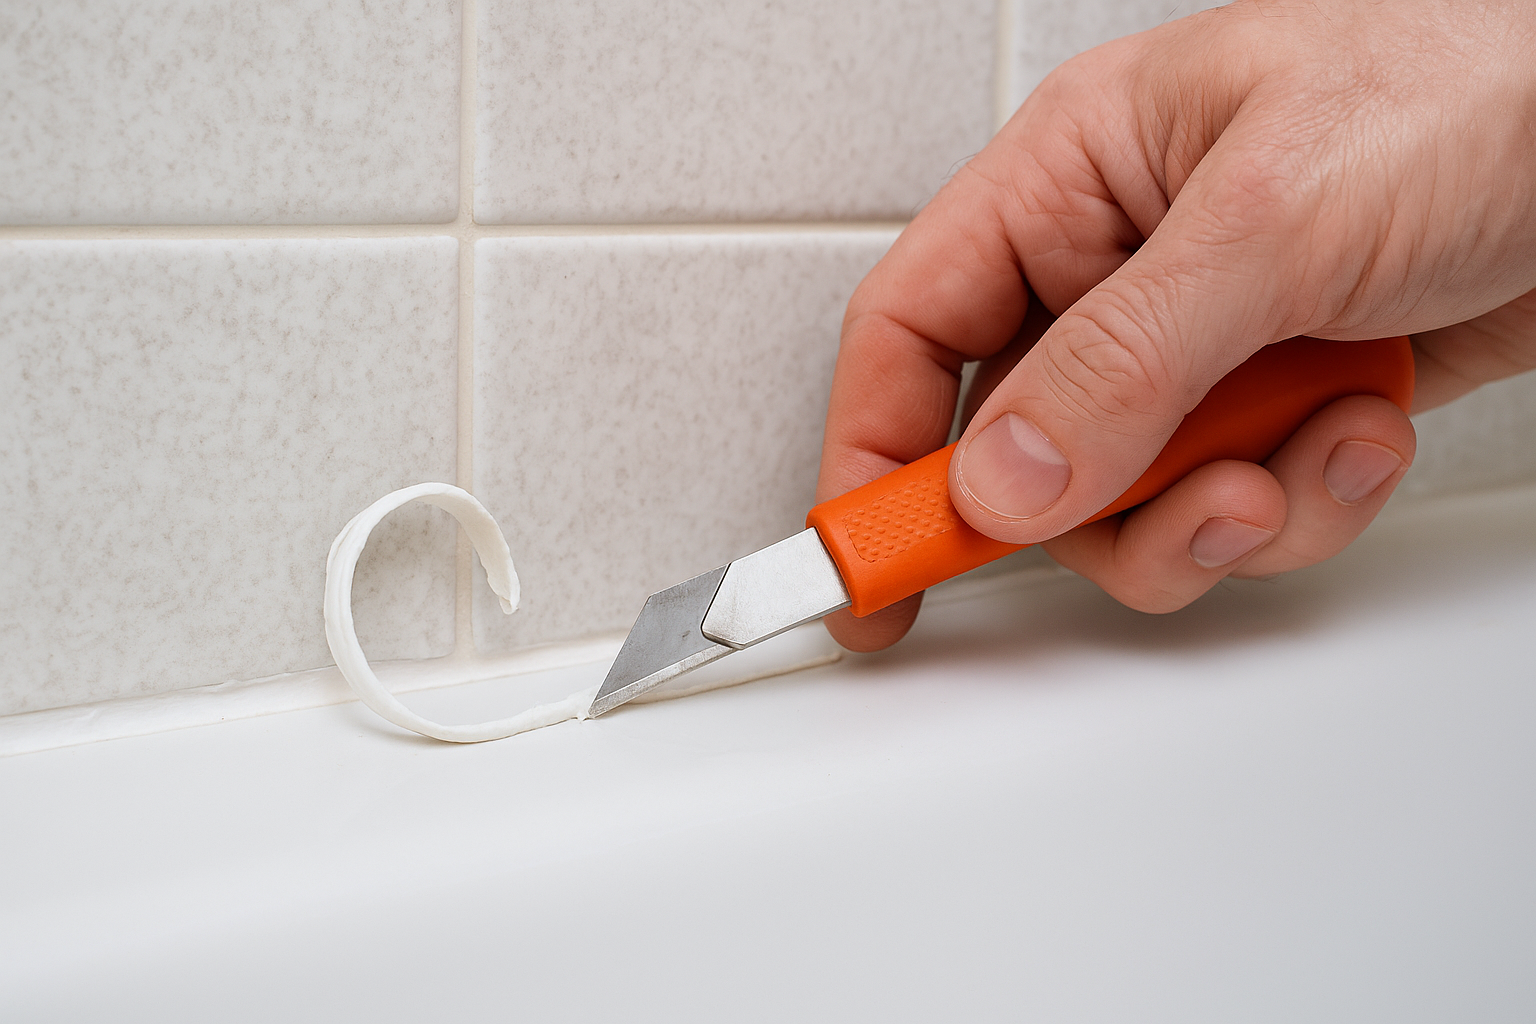
The most fundamental tools for caulk removal are manual cutting and scraping implements. A sharp utility knife with a fresh blade is often the starting point. Its primary function is to break the seal between the caulk bead and the adjacent surfaces. Carefully run the blade along both edges of the silicone caulk, cutting as close to the surface as possible without gouging the material underneath. The goal is to sever the bond, making the bulk of the caulk easier to pull away. Be extremely cautious when using a sharp knife, always cutting away from your body and applying steady, controlled pressure. For scraping away the loosened caulk and residual material, a variety of scrapers can be employed. A stiff putty knife (metal or plastic) is a common choice. Metal putty knives are effective but require care on delicate surfaces to avoid scratches. Plastic putty knives or specialized plastic caulk removal tools are safer alternatives for materials like acrylic tubs, fiberglass showers, or painted surfaces. Some scrapers are designed with specific angles or shapes (like hooked blades) to better fit into corners and crevices where silicone caulking is often applied. When using any scraper, maintain a low angle relative to the surface to minimize the risk of damage. Work in short, deliberate strokes to lift and peel the caulk. This initial mechanical approach using a knife and scraper is often sufficient for removing the majority of the old silicone sealant.
Choosing the Right Caulk Removal Tool
While a utility knife and basic scraper are essential, several specialized tools can significantly expedite and simplify the silicone caulk removal process, especially for large jobs or particularly stubborn caulk. Oscillating multi-tools equipped with a scraper or cutting blade attachment are highly effective. The rapid vibrations break down the caulk and cut through it with minimal effort, saving considerable time and physical strain compared to manual methods. However, they require careful handling to avoid damaging the surrounding surfaces, especially softer materials. Practice on an inconspicuous area first if you’re unfamiliar with the tool. Another category includes dedicated caulk removal tools. These often feature ergonomic handles and specially shaped blades designed to hook under the caulk bead or scrape along surfaces and into corners efficiently. Some combine a cutting edge with a scraping profile. Plastic versions are widely available and recommended for surfaces prone to scratching. When selecting a tool, consider the surface material (tile, porcelain, acrylic, wood, glass, metal), the width and condition of the caulk line, and accessibility (tight corners vs. long straight runs). For instance, a flexible plastic scraper might be best for a curved tub edge, while a robust metal scraper or oscillating tool might be necessary for hardened caulk on tile grout lines. Investing in a specific caulk removal tool or set can be worthwhile if you anticipate doing this task regularly or are facing a particularly challenging removal job. Ultimately, the “right” tool is one that allows you to remove caulk effectively without causing collateral damage.
Chemical Silicone Removers: When and How to Use
Sometimes, mechanical methods alone aren’t enough to remove silicone caulk completely, especially the stubborn residue left behind after scraping. This is where chemical silicone removers or softeners come into play. These products are specifically formulated to break down the chemical structure of cured silicone, turning it into a softer, gel-like substance that is much easier to scrape or wipe away. They are particularly useful for removing silicone caulk residue that clings tenaciously to surfaces. Chemical removers are typically available as liquids, gels, or sprays. Gels are often preferred as they cling well to vertical surfaces and caulk lines, allowing the active ingredients more time to work. Always read and follow the manufacturer’s instructions carefully, as application methods and dwell times vary significantly between products. Generally, the process involves applying the remover generously over the remaining silicone, ensuring full coverage. You’ll then need to let it sit for the recommended duration, which can range from a couple of hours to overnight, depending on the product and the thickness/age of the silicone. During this time, the chemicals penetrate and weaken the caulk. After the dwell time, the softened silicone can usually be scraped away much more easily using a plastic scraper or even wiped off with a cloth. It’s crucial to use these products in a well-ventilated area, as they often emit strong fumes. When considering how to remove silicone using chemicals, test the product on a small, hidden area of the surface first to ensure it doesn’t cause discoloration or damage, especially on plastics, painted surfaces, or porous materials like natural stone. Thorough cleaning after using a chemical remover is essential to neutralize any remaining chemicals before applying new caulking silicone.
Safety Gear for Removing Silicone Caulk
Safety should always be a top priority when undertaking any DIY project, and removing silicone caulk is no exception. Several potential hazards exist, ranging from cuts from sharp tools to irritation from chemical removers or airborne particles. Equipping yourself with the appropriate safety gear is essential. Firstly, protect your hands. Wear sturdy work gloves, preferably cut-resistant ones, especially when using utility knives or sharp scrapers. This minimizes the risk of accidental cuts. If using chemical silicone removers, opt for chemical-resistant gloves (like nitrile or neoprene) to prevent skin irritation or burns. Secondly, protect your eyes. Safety glasses or goggles are crucial to shield your eyes from flying debris dislodged during scraping, potential splashes from chemical removers, or dust particles. Even small fragments of old, hardened caulk can cause eye injury. Thirdly, consider respiratory protection, particularly if you are working in a poorly ventilated area, sanding residue, dealing with moldy caulk, or using chemical removers with strong fumes. A dust mask (N95 recommended) or a respirator with appropriate cartridges can prevent inhalation of dust, mold spores, or chemical vapors. Taking these simple precautions significantly reduces the risk of injury during the silicone caulk removal process, allowing you to focus on getting the job done effectively and safely. Don’t underestimate the importance of safety gear when figuring out how to remove caulk.
Step-by-Step Guide: How to Remove Silicone Caulk from Surfaces
Now that you have your tools and safety gear ready, let’s delve into the practical steps involved in how to remove silicone caulk from surfaces. Following a systematic approach will ensure thorough removal and prepare the area properly for the next stage, whether it’s cleaning or applying new silicone caulking.
Preparation: Cleaning the Area Before Caulk Removal
Before you even pick up a cutting tool, the first crucial step is to thoroughly clean the area around the silicone caulk bead you intend to remove. Use a mild detergent or bathroom cleaner and a sponge or cloth to wash away soap scum, grime, mildew, and any other surface contaminants. Rinse the area well with clean water and, most importantly, allow it to dry completely. Attempting caulk removal on a wet or dirty surface is less effective and potentially messier. Dirt and grime can obscure the edges of the caulk line, making precise cutting difficult. Moisture can interfere with the effectiveness of some chemical removers and make it harder to get a clean scrape. Furthermore, starting with a clean surface prevents grinding existing dirt into the substrate during the scraping process, which could cause scratches or stains. This preparation step ensures you have clear visibility and optimal access to the caulk itself, setting the stage for a more efficient silicone removal process. A clean start is fundamental when learning how to remove sealant properly.
How to Cut and Loosen Old Silicone Caulking
With the area clean and dry, the next step is to mechanically break the bond of the old silicone caulking. Take your utility knife with a sharp blade. Carefully insert the tip of the blade at one end of the caulk line, right where the silicone meets the surface (e.g., where the caulk meets the tile and where it meets the tub). Run the knife along the entire length of the caulk bead on one side, applying steady pressure and keeping the blade angled slightly away from the surface to minimize scratching. Repeat this process on the other edge of the caulk bead. The goal is to slice through the adhesion points on both sides. For wider beads, you might also make a cut down the center of the caulk itself. Once both edges are cut, try to lift one end of the silicone strip using the knife tip, pliers, or your fingers (wearing gloves). If the cuts were successful, you should be able to grab the end and slowly pull the strip of old caulk away from the joint. Pull steadily and at a consistent angle. Sometimes, the entire strip will come off in one go, which is ideal. More often, especially with older or poorly applied caulk, it will break into smaller pieces. Continue cutting and pulling sections until the bulk of the silicone sealant is removed. This initial cutting and pulling phase deals with the main body of the caulk and is a core part of how to remove caulk.
Techniques for Removing Stubborn Caulk
Inevitably, you’ll encounter sections of silicone caulk that resist easy removal. It might be particularly well-adhered, hardened with age, or located in an awkward spot. Dealing with stubborn caulk requires patience and potentially different techniques. If pulling isn’t working, go back with your utility knife or a specialized caulk removal tool and make additional cuts, ensuring the bond is fully severed. Use a scraper (plastic or metal, chosen carefully based on the surface) to get underneath the caulk and pry it upwards. Apply firm, consistent pressure. For very hard, brittle caulk, sometimes gently tapping the back of the scraper with a small hammer or mallet can help break its grip, but be extremely careful not to damage the underlying surface. Another effective technique for removing stubborn caulk is applying heat. A hairdryer set to a medium or high heat setting, or preferably a heat gun on a low setting, can soften the silicone, making it more pliable and easier to cut and scrape. Wave the heat source back and forth over a section of the caulk for a minute or two, being careful not to overheat the area, which could damage surfaces like acrylic or paint. Once softened, try cutting and scraping again. Chemical silicone removers, as discussed earlier, are also a primary solution for stubborn caulk, especially the residual film left after mechanical removal. Persistence is key; continue working methodically until all significant pieces are gone.
How to Remove Silicone Caulk Residue Effectively
After removing the main bead of silicone caulk, you’ll almost always be left with a thin, sometimes almost invisible, residue clinging to the surfaces. It’s crucial to remove silicone caulk residue completely, as any remnants can interfere with the adhesion of new caulk. This residue can be surprisingly tenacious. Start by scraping gently with a plastic scraper or even a credit card edge to lift any remaining thin layers. Be meticulous, checking the surface from different angles and under good lighting. If scraping alone isn’t sufficient, this is where chemical silicone removers truly shine. Apply the remover according to the instructions, let it dwell, and then scrape or wipe away the softened residue. Alternatively, for minor residue, you might try scrubbing vigorously with an abrasive pad (use non-scratch pads on delicate surfaces) dampened with isopropyl alcohol or mineral spirits (turpentine). Test solvents on an inconspicuous area first, as they can damage certain finishes. Sometimes, rubbing the residue firmly with a dry cloth or even your gloved finger can cause it to ball up and peel off (a technique known as ‘gumming’). Thoroughly cleaning the area after residue removal is essential. Use a good cleaner appropriate for the surface, rinse well, and ensure it’s completely dry. Achieving a perfectly clean, residue-free surface is vital for the longevity of the new silicone sealant. Effective silicone caulk residue removal is often the most time-consuming part of the job but arguably the most critical for a professional result.
Removing Silicone Caulk Without Damaging Surfaces
A major concern during silicone caulk removal is avoiding damage to the surrounding surfaces. Different materials require different levels of care. For delicate surfaces like acrylic tubs, fiberglass shower surrounds, painted walls, or wood trim, aggressive scraping with metal tools is generally not advisable as it can easily cause scratches, gouges, or chips. When working on these materials, prioritize using plastic scrapers, specialized plastic caulk removal tools, or even unconventional items like plastic razor blades or old credit cards. If using a utility knife, exercise extreme caution, keeping the blade angle very low and using minimal pressure, just enough to score the caulk. Heat application should also be done carefully; excessive heat can warp plastics or blister paint. Test chemical silicone removers in a hidden spot, as some can discolor or etch plastics or remove paint. For painted surfaces, scoring the caulk edge very precisely is important to avoid peeling away paint along with the caulk. If paint does lift, you’ll need to touch it up after the caulking job is complete. On porous surfaces like unsealed natural stone or grout, silicone can penetrate slightly, making removal more challenging. Chemical removers might soak in, potentially causing stains. Mechanical removal followed by careful scrubbing with a stiff brush and appropriate cleaner is often the best approach. Always choose the least aggressive method that proves effective for the specific surface you are working on when figuring out how to remove caulk from surfaces safely.
Addressing Specific Challenges in Silicone Removal
While the general steps apply broadly, certain situations present unique challenges when removing silicone caulk. Understanding how to tackle these specific scenarios can save time and prevent frustration.
How to Remove Silicone from Bathroom Tiles and Tubs
Bathrooms are the most common area for silicone caulk removal, typically around tubs, showers, sinks, and tile edges. The surfaces involved are often ceramic or porcelain tile, grout, porcelain tubs/sinks, and sometimes acrylic or fiberglass units. For ceramic and porcelain tiles and fixtures, you can generally be a bit more aggressive with metal scrapers, although caution is still needed to avoid chipping glaze or scratching porcelain. Grout lines can be tricky; silicone can adhere strongly here. A utility knife run carefully along the grout edge and a stiff scraper (sometimes a grout saw blade used gently) can help. Be mindful not to damage the grout itself excessively. When dealing with acrylic or fiberglass tubs and shower surrounds, stick to plastic tools for scraping. These materials scratch very easily. Chemical silicone removers should be tested carefully, as some can damage acrylic finishes. Heat should be used sparingly and at lower temperatures. Patience is key when removing silicone from bathroom fixtures made of softer materials. Always ensure thorough cleaning and drying afterwards, as bathrooms are high-moisture environments, and any remaining soap scum or residue can compromise the new caulk adhesion. Pay special attention to corners and curved edges, which often require more detailed work. This specific focus helps users searching for how to remove silicone from bathroom.
Tackling Moldy or Discolored Silicone Caulk Cleaning
One of the primary reasons for removing silicone caulk is the presence of mold or mildew, which appears as black or dark spots, or general discoloration. While surface mold can sometimes be cleaned, mold that has penetrated the caulk or grown underneath it cannot be effectively removed by cleaning alone. In these cases, complete silicone caulk removal is necessary. When dealing with moldy caulk, take extra safety precautions. Wear gloves and a mask (N95 recommended) to avoid skin contact and inhalation of mold spores, which can be released during removal. Dispose of the old, moldy caulk immediately in a sealed bag. After removing the caulk, it’s crucial to treat the underlying area for mold. Clean the surface thoroughly with a mold killer solution or a bleach-water mixture (typically 1 part bleach to 10 parts water, but check recommendations for your surface type). Allow the cleaning solution to sit for a while to kill any remaining spores, then rinse thoroughly and dry completely before applying new caulk. Simply caulking over mold will not solve the problem; the mold will likely grow back through the new silicone. Addressing the mold issue properly during the caulk removal process is essential for a lasting, healthy seal. This involves more than just cleaning silicone caulk; it requires complete removal and treatment.
How to Get Rid of Silicone Caulk in Tight Corners
Corners and tight angles are notoriously difficult areas for caulk removal. Standard scrapers may not fit properly, and getting leverage can be challenging. To get rid of silicone caulk in these spots, specialized tools are often helpful. Caulk removal tools with hooked ends or pointed profiles are designed specifically for digging into corners. A utility knife with a fresh, sharp blade is essential for carefully cutting the caulk free from both surfaces right into the apex of the corner. You might need to make several passes. Pliers, particularly needle-nose pliers, can be useful for grabbing and pulling out small pieces of caulk from tight spots once they are loosened. For scraping residue in corners, you might need to use the corner edge of a plastic scraper or even wrap a cloth dampened with solvent around a thin, non-sharp object (like a popsicle stick) to rub the area. Patience is critical; work slowly and methodically, ensuring you remove all the caulk and residue from the corner before cleaning and re-caulking. Incomplete removal in corners is a common cause of premature failure of the new caulk bead.
Removing Silicone Sealant from Different Materials
Silicone sealant can be applied to a wide variety of materials, and the optimal removal technique can vary.
- Glass: Silicone generally adheres well to glass but can often be removed relatively easily once the bond is broken. A sharp utility knife and a flat razor blade scraper (held at a low angle) are effective. Be cautious not to scratch the glass. Chemical removers are usually safe on glass but test first.
- Metal (Stainless Steel, Aluminum, Chrome): Similar to glass, careful scraping with a sharp blade or plastic scraper works. Avoid abrasive pads that can scratch polished finishes. Solvents like mineral spirits or isopropyl alcohol can help with residue. Test chemical removers, as they might tarnish some metals.
- Plastic (PVC, Acrylic, Fiberglass): As mentioned, these scratch easily. Stick to plastic scrapers and tools. Use heat cautiously. Test chemical removers and solvents diligently in hidden areas. Removing silicone from plastic requires a gentle approach.
- Wood (Painted or Sealed): Use plastic scrapers to avoid damaging the finish. Score the caulk edges carefully to prevent lifting paint or sealant. Heat can soften paint. Test solvents like alcohol in an inconspicuous spot; stronger solvents like mineral spirits might strip the finish. If the wood is bare/unsealed, silicone can soak in, making residue removal harder. Gentle sanding might be necessary after mechanical removal, followed by cleaning.
- Stone (Granite, Marble, Tile) and Masonry (Brick, Concrete): For smooth, sealed stone like polished granite or ceramic tile, removal is similar to glass or porcelain. For porous or unsealed stone, grout, brick, or concrete, silicone can penetrate. Avoid harsh chemicals that might stain. Mechanical removal (knife, scraper, stiff brush) is preferred. Stubborn residue might require specialized stone cleaners or poultices. Always test any chemical or cleaner first. Understanding these nuances is key to successfully removing silicone sealant from different materials.
Natural and DIY Methods for Removing Silicone
For those looking to avoid harsh chemicals, or perhaps dealing with minor silicone caulk residue, some natural or common household items might offer assistance. It’s important to note that these methods are generally less potent than commercial silicone removers and may require more effort or only work on partially cured or less stubborn silicone.
Using Vinegar or Alcohol for Silicone Caulk Removal
Vinegar (specifically white vinegar) contains acetic acid, which can slightly soften some types of silicone caulk, particularly if it hasn’t fully cured or is already degraded. You can try soaking a cloth or paper towel in vinegar and laying it over the caulk residue for an hour or more. This might make subsequent scraping slightly easier. However, vinegar is unlikely to dissolve fully cured, stubborn silicone. Isopropyl alcohol (rubbing alcohol) is another common household solvent that can sometimes help break down silicone caulk residue. Apply it to a cloth and rub the residue vigorously. It can be effective in cleaning up the final traces after most of the caulk has been mechanically removed. Neither vinegar nor alcohol is a magic bullet for silicone caulk removal, but they can be useful, low-toxicity options for the final cleanup stages or for very light residue, especially on sensitive surfaces where stronger chemicals are undesirable. Always rinse the area with water after using vinegar or alcohol.
The Heat Gun Method: How to Soften Silicone Caulk
Applying heat is a non-chemical method to make silicone caulk removal easier. While a standard hairdryer on a high setting can provide some softening effect, a dedicated heat gun is more effective but requires more caution. The heat makes the silicone more pliable and can weaken its adhesive bond to the surface. Set the heat gun to its lowest setting initially (typically around 200-300°F or 100-150°C). Hold the gun several inches away from the caulk line and move it continuously back and forth along a section. Do not concentrate the heat on one spot for too long, as this can quickly damage many surfaces, including melting plastics, scorching wood, cracking tile, or blistering paint. Heat a section for 30-60 seconds, then test the caulk with a scraper. It should feel noticeably softer and be easier to cut or peel away. Work in manageable sections, heating and then immediately scraping/removing the softened caulk. This method can significantly reduce the physical effort required for removing silicone caulk, especially older, hardened types. Always wear heat-resistant gloves when using a heat gun and be aware of flammable materials in the vicinity. The heat gun method is a valuable technique in the how to remove silicone toolkit when used appropriately.
Post-Removal Steps: Cleaning and Preparation for New Caulking
Successfully removing silicone caulk is only half the battle. Properly cleaning and preparing the surface afterward is crucial for ensuring the new caulk adheres correctly and provides a long-lasting, watertight seal. Skipping these steps is a common reason for premature failure of new caulking silicone.
How to Clean Silicone Caulk Area Thoroughly
Once all traces of the old silicone caulk and any removal agents (chemical or otherwise) are gone, a final, thorough cleaning is necessary. Use a suitable cleaner for the specific surfaces involved. For bathrooms and kitchens, a bathroom cleaner designed to remove soap scum and hard water deposits is often a good choice. Alternatively, isopropyl alcohol is excellent for a final wipe-down as it helps remove residual oils or films and evaporates quickly without leaving a residue. Scrub the joint area well with a cloth, sponge, or a stiff brush (like an old toothbrush for corners and grout lines). Pay close attention to the corners and edges where residue might hide. If you encountered mold, ensure you’ve treated the area with a mold killer or bleach solution as previously described. After cleaning, rinse the area meticulously with clean water to remove all traces of the cleaner. Any remaining soap film or chemical residue can act as a bond breaker, preventing the new silicone sealant from adhering properly. This final cleaning step is integral to the process of how to clean silicone caulk areas post-removal.
Ensuring a Dry Surface Before Applying New Silicone Sealant
This step cannot be overemphasized: the surface must be absolutely, completely dry before applying new silicone sealant. Silicone caulk will not adhere properly to damp or wet surfaces. Any trapped moisture can lead to premature failure of the seal and potentially encourage mold growth underneath the new caulk. After the final rinse, wipe the area down with a clean, dry, lint-free cloth. Then, allow ample time for air drying. This might take several hours, especially in humid environments or in porous materials like grout that can retain moisture. To speed up drying, you can use a hairdryer on a cool or low heat setting, direct a fan towards the area, or simply leave a window open (if weather permits) to improve air circulation. Check the surface carefully, especially in corners and crevices, to ensure it feels completely dry to the touch before proceeding with the application of new caulking silicone. Patience at this stage pays dividends in the longevity of the new seal.
Tips for Applying New Silicone Caulking Like a Pro
While this guide focuses on how to remove silicone caulk, briefly touching on reapplication provides context. Choose the right type of silicone caulking for the job (e.g., kitchen and bath silicone with mildew resistance). Cut the nozzle tip of the caulk tube at a 45-degree angle, starting with a small opening (you can always make it bigger). Use a caulking gun to apply a steady, consistent bead along the joint. Move at an even pace to avoid blobs or gaps. For a professional finish, tool the bead immediately after application. You can use a specialized caulk finishing tool, the back of a plastic spoon, or your gloved finger dipped in soapy water (a very dilute solution). Apply light, consistent pressure to smooth the bead and force the silicone into the joint, ensuring good contact with both surfaces. Clean up any excess caulk immediately with a damp cloth or paper towel before it starts to skin over. Allow the new caulk to cure fully according to the manufacturer’s instructions (typically 24 hours or more) before exposing it to water or heavy use. Proper application completes the cycle started by effective silicone caulk removal.
Advanced Silicone Caulk Removal Tips and Tricks
For those facing particularly challenging situations or aiming for maximum efficiency, here are some advanced tips and considerations related to silicone caulk removal.
How to Dismantle Silicone Caulk Connections
In some applications, silicone caulk isn’t just sealing a gap; it might be acting as an adhesive, holding two components together (e.g., a backsplash weakly adhered to a wall, or trim pieces). When you need to dismantle silicone caulk connections like these, the approach is slightly different. You still need to cut the silicone bead, but you might need a longer, more flexible blade (like a filleting knife or a specialized de-bonding tool) to slice through the silicone sandwiched between the two surfaces. Work carefully from the edges, sawing gently through the silicone. Applying heat can be particularly helpful here to soften the adhesive bond. In some cases, thin wires (like cheese wire or guitar string) can be worked into the joint and used to saw through the silicone. Once the connection is severed, you’ll likely have silicone residue on both surfaces that needs to be removed using the standard scraping and cleaning techniques already discussed. This requires careful work to avoid damaging the components being separated during the silicone caulking removal.
Dealing with Aged or Hardened Caulk Silicone Removal
Over many years, silicone caulk can become extremely hard, brittle, and difficult to remove. It might chip away in tiny pieces rather than peeling, making mechanical removal tedious. For such aged or hardened caulk silicone removal, combining techniques is often necessary. Start by scoring heavily with a very sharp utility knife. Using a heat gun (carefully) is highly recommended to soften the material as much as possible. An oscillating multi-tool with a rigid scraper blade can be very effective at chipping away hardened caulk, but requires skill to control. Chemical silicone removers might need longer dwell times or multiple applications to penetrate and soften deeply hardened silicone. Patience is paramount. Don’t resort to excessive force that could damage the substrate. Instead, repeatedly apply heat, scrape small sections, use chemical softeners, and gradually work your way along the joint. This type of removing caulk demands persistence.
Professional vs. DIY Caulk Removal: Pros and Cons
While removing silicone caulk is a feasible DIY project for many, there are situations where hiring a professional might be considered.
DIY Pros: Cost savings (labor), satisfaction of doing it yourself, work at your own pace.
DIY Cons: Time-consuming, requires purchasing tools, potential for surface damage if inexperienced, physical effort involved, might not achieve a perfect result.
Professional Pros: Saves time and effort, expertise in handling different surfaces and stubborn caulk, likely have specialized tools (like oscillating tools), often achieve a cleaner result faster, can handle underlying issues (like mold remediation) properly.
Professional Cons: Higher cost (labor and materials), scheduling required.
Consider hiring a pro if you have a very large area to re-caulk, are dealing with expensive or delicate surfaces you’re afraid to damage, lack the time or physical ability for the job, or if previous DIY attempts at caulk removal have been unsuccessful. For most standard bathroom or kitchen caulking silicone jobs, however, DIY is a very achievable option with the right guidance.
Avoiding Common Mistakes When You Remove Caulk
Several common mistakes can hinder the caulk removal process or lead to problems down the line. Avoid these pitfalls:
- Using the Wrong Tools: Employing overly aggressive tools (like sharp metal scrapers on acrylic) causing scratches, or using dull blades that require excessive force.
- Damaging Surfaces: Gouging, scratching, chipping, or melting the substrate due to impatience or improper tool/heat gun use.
- Incomplete Removal: Leaving behind significant amounts of old caulk or residue, which compromises the new seal. Be meticulous, especially with the residue.
- Skipping Cleaning/Drying: Failing to clean the area thoroughly before removal, or not cleaning and drying completely before applying new caulk. This is a major cause of new caulk failure.
- Inadequate Ventilation: Not ensuring good airflow when using chemical removers or dealing with mold, leading to inhalation of fumes or spores.
- Ignoring Safety Gear: Foregoing gloves, eye protection, or masks, increasing the risk of cuts, eye injuries, or respiratory irritation.
Being aware of these potential errors helps ensure your silicone caulk removal project is successful and safe.
Understanding Different Types of Sealant Removal
While this guide focuses on how to remove silicone caulk, it’s worth noting that other types of caulk and sealants exist, such as latex (acrylic latex) and polyurethane. Their removal methods can differ. Latex caulk is generally easier to remove than silicone. It’s water-based and often softens significantly with water or rubbing alcohol, making scraping simpler. It tends to be less flexible and might become brittle over time. Polyurethane sealant is known for its strong adhesion and durability, often making it more difficult to remove than silicone. It may require more aggressive mechanical removal and might be less responsive to standard silicone removers. Specific polyurethane removers exist but can be harsh. Always try to identify the type of sealant you are dealing with if possible, as it might influence the best sealant removal strategy. However, the general principles of cutting, scraping, cleaning, and potentially using heat or specific chemical removers apply broadly, with silicone removal often being the most commonly encountered task in homes.
How to Take Off Silicone Caulk Quickly
While thoroughness is key, sometimes speed is also desirable. To take off silicone caulk quickly, consider these efficiency tips:
- Use Power Tools: An oscillating multi-tool with a scraper blade attachment is significantly faster than manual scraping for bulk removal, especially on long runs or hard caulk.
- Apply Heat: Using a heat gun (carefully) to soften the silicone makes cutting and scraping much faster and less strenuous.
- Choose an Effective Chemical Remover: If dealing with significant residue, select a well-reviewed, fast-acting chemical silicone remover and follow instructions for optimal dwell time. Don’t skimp on the application.
- Optimize Manual Tools: Ensure your utility knife blade is always sharp. A dull blade slows you down and increases effort. Use a scraper that fits the profile of the joint well.
- Work Systematically: Don’t jump around. Work methodically along the caulk line, completing each step (cutting, bulk removal, residue removal, cleaning) in sections.
- Combine Methods: Don’t rely solely on one technique. Combine cutting, heating, scraping, and chemical softening as needed for the most efficient silicone caulking removal. Remember that speed shouldn’t come at the cost of damaging surfaces or incomplete removal.
Best Practices for Silicone Caulking Removal
To summarize, achieving effective and safe silicone caulking removal relies on adhering to best practices:
- Prepare Properly: Gather all necessary tools, safety gear, and cleaning supplies beforehand.
- Clean First: Always start by cleaning the area around the caulk line.
- Use Sharp Tools: A sharp utility knife blade is essential for clean cuts.
- Choose Tools Wisely: Select scrapers and tools appropriate for the surface material to avoid damage. Prioritize plastic tools on delicate surfaces.
- Cut Both Edges: Score both sides of the caulk bead thoroughly before attempting to pull it out.
- Be Patient with Stubborn Caulk: Use heat or chemical removers if needed, but work carefully. Avoid excessive force.
- Remove All Residue: Be meticulous in scraping, scrubbing, or using chemical removers to eliminate the final film. This is critical for new caulk adhesion.
- Prioritize Safety: Always wear gloves, eye protection, and use adequate ventilation, especially with chemicals or mold.
- Clean and Dry Thoroughly: After removal, clean the joint meticulously and ensure it is completely dry before re-caulking.
- Test Products: Always test chemical removers or solvents on an inconspicuous area first.
By following these guidelines and the detailed steps provided throughout this guide, you can confidently tackle any silicone caulk removal task. Understanding how to remove silicone caulk effectively is a valuable skill that helps maintain the appearance, hygiene, and integrity of your home. Whether you need silicone caulk removal tips for a simple bathroom refresh or are dealing with challenging aged caulking silicone, the right approach makes all the difference.