How to Patch a Hole in Drywall: The Ultimate Guide
Learning how to patch a hole in drywall is a fundamental skill for any homeowner or DIY enthusiast. Drywall, also known as gypsum board, wallboard, or plasterboard, is the ubiquitous material covering walls and ceilings in most modern homes. While durable and fire-resistant, it’s susceptible to damage – from accidental impacts, furniture scuffs, door handle collisions, or the simple act of removing wall anchors. A hole in drywall, regardless of its size, can be an eyesore, detracting from the appearance of your room and potentially leading to further damage if left unaddressed. Fortunately, performing a drywall fix is often simpler and more affordable than you might think. This comprehensive guide will walk you through everything you need to know about drywall hole repair, covering various drywall patching techniques suitable for different types of damage. Whether you’re dealing with a tiny nail hole or a significant gap, understanding the correct drywall repair how-to methods will empower you to restore your walls to a smooth, seamless finish. We’ll explore the essential tools, materials, and step-by-step instructions for fixing drywall holes of all sizes, ensuring your repair is sturdy, invisible, and long-lasting. From simple spackle applications for minor blemishes to more involved techniques involving cutting, backing, and taping for larger drywall holes, this guide covers the spectrum of drywall repair techniques. Prepare to tackle that unsightly hole patch project with confidence.
Understanding the Drywall Hole Problem
Before diving into the specifics of how to fix a hole in drywall, it’s crucial to understand the nature of the damage you’re dealing with. Not all drywall holes are created equal, and the size, location, and type of damage will dictate the most effective drywall fixing methods. A misdiagnosis can lead to a weak patch, a visible repair, or even further damage down the line. Drywall itself consists of a gypsum core sandwiched between two layers of heavy paper. Damage typically involves compromising one or both paper layers and potentially cracking or crumbling the gypsum core. Assessing the extent of this damage is the first step in any successful drywall hole patch project. Is it just a surface scuff, a small puncture, a dent, or a complete penetration through the board? Is the surrounding drywall still structurally sound, or has the impact weakened a larger area? Understanding these factors helps in selecting the appropriate drywall patch guide and materials. Furthermore, consider the location. A hole patch near a corner, edge, or electrical outlet might require slightly different drywall techniques than one in the middle of a wall. Taking a few moments to properly evaluate the drywall hole problem sets the stage for a successful and durable repair. This initial assessment prevents wasted effort and ensures you choose the right approach for fixing the hole in drywall effectively.
Identifying the Type of Drywall Damage
The first crucial step in any drywall repair is accurately identifying the type and severity of the damage. This assessment determines the appropriate drywall patching technique and the materials required. Damage can range significantly:
- Surface Scuffs and Scratches: These are often cosmetic, affecting only the paint layer or the very top surface of the drywall paper. They typically don’t penetrate the gypsum core and usually require minimal intervention, often just cleaning, light sanding, and touch-up paint. However, deeper scratches that tear the paper might need a thin coat of spackle or joint compound before painting.
- Dents: Caused by impacts that compress the gypsum core without necessarily breaking the surface paper entirely. These depressions require filling to restore a flat surface. The integrity of the surrounding drywall is usually intact. A simple drywall fix using spackle or compound is typically sufficient.
- Small Holes (Nail Pops, Screw Holes, Anchor Holes): These are minor punctures, usually less than half an inch in diameter. They penetrate the gypsum core but are small enough that the surrounding drywall remains stable. These are common when removing pictures, shelves, or fixtures. Fixing these small holes in drywall is generally straightforward.
- Medium Holes (Doorknob Impacts, Minor Accidents): Typically ranging from half an inch up to about 6 inches in diameter. These holes often result from moderate impacts, like a doorknob hitting the wall or an accidental bump. The gypsum core is broken, and the paper layers are torn. These require more structural support than small holes, often necessitating a drywall patch.
- Large Holes (Significant Impacts, Water Damage Removal): Holes larger than 6 inches usually result from more substantial impacts, furniture moving accidents, or the removal of damaged sections due to issues like water leaks or mold. Repairing these large holes in drywall involves cutting out the damaged section cleanly and installing a new piece of drywall, often requiring backing support.
- Cracks (Stress Cracks, Settling Cracks): These can appear near corners, windows, or doors, often due to building settlement or stress. Repairing cracks involves specific drywall techniques, often including taping to prevent recurrence. Identifying whether a crack is stable or active is important.
- Damaged Corners (Corner Bead Issues): External corners are often protected by metal or plastic corner beads. Damage here might involve dents in the bead or cracks in the compound covering it. Repairing drywall corners requires addressing the bead itself.
By carefully examining the hole in drywall – its size, depth, whether the paper is torn, if the gypsum is crumbled, and the condition of the surrounding area – you can classify the damage and select the most effective repair strategy from the various drywall fixing methods available.
Small Nail Holes vs. Larger Holes in Drywall
Understanding the fundamental difference between repairing small nail holes and tackling larger holes in drywall is key to choosing the right drywall repair technique and achieving a professional finish. The approach, materials, and time required vary significantly based on the hole’s dimensions.
Small Nail Holes (and similar minor punctures < 1/2 inch):
- Nature of Damage: These are typically clean punctures with minimal damage to the surrounding drywall structure. The paper facing might be slightly torn or pushed inwards, but the gypsum core around the hole is generally intact. Examples include holes left by nails, screws, or wall anchors.
- Repair Approach: The primary goal is simply to fill the void. This usually involves a quick drywall fix using a lightweight spackling compound. No structural reinforcement (like tape or a patch) is typically needed because the surrounding drywall provides sufficient support.
- Materials: Lightweight spackle, putty knife, fine-grit sandpaper.
- Process: Clean the hole, apply spackle directly into the hole, smooth it flush with the wall, let it dry, sand lightly, and prime/paint. It’s a relatively fast and simple process.
Larger Holes in Drywall (> 1/2 inch, especially > 2 inches):
- Nature of Damage: These holes represent a more significant breach in the drywall panel. The gypsum core is broken or missing, and the paper facing is torn away. The hole lacks inherent structural integrity, meaning simply filling it with compound won’t work – the compound would likely fall through or crack later. This category includes doorknob holes, accidental impact damage, and holes cut for access.
- Repair Approach: The goal is not just to fill the void but to bridge the gap and restore structural continuity to the drywall panel. This requires spanning the hole with a reinforcing material before applying compound. Common drywall fixing methods involve using a self-adhesive mesh patch, a metal patch, or cutting a new piece of drywall to fit (often with backing support for very large holes).
- Materials: Drywall patch (adhesive mesh, metal, or a piece of scrap drywall), joint compound (potentially heavier-duty than spackle), drywall tape (paper or fiberglass), utility knife, putty knife/taping knives, sandpaper, possibly backing material (wood strips or metal clips) and drywall screws for large holes.
- Process: Clean and prepare the area (potentially squaring off the hole). Apply the chosen patch method (adhesive patch, new drywall piece with backing). Apply multiple thin layers of joint compound, often embedding tape around the edges of the patch for reinforcement. Each layer needs to dry thoroughly before the next is applied. Sanding between layers and final sanding is required. This process is more time-consuming and requires more skill than fixing small holes.
Recognizing whether you’re dealing with a simple fill job (small hole) or a structural bridging task (larger hole) is the foundation for selecting the correct how-to guide for your drywall hole patch project. Using a small-hole technique on a larger hole will result in a failed repair, while using a large-hole technique on a tiny nail hole is unnecessary overkill.
How to Fix Drywall: Essential Tools and Materials
Embarking on a drywall repair project, whether it’s a minor drywall fix or a more substantial hole patch, requires having the right tools and materials on hand. Being properly equipped not only makes the job easier and faster but also significantly impacts the quality of the final result. Trying to improvise with inadequate tools often leads to frustration and a less-than-professional finish. Gathering everything you need before you start fixing the hole in drywall ensures a smoother workflow. The specific items will vary slightly depending on the size of the hole and the chosen drywall patching technique, but a core set of tools and materials forms the foundation for most drywall hole repair tasks. Investing in decent quality tools, especially putty knives and sanding equipment, can make a noticeable difference in achieving that seamless, invisible patch. Let’s break down the essentials you’ll likely need for common drywall patching scenarios.
Must-Have Tools for Drywall Fixing: Putty Knife, Sandpaper
When tackling any drywall hole repair, from the tiniest nail pop to a more significant gap, having a few essential tools is non-negotiable for achieving a professional-looking result. These tools are fundamental to the various drywall techniques used in patching.
- Putty Knives / Taping Knives: These are arguably the most crucial tools for applying and smoothing patching compounds.
- Putty Knife (1.5″ to 3″): A smaller, often flexible blade putty knife is perfect for applying spackle to small nail holes and minor imperfections. Its size allows for precise application into small voids. It’s also useful for scraping away loose debris around the hole before patching.
- Taping Knife (4″, 6″, 8″, 10″, 12″): Wider knives are essential for larger repairs involving joint compound and tape. You’ll typically use a 4″ or 6″ knife for applying compound over patches and embedding tape. Larger knives (8″ to 12″) are used for “feathering” the compound – spreading it thinly over a wider area around the patch to create a smooth transition with the existing wall surface. Having multiple sizes allows you to build up layers effectively and achieve a flatter finish. Stainless steel blades are generally preferred for durability and ease of cleaning. Flexibility matters too; a slightly flexible blade can be easier to work with for feathering edges.
- Sandpaper / Sanding Sponge: Sanding is critical for smoothing the dried patching compound and blending the repair seamlessly with the surrounding wall.
- Grit Variety: You’ll need different grits. Medium-grit sandpaper (around 100-120 grit) is useful for knocking down high spots or rougher areas after the initial layers of compound have dried. Fine-grit sandpaper (150-220 grit or higher) is essential for the final sanding pass, creating a super-smooth surface ready for priming and painting.
- Sanding Block/Sponge: Using sandpaper wrapped around a block or using a dedicated sanding sponge helps maintain a flat surface during sanding. Hand-sanding without a block can create grooves or unevenness in the patch. Sanding sponges are often easier to handle and conform slightly to curves while still providing a flat surface. For larger areas, a pole sander can save time and effort.
- Wet Sanding: Some prefer wet sanding (using a damp sponge) as it minimizes airborne dust. This technique requires specific sponges and careful application to avoid over-wetting the compound.
- Utility Knife: A sharp utility knife is indispensable for preparing the damaged area, especially for medium to large holes. It’s used for cutting away loose paper and crumbled gypsum, squaring off irregular holes for easier patching, cutting drywall tape, scoring and snapping new pieces of drywall for large repairs, and trimming patches if necessary. Ensure you have sharp blades, as dull blades can tear the drywall paper.
- Measuring Tape: Essential for measuring the dimensions of larger holes to cut replacement drywall pieces accurately and for determining the appropriate patch size.
- Dust Mask / Respirator: Crucial safety gear. Sanding drywall compound creates fine dust that should not be inhaled.
- Safety Glasses: Protect your eyes from debris and dust, especially when cutting drywall or sanding overhead.
- Drop Cloths / Plastic Sheeting: Protect floors and furniture from dust and compound spills. Drywall repair, especially the sanding stage, can be messy.
- Clean Rags / Sponge & Bucket: Needed for cleaning the damaged area before patching and for cleaning tools during and after the process.
Having these must-have tools readily available will streamline your drywall fixing process and contribute significantly to the quality of your hole patch.
Patching Compound Choices: Spackle for Drywall Hole Repair
Choosing the right patching compound is a critical step in any drywall hole repair project. The terms “spackle” and “joint compound” are often used interchangeably, but they have distinct properties and are suited for different types of drywall patching tasks. Understanding the differences helps ensure your repair is durable and blends seamlessly.
- Spackling Compound (Spackle):
- Best Use: Primarily designed for filling small holes (like nail holes, screw holes, small dents) and minor cracks in drywall or plaster. It’s the go-to for a quick drywall fix on minor blemishes.
- Properties: Spackle typically comes pre-mixed in small tubs. Lightweight spackle is very common; it’s airy, dries quickly, shrinks minimally, and is very easy to sand. Some formulas change color when dry. Heavier vinyl spackle is also available, offering more strength but potentially shrinking more and drying slower.
- Application: Applied directly into the small hole or crack using a small putty knife. Due to its fast drying time and low shrinkage, small repairs can often be done with a single application, sanded smooth quickly, and ready for paint in a short time.
- Limitations: Spackle generally lacks the structural strength and adhesion needed for larger holes (over 1/2 inch) or for embedding drywall tape. Using it for larger repairs can lead to cracking or the patch failing over time.
- Joint Compound (Drywall Mud):
- Best Use: The standard material for taping drywall joints (seams between drywall sheets) and for repairing medium-to-large holes where structural integrity and strong adhesion are required. It’s used in conjunction with drywall tape (paper or fiberglass mesh) and drywall patches.
- Properties: Joint compound has a thicker, mud-like consistency and contains binders that provide strong adhesion. It comes in two main forms:
- Pre-mixed: Sold in tubs or buckets, ready to use. Available in different types like “all-purpose” (good adhesion for taping and filling, but harder to sand), “topping” (easier to sand, used for final coats), and “lightweight all-purpose” (balances adhesion, workability, and sanding ease). Pre-mixed compound dries through evaporation, which can take 24 hours or more per coat, depending on thickness and humidity. It also shrinks as it dries, necessitating multiple coats for filling deeper areas.
- Powdered (Setting-Type Compound): Comes in bags as a powder that you mix with water. It sets chemically, much like concrete, rather than drying through evaporation. Setting times vary (e.g., 20, 45, 90 minutes), allowing for faster application of multiple coats. Setting-type compounds are generally stronger, shrink less, and are excellent for pre-filling gaps and embedding tape, especially for larger hole repair jobs. However, they are harder to sand once fully cured, so applying them smoothly is important.
- Application: Applied in thin layers using taping knives. For repairs involving patches or tape, the first layer embeds the tape/covers the patch, and subsequent layers widen and feather the compound out from the repair area to create a smooth, invisible transition. Each layer must dry (or set) before the next is applied and sanded.
- Choice for Hole Patching: For medium holes using adhesive patches, pre-mixed all-purpose or lightweight compound is common. For large holes requiring new drywall pieces and taping, starting with a setting-type compound for the initial taping and filling, followed by pre-mixed topping or lightweight compound for finishing coats, is often recommended by professionals for speed and strength.
In summary, use spackle for quick fixes on small holes (<1/2 inch). For anything larger requiring a patch or tape, joint compound (either pre-mixed or setting-type) is the appropriate choice due to its superior strength, adhesion, and ability to work with reinforcing materials – essential elements in successful drywall patching techniques.
Selecting the Right Drywall Patch Method
Once you’ve identified the type of damage and gathered your tools and materials, the next crucial decision is selecting the appropriate drywall patch method. Choosing the right technique ensures the repair is structurally sound, durable, and cosmetically invisible after painting. The size of the hole in drywall is the primary factor guiding this selection. Here’s a breakdown of common drywall fixing methods based on hole size:
- Method for Small Holes (Under 1/2 Inch – Nail/Screw Holes, Small Dents):
- Technique: Direct Filling.
- Description: This is the simplest drywall fix. No patch or tape is needed. The hole is small enough that the surrounding drywall provides sufficient support.
- Process: Clean debris from the hole. Apply lightweight spackling compound directly into the hole using a small putty knife, slightly overfilling to account for minor shrinkage (though lightweight spackle shrinks very little). Smooth the spackle flush with the wall surface. Once dry, sand lightly until smooth.
- Why it Works: Quick, easy, requires minimal materials, and perfectly adequate for tiny imperfections.
- Method for Medium-Sized Holes (Approx. 1/2 Inch to 6 Inches – Doorknob Holes, Minor Impacts):
- Technique: Self-Adhesive Patch or Metal Patch.
- Description: These holes are too large to simply fill, as the compound would lack support and likely crack or fall out. A patch is needed to bridge the gap. Self-adhesive mesh patches are popular for DIYers due to their ease of use. Galvanized metal patches offer more rigidity.
- Process: Clean the area. Apply the self-adhesive mesh patch, ensuring it lays flat and covers the hole completely with overlap onto the sound drywall. Apply thin layers of joint compound over the patch using taping knives, starting from the center and working outwards, feathering the edges. Multiple coats (usually 2-3) are needed, allowing drying time and light sanding between coats. For metal patches, apply compound around the hole, embed the patch, and then cover with compound.
- Why it Works: The patch provides a stable backing for the joint compound, effectively spanning the hole and integrating with the existing drywall surface. This is a common and effective drywall hole patch method.
- Method for Large Holes (Over 6 Inches – Major Impacts, Cut-outs):
- Technique: Drywall Cut-and-Replace (often with Backing).
- Description: Holes this large require removing the damaged section and fitting in a new piece of drywall. Simply patching over such a large void is not structurally sound.
- Process: Use a utility knife and possibly a drywall saw to cut the damaged area into a clean square or rectangle. Install backing supports (thin wood strips or metal drywall clips) behind the edges of the hole inside the wall cavity, securing them to the existing drywall. Cut a new piece of drywall to fit the opening snugly. Fasten the new piece to the backing supports using drywall screws. Apply drywall tape (paper or mesh) over the seams between the patch and the existing drywall, embedding it in the first layer of joint compound. Apply additional layers of compound, feathering the edges widely (using larger taping knives) to blend the repair. Sand smooth when dry.
- Why it Works: This method essentially replaces the damaged section, restoring the structural integrity of the wall surface. The backing provides solid support for the patch, and taping the seams prevents cracks from forming later. This is the most robust drywall repair technique for significant damage.
- Alternative Technique (for Medium/Large Holes): The California Patch (or Butterfly Patch):
- Description: An advanced drywall technique that avoids tape and backing for certain situations. A new piece of drywall is cut larger than the hole, then the gypsum is scored and snapped off around the edges, leaving paper flaps. Compound is applied around the hole, the paper flaps are embedded, and the patch is smoothed in. Requires precision but can be faster if done correctly.
Selecting the method that corresponds to the size and nature of your drywall hole is paramount. Using an under-spec method will lead to failure, while over-spec methods might be unnecessarily complex for simple repairs. Always assess the hole first, then choose the appropriate patch a hole in drywall strategy.
How to Patch a Hole: Small Holes (Under 1/2 Inch)
Fixing small holes in drywall, typically those less than half an inch in diameter left by nails, screws, picture hooks, or wall anchors, is one of the easiest and most common home repair tasks. It requires minimal tools, materials, and time, yet makes a significant difference in the appearance of your walls. This type of drywall fix doesn’t require structural patches or tape because the surrounding drywall is intact and provides enough support. The goal is simply to fill the small void cleanly and smoothly. Following these simple steps will ensure your small drywall hole patch is virtually invisible once painted, restoring your wall to its pristine condition. This process is often referred to as a quick drywall fix and primarily utilizes spackling compound.
How to Patch Step 1: Cleaning the Hole in Drywall
Before you even think about applying spackle or any patching compound, the first crucial step in achieving a successful and durable drywall fix for a small hole is proper preparation, specifically cleaning the area around the hole. Skipping this step can compromise the adhesion of the spackle and result in a repair that fails or looks messy.
Here’s why cleaning is essential and how to do it effectively:
- Remove Loose Debris: Small holes, especially those left by removing screws or anchors, often have loose bits of drywall paper, crumbled gypsum dust, or debris pushed outwards or inwards. Use the corner of a stiff putty knife or a utility knife to gently scrape away any loose material from the edges of the hole. Be careful not to enlarge the hole significantly, but ensure any frayed paper or unstable material is removed.
- Address Raised Edges: Sometimes, driving a nail or screw creates a slight raised lip around the hole. If this lip is left in place, the spackle patch will create a bump on the wall. Gently sand down any raised edges with fine-grit sandpaper or use a putty knife to carefully trim them flush with the wall surface. Alternatively, you can slightly indent the edges of the hole with the rounded handle of your putty knife or a screwdriver handle. This creates a small concave area that allows the spackle to sit slightly below the surface initially, making it easier to sand flush later without creating a mound.
- Wipe Away Dust: After scraping or sanding, there will inevitably be fine dust around the hole. This dust can prevent the spackle from adhering properly to the drywall surface. Use a slightly damp cloth or sponge (ensure it’s not too wet, as excessive moisture can damage the drywall paper) to wipe the area clean. Alternatively, use a vacuum cleaner with a brush attachment to remove the dust.
- Ensure the Area is Dry: If you used a damp cloth, allow the area to dry completely before applying the spackle. Applying spackle to a damp surface can affect its drying time and adhesion.
Taking these few extra moments to properly clean and prepare the small hole in drywall sets the foundation for a smooth, well-adhered patch. It ensures the spackle bonds directly to the solid drywall material, minimizes the chances of the patch flaking or cracking later, and makes the subsequent steps of applying and smoothing the compound much easier. This initial preparation is a key part of any effective drywall patching technique, regardless of the hole size.
Applying Spackle for a Quick Drywall Fix
With the small hole properly cleaned and prepped, the next step is applying the spackling compound. This is where the actual filling happens, bridging the tiny gap left by the nail or screw. For small holes under half an inch, lightweight spackling compound is typically the best choice due to its ease of use, fast drying time, minimal shrinkage, and excellent sandability. This makes it ideal for a quick drywall fix.
Here’s how to apply spackle effectively:
- Load the Putty Knife: Scoop a small amount of lightweight spackle onto the tip of a clean, flexible putty knife (a 1.5-inch or 2-inch knife usually works well for small holes). You don’t need a large amount; start with less, as you can always add more. Avoid contaminating the spackle tub by using a separate tool (like a clean stick or another knife) to transfer spackle to your working putty knife if needed.
- Press Spackle into the Hole: Position the edge of the putty knife slightly above the hole. Holding the knife at a roughly 45-degree angle to the wall, press the spackle firmly into the hole. The goal is to ensure the spackle completely fills the void, leaving no air pockets. Make a pass swiping downwards or sideways across the hole.
- First Pass – Filling: The primary objective of the first pass is to fill the hole thoroughly. Don’t worry too much about perfect smoothness at this stage, but try to push the compound deep into the cavity.
- Second Pass – Smoothing and Removing Excess: Immediately after filling, make a second pass with the putty knife held at a lower angle (closer to 30 degrees). Swipe cleanly across the filled hole, removing the excess spackle from the surrounding wall surface. Apply firm, even pressure. The aim is to leave the spackle filling the hole slightly proud (very slightly raised above the wall surface) or perfectly flush. Lightweight spackle shrinks very little, but leaving it slightly raised ensures you have enough material to sand perfectly smooth without creating a divot. Avoid leaving thick edges or ridges of spackle around the repair.
- Clean the Knife: Wipe any excess spackle off your putty knife onto the edge of the spackle container or a piece of scrap cardboard. Keeping your knife clean between swipes helps achieve a smoother finish.
- Inspect the Fill: Look at the filled hole. It should be completely filled, with the spackle smoothly transitioning to the wall surface around it. If you see low spots or air bubbles, apply a tiny bit more spackle and smooth again. For very small nail holes, one application is usually sufficient. If the hole was slightly larger (closer to the 1/2 inch mark) or deeper, you might need a second thin coat after the first one dries if significant shrinkage or a depression occurs, though this is less common with modern lightweight spackles.
- Allow to Dry Completely: Let the spackle dry according to the manufacturer’s instructions. Drying time for lightweight spackle is often short (sometimes under an hour for small fills), but factors like temperature, humidity, and the depth of the fill can affect it. Some spackles change color (e.g., from pink to white) to indicate they are dry. Ensure it’s fully dry before proceeding to the next step: sanding.
Applying spackle correctly is central to patching drywall effectively for small holes. Taking care to fill the hole completely and smooth the excess properly minimizes the amount of sanding needed and leads to a much cleaner final repair.
Smoothing for Seamless Patching Drywall Results
Achieving a smooth finish during the application phase is crucial for seamless patching drywall results, especially when dealing with small holes filled with spackle. While sanding is the final step to perfect the surface, careful smoothing with the putty knife minimizes the amount of sanding required and helps prevent common issues like visible ridges or depressions around the patch. The goal is to blend the spackle into the existing wall surface as flawlessly as possible before it even dries.
Here’s how to focus on smoothing during and immediately after applying spackle:
- Use the Right Knife Angle: As mentioned previously, after forcing the spackle into the hole (using a steeper angle, ~45 degrees), use a lower angle (around 30 degrees or even less) for the smoothing pass. This low angle helps shear off the excess compound cleanly from the wall surface, leaving only the filled hole.
- Apply Even Pressure: Consistent pressure across the width of the putty knife blade is key. If you press harder on one side, you might scoop out compound or leave a ridge on the other side. Practice maintaining even pressure as you draw the knife across the repair area.
- Smooth in Multiple Directions (If Necessary): While a single, clean swipe is often sufficient for tiny nail holes, sometimes a second swipe perpendicular to the first can help ensure smoothness. For example, if your first swipe was vertical, make a second gentle horizontal swipe. This can help eliminate any subtle lines left by the edges of the knife. Be careful not to overwork the spackle, especially as it begins to set up.
- Feather the Edges: “Feathering” means creating a very thin transition between the edge of the spackled area and the surrounding wall. While extensive feathering is more critical for larger patches with joint compound, even with small spackle repairs, ensure there isn’t an abrupt edge where the spackle stops. The smoothing pass with the low-angled knife should naturally create a slight feathering effect. You want the spackle to taper down to nothing at the edges.
- Wipe Away Smears Immediately: If you accidentally smear excess spackle onto the surrounding wall beyond the immediate repair area, wipe it away promptly with a clean, damp cloth or sponge before it starts to dry. Dried smears will need to be sanded off later, creating more work and potentially affecting the wall texture.
- Clean Knife Edge: A buildup of drying spackle on the edge of your putty knife will leave streaks and ridges in your smooth coat. Wipe the blade clean frequently on a rag or the edge of your spackle container. A clean tool is essential for a smooth finish.
- Resist Over-Smoothing: While smoothness is the goal, don’t keep swiping over the spackle excessively, especially as it begins to dry. Overworking can pull the compound back out of the hole or create a rougher texture. Apply, smooth cleanly, and then let it be. Minor imperfections are often easier to fix with light sanding than by fussing with drying spackle.
By focusing on these smoothing techniques during the application phase of your drywall fix, you significantly reduce the effort needed in the sanding stage. A well-smoothed spackle application results in a patch that requires only minimal touch-up sanding to become completely invisible, achieving that truly seamless patching drywall look.
Sanding Your Drywall Hole Patch Smooth
Sanding is the final, critical step in making your small drywall hole patch disappear completely. Even with careful application and smoothing, there will likely be minor imperfections or a slight elevation where the spackle fills the hole. Sanding levels the dried spackle perfectly flush with the surrounding wall surface, creating a smooth, uniform plane ready for priming and painting. Proper sanding technique is essential for achieving an invisible drywall repair.
Here’s how to sand your small drywall hole patch effectively:
- Ensure Spackle is Fully Dry: Before you start sanding, double-check that the spackling compound is completely dry. Check the manufacturer’s instructions for drying times, and look for any color change indicators if applicable. Sanding partially dried spackle will gum up your sandpaper and can pull the compound out of the hole, ruining the repair. Press gently on the patch; it should feel hard and not cool or damp.
- Choose the Right Sandpaper: For sanding lightweight spackle on small hole repairs, fine-grit sandpaper is usually best. Start with 120-grit or 150-grit if there are noticeable high spots or ridges. For the final smoothing pass, use a finer grit, such as 180-grit or 220-grit. Using sandpaper that is too coarse can scratch the spackle and the surrounding drywall paper, creating more texture than you want.
- Use a Sanding Block or Sponge: Avoid sanding directly with just your fingers, as this can create uneven pressure and result in dips or grooves in the patch. Wrap the sandpaper around a small sanding block or use a dedicated sanding sponge. This provides a flat surface that helps ensure you sand the patch level with the wall. A sanding sponge is often ideal for small repairs as it’s easy to handle and conforms slightly while maintaining flatness.
- Apply Light, Even Pressure: Let the sandpaper do the work. Apply light, consistent pressure and use gentle, circular motions or back-and-forth strokes. Start sanding directly over the patch, gradually working slightly outwards to blend the edges (feathering). The goal is to smooth the spackle until it feels completely level with the surrounding wall when you run your fingertips over it (close your eyes – your sense of touch is often more accurate than sight for detecting slight variations).
- Feather the Edges: Pay particular attention to the edges where the spackle meets the original wall. You want this transition to be imperceptible. Sand lightly around the perimeter of the patch to blend it seamlessly.
- Check for Smoothness Frequently: Stop sanding periodically and wipe away the dust with a clean, dry cloth or tack cloth. Run your hand over the area to feel for any high spots, low spots, or ridges. Check visually from different angles under good lighting. If you find low spots, you may need to apply a very thin second coat of spackle, let it dry, and sand again.
- Avoid Oversanding: Be careful not to sand too aggressively or for too long. Oversanding can remove too much spackle, creating a divot, or scuff up the paper surface of the surrounding drywall, which can show through paint (known as “fuzzing”). Sand just enough to achieve a smooth, level surface.
- Clean Up Dust: Once you’re satisfied with the smoothness, thoroughly remove all sanding dust from the patch and the surrounding area using a vacuum with a brush attachment, followed by a tack cloth or a slightly damp cloth. Any remaining dust will interfere with primer and paint adhesion, leaving a gritty texture.
Proper sanding is the key to transforming a filled hole into an invisible part of the wall. Taking your time with this step, using the right materials, and focusing on achieving a perfectly smooth, feathered transition ensures your drywall hole patch will vanish after priming and painting.
Fixing Medium-Sized Holes (Up to 6 Inches): The Drywall Patch Method
When faced with a hole in your drywall that’s larger than a simple nail hole but not excessively big – typically ranging from about half an inch up to six inches in diameter – you need a more robust repair strategy than just filling it with spackle. These medium-sized holes, often caused by doorknobs, accidental impacts, or removing larger fixtures, require structural support because the patching compound alone cannot bridge the gap effectively. The most common and DIY-friendly solution for this scale of drywall repair is using a pre-fabricated drywall patch. These patches provide a stable base over which joint compound can be applied, ensuring a durable and long-lasting fix. This section details the standard drywall patch method, focusing on the widely used self-adhesive mesh patch, a staple in many drywall patch guides. Successfully fixing medium-sized holes involves preparing the area, applying the patch correctly, and building up layers of joint compound for a seamless finish.
Using a Self-Adhesive Drywall Patch
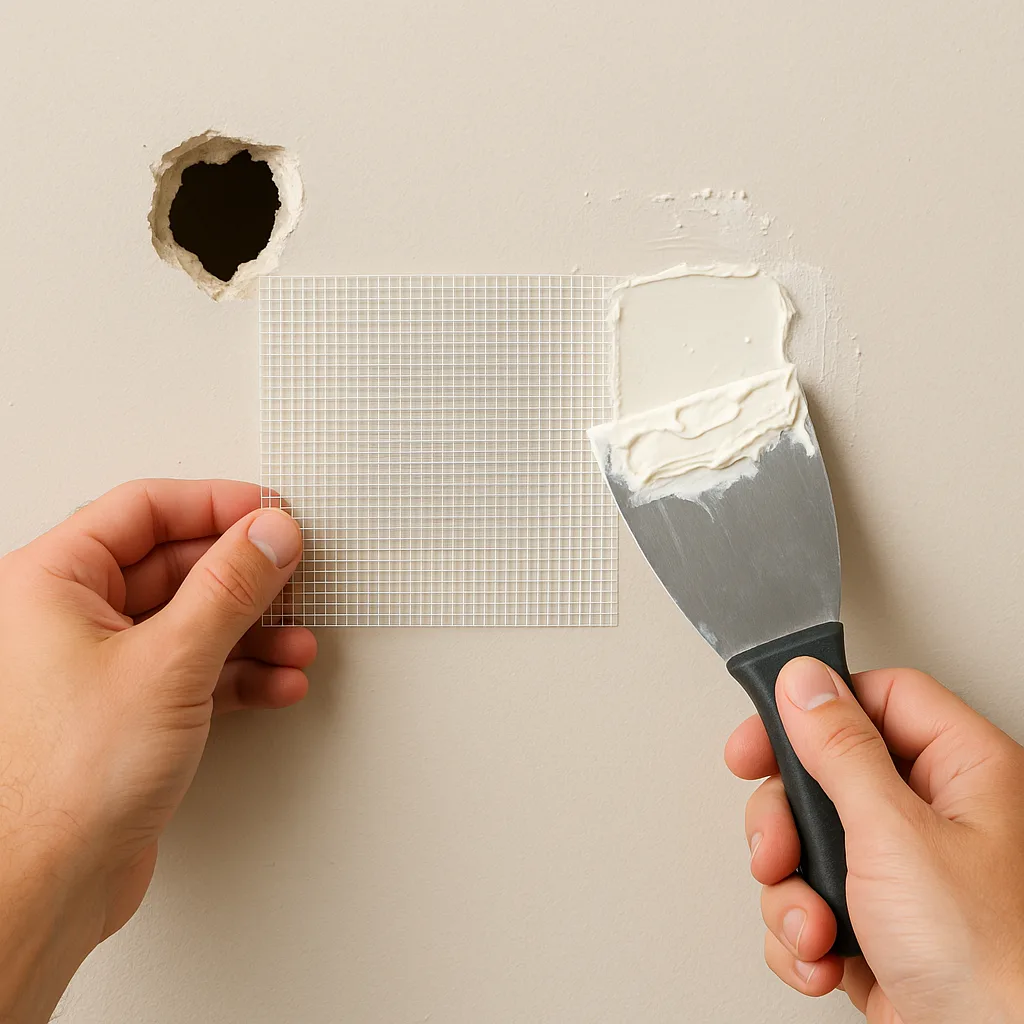
The self-adhesive drywall patch is a popular and convenient solution for repairing medium-sized holes (typically 1/2″ to 6″). These patches usually consist of a fiberglass mesh or sometimes a combination of mesh and a solid center panel (like aluminum or plastic), with an adhesive backing. They provide the necessary reinforcement over the hole, creating a stable surface for applying joint compound. Their ease of use makes them a favorite for DIY drywall hole patch projects.
Here’s how to effectively use a self-adhesive drywall patch:
- Select the Right Size Patch: Choose a patch that is larger than the hole itself. The patch should extend at least 1 inch beyond the edges of the hole onto the surrounding, undamaged drywall on all sides. For example, for a 3-inch hole, you’d want at least a 5×5 inch patch. Having sufficient overlap ensures good adhesion and provides a solid base.
- Prepare the Damaged Area: Just like with small holes, proper preparation is key.
- Clean: Remove any loose debris, crumbled gypsum, or torn paper from inside and around the edges of the hole. Use a utility knife to trim away any frayed edges for a cleaner opening.
- Smooth: Ensure the wall surface immediately surrounding the hole is smooth and free of bumps or ridges. Lightly sand the area where the patch adhesive will stick if the wall texture is rough, to promote better adhesion. However, avoid sanding too smoothly if the wall has texture you want to preserve around the patch later.
- Wipe: Clean the area around the hole thoroughly with a damp cloth to remove any dust, grease, or grime. Allow the area to dry completely. Good adhesion is critical for the patch to stay in place.
- Apply the Patch:
- Peel: Carefully peel the protective backing off the adhesive side of the patch. Avoid touching the adhesive surface excessively.
- Center and Apply: Center the patch over the hole, ensuring the hole is completely covered and the patch extends evenly onto the surrounding drywall.
- Press Firmly: Press the patch firmly onto the wall, starting from the center and working outwards. Pay special attention to the edges, ensuring they are securely adhered all the way around. Run your hand or a putty knife (gently) over the entire surface of the mesh to bond it tightly to the drywall. The patch should lie flat against the wall without any bubbles or wrinkles.
- Inspect Adhesion: Check that the patch is stuck securely. If the edges are lifting, press them down again. Some professionals recommend applying a very thin coat of setting-type joint compound around the hole before applying the mesh patch, embedding the patch into this thin layer for maximum adhesion, though the self-adhesive backing is often sufficient for typical indoor conditions.
Using the self-adhesive patch correctly provides the necessary bridge across the medium-sized hole. It creates a reinforced substrate ready for the application of joint compound, which is the next crucial step in this drywall fixing method. This simple patching drywall technique significantly simplifies the repair of moderately sized damage.
Applying Joint Compound Over the Hole Patch
Once the self-adhesive drywall patch is securely in place over the medium-sized hole, the next step is to apply joint compound (often called drywall mud). This is what actually fills the mesh openings, covers the patch material, and builds up the surface to be level and smooth with the surrounding wall. Unlike small holes filled with spackle, repairing over a patch requires multiple thin coats of compound for a strong, seamless finish. Using the right technique here is vital for the success of your drywall hole repair.
Here’s how to apply joint compound effectively over a self-adhesive patch:
- Choose Your Compound: For this step, an all-purpose joint compound or a lightweight all-purpose joint compound is generally recommended. Pre-mixed compounds are convenient for DIYers. Setting-type compounds can also be used for faster drying times, especially for the first coat, but they are harder to sand.
- First Coat – Embedding the Mesh:
- Load Your Knife: Use a 4-inch or 6-inch taping knife. Load it with a moderate amount of joint compound.
- Apply Pressure: Start applying the compound over the center of the mesh patch. Use firm pressure to push the compound through the mesh openings and directly onto the drywall underneath and into the hole cavity behind the mesh. This initial pressure is important to ensure good bonding and fill any voids.
- Cover the Patch: Spread the compound evenly over the entire patch surface, extending slightly beyond the patch edges onto the surrounding wall (about an inch or so). The goal of this first coat is primarily to embed the mesh completely and create a relatively flat base. Don’t worry about perfect smoothness yet, but avoid leaving thick ridges or high spots. Ensure all mesh fibers are covered.
- Smooth: Once the patch is covered, use the taping knife held at a lower angle to smooth the compound as much as possible. Clean excess compound from the knife frequently.
- Let it Dry: Allow this first coat to dry completely. Pre-mixed compound can take 24 hours or longer, depending on thickness, temperature, and humidity. Setting-type compounds will harden based on their specified time (e.g., 90 minutes), but still need time to fully dry before sanding or recoating. Rushing the drying process can lead to issues later.
- Inspect and Prepare for Next Coat: Once dry, inspect the first coat. It will likely have shrunk slightly, and the mesh pattern might still be subtly visible. If there are any significant ridges or bumps, lightly scrape them down with your taping knife or give the area a very light sanding with medium-grit sandpaper (120-grit). Wipe away any sanding dust.
Applying this first layer of compound correctly is crucial. It anchors the patch, fills the gaps, and provides the foundation for subsequent layers that will build up and smooth out the repair area, making it a key part of fixing drywall holes using the patch method.
Taping Edges: A Key Drywall Repair Technique
While self-adhesive mesh patches are designed to bridge the hole and provide a base for the compound, some drywall repair professionals and experienced DIYers advocate for an additional step, especially for larger medium-sized holes or when aiming for maximum durability: taping the edges of the patch. This drywall repair technique adds extra reinforcement where the patch meets the existing drywall, further reducing the risk of cracks forming around the perimeter of the repair over time due to stress or movement.
Here’s why and how you might consider taping the edges:
- Why Tape the Edges?
- Crack Prevention: The transition point between the patch material (often fiberglass mesh) and the original drywall paper surface is a potential stress point. Changes in temperature, humidity, or minor building movements can sometimes cause a hairline crack to appear along this edge if it’s only covered by compound. Drywall tape (either paper or fiberglass mesh tape) is specifically designed to resist this type of cracking at joints and transitions.
- Strength: Adding tape provides an extra layer of tensile strength across the boundary of the repair.
- Blending: Incorporating tape can sometimes help in the process of feathering the compound smoothly into the surrounding wall, although this requires careful application.
- When to Consider Taping Edges:
- For patches nearing the upper end of the “medium-sized” range (e.g., 5-6 inches).
- In areas prone to vibration or minor movement.
- If using a patch material that feels less robust (though most modern patches are quite strong).
- If you want the absolute most crack-resistant repair possible.
- Note: Many successful repairs are done without explicitly taping the edges of self-adhesive patches, relying on the mesh itself and proper compound application. This step adds a layer of insurance.
- How to Tape the Edges (If You Choose To):
- Timing: This is typically done after the self-adhesive patch is applied but before or during the application of the first full coat of joint compound.
- Method 1 (Embedding Tape in First Coat): Apply the self-adhesive patch as usual. Then, apply a thin layer of joint compound directly over the edges of the patch, extending onto the wall. Cut pieces of drywall tape (paper tape is often preferred by pros for its strength and ability to create sharp corners, but fiberglass mesh tape is easier for beginners) to cover the perimeter seam. Press the tape firmly into the wet compound using a taping knife, squeezing out excess compound from underneath. Ensure there are no air bubbles. Immediately apply another thin coat of compound over the tape to fully embed it (the “tape coat”). Then proceed to cover the rest of the patch with compound as described previously, blending into the taped edges.
- Method 2 (Using Mesh Tape Only): Some self-adhesive patches are essentially just larger pieces of fiberglass mesh tape. If your patch is mesh, applying it securely and then properly embedding it with the first coat of compound (forcing compound through the mesh) essentially serves the purpose of taping, as the mesh itself acts as the tape bridging the edge. Ensuring the compound fully penetrates and covers the mesh edges is key here.
- Considerations:
- Taping adds complexity and requires more skill with the taping knife to avoid creating thickness or ridges.
- Paper tape requires a layer of compound underneath and on top, while fiberglass mesh tape is self-adhesive and can be applied directly before mudding over it (though embedding it in mud is stronger).
While not always strictly necessary when using modern self-adhesive patches for typical medium-sized hole repair, understanding the principle of taping edges is a valuable drywall repair technique, particularly as you tackle larger or more challenging repairs. It emphasizes the importance of reinforcing transitions for long-term durability.
Layering Compound for Fixing Drywall Holes
After the initial coat of joint compound has been applied over the drywall patch (and any edge taping, if performed) and has fully dried, the process of fixing drywall holes is far from over. Achieving a truly flat, seamless repair that blends invisibly with the surrounding wall requires applying additional, thin layers of joint compound. This layering process serves several crucial purposes:
- Filling Imperfections and Shrinkage: The first coat often shrinks slightly as it dries, potentially revealing the texture of the mesh patch or leaving minor low spots. Subsequent coats fill these imperfections.
- Building Smoothness: Each layer allows you to further smooth and refine the surface.
- Feathering the Edges: This is perhaps the most critical aspect of layering. Each successive coat should be applied wider than the previous one, extending further onto the existing wall surface. This “feathering” technique creates a gradual transition from the slightly raised patched area to the original wall plane, making the repair invisible after sanding and painting. Trying to build up the necessary thickness and achieve a smooth feather in a single thick coat is difficult and often leads to cracking, excessive shrinkage, and sanding problems.
Here’s how to effectively layer joint compound for fixing drywall holes:
- Second Coat:
- Preparation: Lightly sand the dry first coat with medium-grit sandpaper (120-grit) or scrape down any high spots or ridges with a taping knife. Wipe away all dust.
- Wider Knife: Use a wider taping knife than for the first coat (e.g., if you used a 6-inch knife first, use an 8-inch or 10-inch knife now).
- Application: Apply a thin, even layer of joint compound over the entire patched area, extending it 2-3 inches beyond the edges of the first coat on all sides. Hold the knife at a low angle and apply steady pressure, especially at the outer edges, to feather the compound thinly onto the wall.
- Smooth: Aim for a smooth application, minimizing tool marks.
- Dry: Allow the second coat to dry completely (again, typically 24 hours for pre-mixed).
- Third Coat (and Subsequent Coats, if Needed):
- Preparation: Lightly sand the dry second coat with fine-grit sandpaper (150-220 grit), focusing on smoothing any imperfections and feathering the edges further. Wipe away all dust.
- Even Wider Knife: Use an even wider knife (e.g., 10-inch or 12-inch) for the final coat(s).
- Application: Apply another very thin layer of compound, extending it even further beyond the edges of the previous coat (another 2-3 inches). This final coat is primarily about achieving perfect smoothness and blending. Use long, smooth strokes. Some professionals switch to a topping compound for the final coat, as it’s typically easier to sand to a fine finish.
- Feathering: The key is the feathering – the compound at the outermost edges should be paper-thin, creating an imperceptible transition.
- Dry: Allow the final coat to dry thoroughly.
- Checking for Flatness: Between coats and especially after the final coat, check the flatness of the repair. Place a straightedge (like a long level or the edge of your widest taping knife) across the patch and onto the surrounding wall. There should be no significant gaps under the straightedge or high spots. You can also use angled lighting to reveal imperfections. If necessary, apply another very thin skim coat to fill minor low spots or further feather the edges.
Layering compound is a fundamental drywall technique. It requires patience, as each layer needs to dry completely. Rushing the process or applying coats too thickly will compromise the quality of the repair. Properly layered and feathered compound is the secret to making your drywall hole patch truly disappear.
How to Fix a Hole in Drywall (Large Holes – Over 6 Inches)
Tackling a large hole in drywall – one exceeding roughly 6 inches in diameter – requires a more involved approach than simply using a self-adhesive patch. These larger areas of damage, often resulting from significant impacts, furniture moving accidents, water damage removal, or accessing plumbing/electrical systems, necessitate replacing the missing section with a new piece of drywall. This method ensures structural integrity and provides a solid, stable repair that won’t fail over time. Fixing a large hole in drywall involves carefully cutting out the damaged area, providing backing support within the wall cavity, fitting a precisely cut replacement piece, securing it, and then finishing the seams with tape and joint compound, much like finishing seams in new drywall installation. While more complex than smaller repairs, this drywall repair technique is well within the capabilities of a determined DIYer with the right tools and patience.
Cutting Out Damage for a Clean Hole Repair
The first step in addressing a large hole in drywall is to remove the damaged section cleanly and create a regularly shaped opening, typically a square or rectangle. Working with straight, clean edges makes it much easier to cut and fit the replacement drywall patch accurately. Attempting to patch an irregularly shaped large hole is significantly more difficult and often leads to a weaker, less visually appealing repair.
Here’s how to properly cut out the damaged section for a clean hole repair:
- Assess the Damage and Mark the Cut Lines: Examine the extent of the damage. Ensure you are cutting out all the weakened, cracked, or water-damaged drywall. Using a pencil and a straightedge (like a level or a T-square), draw a square or rectangular outline around the damaged area. Make the outline large enough to encompass all the damage plus a small margin of sound drywall. Ensure your lines are straight and your corners are as close to 90 degrees as possible.
- Check for Obstructions: Before cutting, check for wiring, plumbing, or obstructions behind the drywall within your marked cutting area. You can often make a small exploratory hole in the center of the damaged area and peek inside with a flashlight, or use a stud finder that can detect electrical wiring and pipes. If obstructions are present, adjust your cut lines accordingly or proceed with extreme caution. If unsure, it might be safer to make shallow initial cuts.
- Use a Sharp Utility Knife for Scoring: Start by scoring along your marked lines with a sharp utility knife. Press firmly and make several passes to cut through the paper facing and into the gypsum core. Using a straightedge held firmly against the line will help guide the knife for a clean cut.
- Complete the Cut with a Drywall Saw (Keyhole Saw): Once scored, you can often complete the cut using a manual drywall saw (also known as a keyhole saw or jab saw). Insert the pointed tip of the saw through the drywall near one of your scored lines (or start at the existing hole) and carefully saw along the lines. Keep the saw blade relatively perpendicular to the wall for a straight edge. Work slowly and carefully, especially near corners. For very large cuts or thicker drywall, a small rotary tool with a drywall cutting bit can also be used, but requires careful control.
- Remove the Damaged Piece: Once all sides are cut, gently remove the damaged section of drywall. If it resists, check if the cuts are deep enough or if it’s snagged on something.
- Clean Up the Edges: Inspect the edges of the opening you’ve created. Use your utility knife to trim away any ragged paper or loose gypsum, ensuring the inside edges are clean and relatively smooth. A clean opening is crucial for fitting the new patch snugly and for proper adhesion of tape and compound later.
Creating a clean, square or rectangular opening is a foundational step in this method of fixing a hole in drywall. It simplifies the subsequent steps of installing backing and fitting the new piece, setting the stage for a professional-quality large drywall hole repair.
Installing Backing for Large Drywall Hole Repair
When you cut out a large section of drywall, the edges of the opening often lack solid support behind them, especially if the cut doesn’t land directly on a wall stud. To create a stable and secure repair, you need to install backing material inside the wall cavity behind the edges of the hole. This backing provides a surface to which both the existing drywall and the new drywall patch can be attached, preventing the patch from being pushed inwards and ensuring the seams are strong and resistant to cracking. Installing backing is a critical step in large drywall hole repair techniques.
Here are common methods for installing backing:
- Wood Strip Backing (Furring Strips or Plywood):
- Materials: Thin strips of wood, such as 1×2 or 1×3 furring strips, or scraps of thin plywood (e.g., 1/4″ or 3/8″). The wood needs to be thin enough to fit behind the drywall without protruding too much.
- Cutting: Cut pieces of wood that are several inches longer (e.g., 4-6 inches longer) than the dimension of the hole they will span. For a square hole, you’ll typically need backing along at least two opposite sides, or potentially all four sides for very large holes or added rigidity.
- Installation:
- Slide a wood strip into the wall cavity behind one edge of the opening. Position it so that it spans the hole and extends behind the existing drywall on either side. Half of the wood strip’s width should sit behind the existing drywall, and the other half should be exposed in the opening to support the new patch.
- Secure the backing strip to the existing drywall. Drive drywall screws (typically 1-1/4 inch) through the face of the existing drywall and into the wood strip. Place screws about an inch back from the cut edge. Use enough screws to hold the strip firmly in place (e.g., two screws above and two below the opening for a vertical strip). Be careful not to overdrive the screws, which could damage the existing drywall. Just dimple the surface slightly.
- Repeat this process for the opposite side of the hole, and potentially the top and bottom edges if desired or necessary for stability. Ensure the backing strips are positioned flush against the back of the existing drywall.
- Metal Drywall Repair Clips:
- Materials: Specially designed metal clips that attach to the edge of the existing drywall and provide a flange for screwing the new patch into.
- Installation: These clips are typically slid onto the edge of the existing drywall around the perimeter of the hole. They often have bendable tabs or require screws through the face of the existing drywall to hold them securely. The specific installation method varies by clip design, so follow the manufacturer’s instructions. They offer a convenient alternative to wood backing, especially in tight spaces.
- Using Existing Studs: If one or more edges of your cut-out hole happen to land directly over a wall stud, you have built-in backing on that side. You can attach the existing drywall edge more securely to the stud if needed and attach the new patch directly to the stud on that side. You will still need to add backing to any edges that are not supported by a stud.
Regardless of the method chosen, the goal is to create a solid, stable frame around the inside perimeter of the hole. This backing is essential for securing the new drywall piece and ensuring the long-term stability of the patch a hole in drywall repair. Without adequate backing, the patch will be weak, flexible, and prone to cracking at the seams.
Fitting the New Drywall Piece
With the opening cut cleanly and the backing securely installed, the next step in repairing a large drywall hole is to cut and fit a replacement piece of drywall, often referred to as the patch or plug. Accuracy is key here; the new piece should fit snugly into the opening, with minimal gaps around the edges. A well-fitted patch makes the subsequent taping and mudding process much easier and results in a stronger, more seamless repair.
Here’s how to cut and fit the new drywall piece:
- Measure the Opening Carefully: Use a measuring tape to accurately measure the height and width of the rectangular or square opening you created. Measure in at least two places for both height and width to account for any slight variations, and use the smaller measurement if there’s a discrepancy. Precision matters – aim for measurements accurate to within 1/16th of an inch.
- Select the Replacement Drywall: You need a scrap piece of drywall that is the same thickness as the existing drywall on your wall. Common thicknesses are 1/2 inch and 5/8 inch. Using the wrong thickness will result in a patch that is either recessed or raised, making it impossible to achieve a flat finish. If you don’t have scraps, you can buy a small “patch panel” (often 2×2 feet) or a full sheet from a home improvement store.
- Mark the Patch Dimensions: On the back (paper side) of the replacement drywall piece, carefully mark out the dimensions you measured for the opening using a pencil and a straightedge or T-square. Ensure your lines are straight and the corners are square. Double-check your measurements before cutting.
- Cut the Drywall Patch: The standard method for cutting drywall is “score and snap”:
- Score: Place a sharp utility knife against your straightedge and score deeply along one of the marked lines. Make several firm passes to cut through the paper and well into the gypsum core.
- Snap: Place the drywall over a firm edge (like a piece of 2×4 or the edge of a workbench) with the scored line facing up and just over the edge. Apply firm, quick pressure to the side hanging over the edge (or lift the supported side) to snap the drywall cleanly along the scored line. The paper on the back side will still be holding the pieces together.
- Cut Back Paper: Fold the snapped piece back slightly and run your utility knife along the crease in the paper on the back side to cut it free.
- Repeat: Repeat this score-and-snap process for the remaining lines until your patch piece is cut to the exact dimensions needed.
- Clean Edges: Use your utility knife or a drywall rasp to smooth any rough or uneven edges on the cut patch piece.
- Test Fit the Patch: Carefully insert the cut drywall patch into the opening in the wall. It should fit snugly with minimal gaps (ideally less than 1/8 inch) around the perimeter. If it’s too tight, identify where it’s binding and carefully trim the edge of the patch slightly with a utility knife or rasp. If it’s slightly too loose but the gaps are small (less than 1/4 inch), it’s usually acceptable, as the tape and compound will bridge these small gaps. If the fit is poor (large gaps or significantly crooked), you may need to re-measure and cut a new patch.
Getting a good fit is crucial for the structural integrity of the repair. A patch that fits well provides a solid surface for taping and finishing, making the final steps of how to repair drywall hole much more manageable and effective.
Securing the Patch a Hole in Drywall Repair
Once you have cut the new drywall piece and confirmed it fits snugly into the prepared opening with backing installed, the next critical step is to securely fasten this patch in place. This ensures the patch is stable, doesn’t move or flex, and becomes an integrated part of the wall structure, ready for taping and finishing. Properly securing the patch is fundamental to the longevity of your large hole repair.
Here’s how to secure the new drywall patch:
- Position the Patch: Place the accurately cut drywall patch into the opening, ensuring it rests flush against the backing strips (wood or metal clips) that you installed previously. The face of the patch should be level with the face of the existing surrounding drywall. If the backing strips were installed correctly against the back of the existing drywall, and the patch is the correct thickness, it should naturally sit flush.
- Use Drywall Screws: The standard fastener for attaching drywall is the drywall screw. Use screws of the appropriate length – typically 1-1/4 inch screws are sufficient for attaching 1/2-inch or 5/8-inch drywall to wood backing. If using metal clips, they may require specific screw types or lengths; check the clip manufacturer’s recommendations.
- Screw Placement: Drive drywall screws through the face of the new drywall patch and into the backing strips behind it.
- Spacing: Place screws approximately every 6 to 8 inches along each edge of the patch where there is backing. Keep screws about 3/8 to 1/2 inch away from the cut edge of the patch to avoid crumbling the gypsum core.
- Existing Drywall: It’s also a good idea to ensure the existing drywall is securely fastened to the backing strips as well, adding screws through the existing drywall into the backing if you haven’t already done so when installing the backing. This ensures the entire perimeter of the opening is stable.
- Proper Screw Depth (Dimpling): This is crucial. Drive the screws just deep enough so that the screw head slightly sinks below the surface of the drywall paper without tearing the paper completely. This creates a small concave “dimple.” This dimple allows you to cover the screw head completely with joint compound later. If the screw is left sticking out, it will be impossible to get a smooth finish. If driven too deep, it tears the paper and loses its holding power. Using a drill with a clutch setting or a dedicated drywall screw gun helps achieve the correct depth consistently. Practice on a scrap piece if you’re unsure.
- Check for Stability: Once all screws are in place, gently press on the patch and around its edges. It should feel solid and stable, with no movement or flex. The patch should be flush with the surrounding wall surface.
Securing the patch correctly transforms the separate piece into an integral part of the wall. This stable foundation is essential before moving on to the finishing stages of taping the seams and applying joint compound. This step solidifies the structural aspect of the patch a hole in drywall repair for large damages.
Advanced Drywall Patching Techniques
While the standard methods for fixing small, medium, and large holes cover most common scenarios, sometimes you encounter situations that require more specialized or advanced drywall patching techniques. These might involve dealing with tricky locations like corners, matching existing wall textures, or employing methods favored by professionals for speed or specific results. Mastering these advanced techniques can elevate the quality of your repairs, allowing you to tackle more complex drywall fixing challenges and achieve truly invisible results even in difficult circumstances. Understanding these methods expands your toolkit beyond basic hole patching, enabling you to handle a wider range of drywall repair tasks with confidence and skill.
The California Patch: An Advanced Drywall Technique
The California Patch, sometimes known as the “Butterfly Patch” or “Blowout Patch,” is a clever and often faster drywall technique used primarily for medium-sized holes (typically up to 6-8 inches, though skilled users might apply it to larger ones). It’s considered advanced because it requires more precision in cutting and handling than standard methods, but its main advantage is that it eliminates the need for installing separate backing strips and, in many cases, eliminates the need for traditional taping of the seams. It relies on using overlapping paper edges from the patch itself to create the seam reinforcement.
Here’s how the California Patch technique works:
- Prepare the Hole: Clean up the edges of the hole in the wall as usual. Ensure the area around the hole is clean and smooth. Unlike the large hole method, you don’t need to cut a perfect square, but having relatively clean edges helps.
- Cut the Patch Piece:
- Measure the hole.
- Cut a piece of new drywall (same thickness as the wall) that is significantly larger than the hole – typically about 2 inches larger on all sides. So, for a 4×4 inch hole, you’d cut an 8×8 inch patch.
- Center the hole dimensions on the back side of this larger patch piece and draw the outline of the actual hole size.
- Score and Remove Gypsum (The Key Step):
- On the back side of the patch piece, carefully score along the lines marking the actual hole size using a utility knife. Score deeply, cutting through the back paper and well into the gypsum core.
- Now, from the front side of the patch piece, gently snap the gypsum along the scored lines backwards. The goal is to break the gypsum core cleanly along the lines while leaving the front paper facing intact.
- Carefully peel the broken gypsum core away from the front paper in the oversized margin area. You should be left with a central piece of drywall (the size of the hole) surrounded by a 2-inch flap of only the front paper layer. This paper flap acts as the integrated “tape.”
- Test Fit: Check if the central gypsum part of your patch fits snugly into the hole in the wall. The paper flaps will overlap onto the surrounding wall surface. Trim the gypsum core slightly if needed for a good fit.
- Apply Joint Compound: Apply a layer of joint compound (setting-type is often preferred for speed and strength, but all-purpose works too) to the wall surface around the perimeter of the hole, where the paper flaps will sit. Apply it generously enough to fully embed the paper.
- Embed the Patch:
- Carefully place the California patch into the hole, pressing the central gypsum part into the opening.
- Smooth the paper flaps outwards onto the surrounding wall, embedding them firmly into the layer of joint compound you just applied. Use a taping knife (e.g., 6-inch) to press the paper flaps flat, squeezing out excess compound from underneath, much like embedding paper tape. Ensure there are no air bubbles trapped under the paper flaps.
- Apply Skim Coat: Immediately apply a thin skim coat of joint compound over the paper flaps and feather the edges slightly. Be careful not to create too much buildup.
- Finish Coats: Once the embedding coat is dry/set, apply additional thin coats of joint compound as needed, using progressively wider knives (8″, 10″, 12″) to feather the edges widely and blend the patch seamlessly into the wall. Sand smooth between coats and after the final coat.
Advantages:
- Faster for medium holes (no backing installation).
- Potentially stronger seam if done correctly (integrated paper tape).
Disadvantages:
- Requires precise scoring and snapping. Mistakes can ruin the patch.
- Can be tricky to get the paper flaps perfectly flat without wrinkles or bubbles.
- Might create slightly more buildup than other methods if not feathered carefully.
The California Patch is a valuable drywall technique for experienced DIYers or professionals looking for an efficient way to handle medium-sized repairs without backing. Mastering it requires practice but can save time and materials.
Repairing Drywall Holes Near Corners
Repairing drywall holes located very close to an inside or outside corner presents unique challenges compared to patching a hole in the flat field of a wall. Corners involve two intersecting planes, and often a corner bead (for outside corners) or tape (for inside corners), which complicates the repair process. Achieving a sharp, clean corner line after the patch is crucial for an invisible repair.
Repairing Holes Near Outside Corners:
- Challenge: Outside corners typically have a metal or plastic corner bead underneath the joint compound to create a sharp, durable edge. Damage often involves not just the drywall surface but also denting or damaging the corner bead itself.
- Assessment: Check if the corner bead is damaged. If it’s significantly dented or bent, simply patching over it won’t work well; the corner will look wavy or crushed.
- Repair Steps:
- Address Bead Damage: If the bead is badly damaged, you may need to cut out the affected section of the bead using tin snips or aviation snips. Clean the area. Install a new section of corner bead (metal or plastic, matching the existing type if possible), securing it with drywall nails or screws, or using a spray adhesive/staples for some types. Ensure the new bead section aligns perfectly with the existing bead above and below.
- Patch the Hole: If the hole is adjacent to the bead, patch it using the appropriate method for its size (e.g., self-adhesive patch or cut-and-replace). Ensure the patch material sits flush with the surrounding drywall and doesn’t interfere with the corner bead flange.
- Apply Compound: Apply joint compound over the patch and the corner bead flange simultaneously. Use a taping knife held carefully against both wall surfaces meeting at the corner. Build up thin coats, feathering away from the corner onto both walls.
- Sanding: Sanding requires care to maintain the sharp corner line. Use a sanding sponge with a corner profile, or carefully sand each face up to the corner line. Avoid rounding over the corner.
Repairing Holes Near Inside Corners:
- Challenge: Inside corners rely on drywall tape (paper or mesh) embedded in compound to bridge the joint between the two wall panels and prevent cracking. A hole near the corner can disrupt this tape or make it difficult to apply new tape smoothly.
- Repair Steps:
- Prepare: Clean the hole and the corner area. If the existing corner tape is damaged near the hole, carefully cut away the damaged section with a utility knife.
- Patch the Hole: Repair the hole using the appropriate method based on size. If cutting a patch piece, ensure it fits snugly into the corner.
- Re-tape the Corner: Apply a layer of joint compound to both sides of the inside corner where the tape needs to be replaced or applied over the patch seam. Cut a piece of paper drywall tape to length, fold it lengthwise down the center crease, and press it firmly into the wet compound in the corner using an inside corner taping tool or the blade of a putty/taping knife. Squeeze out excess compound and ensure good adhesion without air bubbles.
- Apply Compound: Apply thin coats of joint compound over the tape and the patch area. Use the corner tool or careful knife work to smooth the compound into the corner and feather it out onto both adjacent walls. Multiple coats will be needed.
- Sanding: Sanding inside corners carefully is important. Use a specialized inside corner sanding tool or sponge, or fold sandpaper to fit into the corner, sanding each side smoothly up to the center line.
Repairing drywall near corners requires extra attention to detail, especially when dealing with corner beads or re-taping inside corners. Using the right tools (like corner tools) and techniques ensures that the finished repair restores the sharp, clean lines expected of a corner, making the drywall fixing process successful even in these tricky locations.
Tips for Textured Drywall Repair
Repairing a hole in drywall that has a textured finish (like orange peel, knockdown, popcorn, or splatter) adds another layer of complexity. Simply patching the hole and sanding it smooth will leave a noticeable flat spot that starkly contrasts with the surrounding texture. The final, crucial step in repairing textured drywall is to re-apply texture to the patched area to match the existing finish, making the repair truly invisible.
Here are essential tips for textured drywall repair:
- Identify the Existing Texture: Before you start, closely examine the existing wall texture. Is it fine, medium, or coarse? Is it a sprayed texture (like orange peel or popcorn) or a hand-applied texture (like skip trowel or knockdown)? Identifying the texture helps you choose the right product and application method. Take a photo if needed for reference.
- Complete the Flat Patch First: Follow all the standard steps for patching the hole in the drywall (cleaning, patching method based on size, applying compound layers, sanding smooth) as if it were a flat wall. Ensure the patched area is perfectly level and smooth with the surrounding untextured drywall plane. The texture will be applied on top of this smooth, primed repair.
- Prime the Patch: Always prime the smoothly sanded patch area before applying texture. Dried joint compound absorbs moisture differently than painted drywall, and priming seals the patch, ensuring the texture coat dries evenly and adheres properly. Use a quality primer suitable for drywall.
- Choose Your Texture Product:
- Aerosol Sprays: For small patch areas and common textures like orange peel and knockdown, aerosol texture sprays are the most convenient option for DIYers. They come in water-based formulas and often have adjustable nozzles to help match different texture intensities (fine, medium, coarse). There are also specific sprays for popcorn ceiling texture repair.
- Pre-mixed Texture Mud: For larger areas or specific hand-applied textures, you can buy pre-mixed texture mud in tubs. This is typically applied using specialized tools like texture rollers, brushes, or hopper guns (for sprayed textures).
- Powdered Texture Mix: Similar to joint compound, texture can come in powdered form to be mixed with water. This offers more control over consistency but requires proper mixing.
- Practice Application: Texture application can be tricky to match perfectly. Before spraying or applying texture directly onto your primed patch, practice on a scrap piece of cardboard or drywall. Adjust the nozzle settings (for aerosols), your distance from the surface, and your spraying motion (sweeping passes) until you achieve a pattern that closely resembles the existing wall texture. For hand-applied textures, practice the trowel or brush technique.
- Apply the Texture to the Patch:
- Mask off the surrounding area if using a spray, to avoid overspray onto the existing textured wall or trim.
- Apply the texture to the primed patch area, slightly overlapping onto the edges of the existing texture to help blend it in. Apply it sparingly at first; it’s easier to add more than to remove excess.
- For Knockdown Texture: After spraying droplets, wait for them to partially set (lose their wet sheen, typically 10-20 minutes), then gently glide a wide knockdown knife or taping knife lightly over the sprayed peaks to flatten them, matching the existing knockdown pattern.
- Allow Texture to Dry: Let the newly applied texture dry completely according to the product instructions. Drying times can vary significantly.
- Prime (Optional but Recommended): Some professionals recommend priming the newly textured area again after it’s fully dry, especially before painting. This ensures the paint absorbs evenly over the textured patch and the surrounding wall.
- Paint: Finally, paint the repaired area, feathering the paint into the surrounding wall to blend the color and sheen. Using the same paint as the rest of the wall is crucial for an invisible finish.
Matching texture is often the most challenging part of a drywall hole patch on textured walls. Patience, practice, and choosing the right product are key. Sometimes a perfect match is difficult, but getting it close is usually sufficient to make the repair unnoticeable to the casual observer.
Finishing Your Drywall Repair Like a Pro
Completing the structural part of patching a hole in drywall – whether small, medium, or large – is only half the battle. The difference between an obvious, amateur repair and a professional, invisible one lies in the finishing touches. This final phase involves achieving perfect smoothness, properly preparing the surface for paint, and matching the paint color and sheen precisely. Rushing these finishing steps can undo all the careful work you put into the patch itself. Taking the time to sand meticulously, prime correctly, and paint carefully ensures your drywall repair blends seamlessly into the existing wall, leaving no trace of the previous damage. These final procedures are essential components of any comprehensive drywall repair how-to guide.
Achieving Smoothness in Your Drywall Patching
The ultimate goal of the patching and compounding process is to restore a perfectly smooth, flat surface where the hole used to be. Achieving this level of smoothness requires careful attention during the final stages of compound application and, most importantly, meticulous sanding. Any remaining bumps, ridges, tool marks, or depressions will be highlighted once paint is applied, especially under certain lighting conditions.
Here’s how to focus on achieving superior smoothness in your drywall patching:
- Final Skim Coat: Apply the last coat of joint compound (often a lightweight or topping compound) as thinly as possible using your widest taping knife (10″ or 12″). Use long, smooth, overlapping strokes, applying even pressure. The goal is to fill any remaining minor imperfections and create the final feathered edge, blending the patch area seamlessly into the surrounding wall over a wide area. Let this coat dry completely.
- Inspect with Light: Before final sanding, inspect the dried patch critically. Use a bright work light held at a low angle (raking light) across the surface. This technique exaggerates minor imperfections, revealing high spots, low spots, ridges, or tool marks that might not be visible under normal overhead lighting. Circle any problem areas lightly with a pencil.
- Address Minor Imperfections:
- High Spots/Ridges: Gently scrape down minor ridges with a clean taping knife before sanding, or start sanding directly on these spots.
- Low Spots/Divots: If you find noticeable low spots or depressions, it’s often better to apply another very thin skim coat of compound specifically to those areas rather than trying to sand down the entire surrounding area to match. Let this touch-up coat dry fully before sanding.
- Final Sanding Technique:
- Fine Grit: Use fine-grit sandpaper (180-220 grit or even higher) for the final sanding.
- Sanding Block/Tool: Always use a sanding block, sanding sponge, or pole sander (for large areas) to maintain a flat surface.
- Light Pressure: Use light, overlapping strokes and let the sandpaper do the work. Avoid pressing too hard, which can create grooves or scuff the drywall paper.
- Feather Edges: Pay special attention to feathering the outermost edges of the compound so they blend imperceptibly into the existing wall surface.
- Feel for Smoothness: Frequently wipe away dust and run your hand (fingertips) over the entire repair area, including the transition zone. Your sense of touch is often the best guide to detect subtle unevenness. The entire area should feel perfectly smooth and level.
- Consider Wet Sanding: As an alternative to dry sanding, wet sanding with a damp drywall sponge minimizes airborne dust. Dip the sponge in water, wring it out thoroughly, and use gentle circular motions. Rinse the sponge frequently. Wet sanding works best with specific types of compound (usually lightweight or topping) and requires care not to over-wet the surface, which can damage the compound or drywall paper. It produces a very smooth finish but might be slower than dry sanding.
- Dust Removal: After sanding, thorough dust removal is paramount. Vacuum the area meticulously with a brush attachment. Then, wipe the surface down with a tack cloth or a slightly damp microfiber cloth to remove any residual fine dust. Any remaining dust will create a gritty texture under the primer and paint.
Achieving perfect smoothness requires patience and attention to detail. Don’t stop sanding until the patch feels completely integrated with the rest of the wall. This meticulous approach is key to making your drywall hole patch truly invisible after painting.
Priming Your Repaired Drywall Hole
After achieving a perfectly smooth, dust-free surface on your drywall patch, the next essential step before painting is priming. Skipping primer is a common mistake that can lead to a visibly flawed finish, making your carefully executed repair stand out. Primer serves several critical functions in ensuring a professional-looking final result for your fixed drywall hole.
Why Priming is Crucial:
- Sealing the Porous Surface: Dried joint compound (and spackle) is more porous than the surrounding painted drywall surface. If you paint directly over the patch without priming, the compound will absorb the paint differently than the rest of the wall. This difference in absorption, known as “flashing” or “ghosting,” results in the patched area having a different sheen or color depth than the surrounding wall, even when using the exact same topcoat paint. The outline of the patch becomes visible.
- Ensuring Even Paint Sheen: Primer creates a uniform base coat with consistent porosity across both the patched area and the adjacent wall surface. This allows the topcoat of paint to dry evenly and achieve a consistent sheen across the entire area, preventing dull spots over the patch.
- Improving Paint Adhesion: Primer provides an ideal surface for the topcoat paint to adhere to. This promotes better bonding, durability, and resistance to peeling or chipping later on.
- Blocking Stains and Preventing Fuzz: While less common with standard patches, primers can help block minor stains. More importantly, primer helps to seal down any slightly “fuzzed” paper fibers on the drywall surface that might have been raised during sanding, preventing them from showing through the paint.
- Color Uniformity: Using a primer, especially a tinted one if covering a dark color, helps ensure the final paint color looks uniform and true across the entire wall.
How to Prime Your Repaired Drywall Hole:
- Choose the Right Primer: Use a quality interior drywall primer-sealer. Water-based (latex) primers are common and work well for this purpose. Look for products specifically labeled for new drywall or repairs. A PVA (polyvinyl acetate) primer is an economical option often used for new drywall, but a good quality acrylic latex primer-sealer generally offers better performance for repairs.
- Application: Apply the primer using a brush, roller, or sprayer, depending on the size of the patch and your preference. For most patches, a small roller provides a smooth application.
- Coverage: Ensure you apply the primer not just over the patch itself, but also extend it several inches beyond the edges of the patch onto the surrounding wall. This helps blend the transition and ensures the entire area that might have been sanded or affected is sealed uniformly.
- Even Coat: Apply a thin, even coat. Avoid heavy application or drips.
- Drying Time: Allow the primer to dry completely according to the manufacturer’s instructions. Drying times vary but are typically shorter than paint. Ensure it’s fully dry before painting.
- Light Sanding (Optional): Some primers may raise the grain of the drywall paper slightly or leave minor imperfections. If necessary, you can lightly sand the dried primer with very fine-grit sandpaper (220-grit or higher) and wipe away the dust before applying the topcoat. This creates an ultra-smooth base for the paint.
Priming is a non-negotiable step for finishing a drywall repair like a pro. It bridges the gap between the raw patch materials and the final paint finish, ensuring the repair blends invisibly and the paint job looks uniform and lasts longer. Don’t underestimate the importance of this crucial sealing step for your fixed drywall hole.
Matching Paint for the Fixed Drywall Hole
The final step in making your drywall repair completely disappear is painting the primed patch. However, simply applying any paint won’t do. Achieving an invisible repair requires meticulous attention to matching the color and sheen of the existing wall paint. Even slight variations in color or gloss level can make the patched area stand out, especially under different lighting conditions.
Here’s how to approach matching paint for your fixed drywall hole:
- Identify the Existing Paint:
- Leftover Paint: The ideal scenario is having leftover paint from the original paint job. Check the can for the brand, color name/code, and sheen level (e.g., flat, matte, eggshell, satin, semi-gloss, gloss). Ensure the paint is still usable (well-mixed, no lumps or foul odor).
- Color Matching: If you don’t have the original paint, you need to get the color matched. Carefully cut a small sample (at least 1×1 inch) of the existing paint from the wall. Choose an inconspicuous area if possible, or take a piece from the damaged section before patching. Take this sample to a reputable paint store with color-matching technology. They can scan the sample and mix a custom color to match. Note that matches are usually very close but sometimes not 100% perfect, especially for older or faded paint.
- Sheen Identification: Matching the sheen is just as important as matching the color. Look closely at the existing wall finish under good light. Is it completely non-reflective (flat/matte), slightly reflective (eggshell/satin), or noticeably shiny (semi-gloss/gloss)? Tell the paint store the sheen you need, or compare your sample to their sheen charts. Getting the sheen wrong will make the patch visible even if the color is perfect.
- Preparation: Ensure the primed patch area is clean, dry, and smooth. If you lightly sanded the primer, wipe away any dust. Use painter’s tape to protect adjacent trim, ceilings, or walls if necessary.
- Application Technique – Feathering: The goal is to blend the new paint seamlessly with the old. Avoid just painting a square directly over the patch.
- Use the Same Applicator: Try to use the same type of applicator (roller nap thickness, brush type) that was likely used for the original paint job. This helps replicate the original paint texture.
- Cut In (If Near Edges): If the patch is near a corner or trim, carefully “cut in” the edges with a brush first.
- Roll/Brush the Patch: Apply paint to the patched area.
- Feather Out: Extend the paint beyond the patched area onto the surrounding wall, using progressively lighter pressure as you move outwards. This “feathering” technique helps blend the new paint into the old, making the transition less noticeable. For larger patches, you might need to paint the entire wall section from corner to corner to ensure a uniform appearance, especially if the original paint has faded or the color match isn’t perfect.
- Multiple Coats: You will likely need at least two thin topcoats for good coverage and color consistency. Allow the first coat to dry completely according to the manufacturer’s instructions before applying the second coat.
- Check the Results: Once the paint is dry, remove any painter’s tape carefully. Inspect the repair from different angles and under various lighting conditions (natural daylight, artificial light). A successful paint job means the patched area is indistinguishable from the rest of the wall in both color and sheen.
Matching paint perfectly can sometimes be challenging, especially with older paint jobs that may have faded or changed over time. If a perfect blend proves difficult, painting the entire affected wall from corner to corner is often the best solution to guarantee a uniform finish. This final painting step completes your drywall hole repair, transforming the previously damaged spot back into a flawless part of your room.
Common Drywall Fixing Methods Compared
When faced with a hole in drywall, choosing the right repair strategy involves understanding the different materials and techniques available. Various drywall fixing methods exist, each suited to particular situations. Key decisions often revolve around the type of patching compound to use (spackle vs. joint compound) and the method for bridging larger holes (adhesive patches vs. installing backing with a new drywall piece). Comparing these common approaches helps clarify their respective strengths, weaknesses, and ideal applications, enabling you to select the most effective and efficient method for your specific drywall hole patch project. Making an informed choice based on the hole size, location, desired durability, and your own skill level contributes significantly to a successful repair.
Spackle vs. Compound for Patching a Hole in Drywall
One of the most fundamental choices in drywall repair is selecting the right filling material: spackling compound (spackle) or joint compound (mud). While both are used for patching holes in drywall, they have different compositions, properties, and best uses. Understanding the distinction is crucial for ensuring your repair is both effective and durable.
Spackling Compound (Spackle):
- Composition: Typically a gypsum-based powder mixed with binders, often pre-mixed into a paste. Lightweight versions incorporate vinyl or other lightweight fillers, making them less dense.
- Primary Use: Best suited for filling small imperfections like nail holes, screw holes, small dents, and minor cracks (generally less than 1/2 inch in diameter). Ideal for quick drywall fix tasks.
- Properties:
- Drying: Lightweight spackle dries very quickly (often in under an hour for small fills).
- Shrinkage: Shrinks very little upon drying, often allowing for a one-coat repair for small holes.
- Sanding: Generally very easy to sand to a smooth finish.
- Strength: Less structural strength compared to joint compound. Not suitable for embedding tape or filling larger gaps where strength is needed.
- Adhesion: Good adhesion for small fills but may not bond as strongly over larger areas or to certain substrates as joint compound.
- Cost/Convenience: Usually sold in smaller, convenient tubs, perfect for minor repairs.
- When to Use: Choose spackle for quick, cosmetic repairs of very small holes and cracks where no structural bridging is required.
Joint Compound (Drywall Mud):
- Composition: Also gypsum-based but formulated with different binders and additives for greater strength, adhesion, and workability over larger areas and with drywall tape. Comes pre-mixed or in powdered (setting-type) form.
- Primary Use: Intended for taping and finishing seams between drywall sheets, covering corner beads, and repairing medium to large holes (typically > 1/2 inch) where patches or new drywall pieces are used. Essential for repairs requiring structural integrity and reinforcement (tape/patches).
- Properties:
- Drying: Pre-mixed compound dries slowly through evaporation (can take 24+ hours per coat). Setting-type compound hardens chemically in a specific time (e.g., 20-90 mins) but still requires drying.
- Shrinkage: Pre-mixed compound shrinks noticeably as it dries, requiring multiple thin coats for filling depressions or covering patches/tape. Setting-type shrinks much less.
- Sanding: All-purpose compound can be harder to sand than spackle or topping compound. Lightweight and topping compounds offer easier sanding. Setting-type compound is very hard to sand once fully cured.
- Strength: Significantly stronger and more durable than spackle, providing better structural integrity for larger repairs. Designed to bond strongly with drywall paper and tape.
- Adhesion: Excellent adhesion, necessary for embedding tape and covering patches securely.
- Cost/Convenience: Pre-mixed is convenient but comes in larger tubs/buckets. Powdered requires mixing but offers faster setting times and less shrinkage.
- When to Use: Choose joint compound for any repair involving drywall tape, mesh patches, corner bead, or filling holes larger than about 1/2 inch. Use it when strength, adhesion, and the ability to feather edges smoothly over a larger area are required.
Summary: Use spackle for quick fixes on tiny holes. Use joint compound for anything larger that requires taping, patching, or structural filling. Using the wrong product can lead to a failed repair (e.g., spackle cracking in a large hole, or unnecessary work using compound for a tiny nail hole). This distinction is fundamental to effective drywall patching.
Adhesive Patches vs. Backing for Hole Patching
When dealing with medium to large holes in drywall (generally larger than 1/2 inch), simply filling the void isn’t enough; you need to bridge the gap structurally. Two common drywall fixing methods achieve this: using a self-adhesive patch or installing backing material and fitting a new piece of drywall. Each approach has its advantages and is suited for different hole sizes and situations.
Self-Adhesive Patches (Mesh or Metal/Mesh Combo):
- Description: Pre-fabricated patches, usually made of fiberglass mesh or a thin metal plate covered with mesh, with an adhesive backing. They stick directly over the hole onto the surrounding wall.
- Best Use: Ideal for medium-sized holes, typically ranging from about 1/2 inch up to 6 inches in diameter (e.g., doorknob holes, moderate impacts).
- Advantages:
- Ease of Use: Very convenient and relatively easy for DIYers to apply. No cutting of drywall or installation of separate backing needed. Peel-and-stick application is straightforward.
- Speed: Generally faster for medium-sized repairs compared to the cut-and-replace method.
- Minimal Tools: Requires fewer specialized tools (no drywall saw or screws needed for the patch itself, just for potential prep).
- Disadvantages:
- Limited Size: Not suitable for very large holes (over 6-8 inches) as they lack the rigidity and structural integrity needed for bigger spans.
- Potential for Flex: Depending on the patch type and size, there might be slight flex, though good quality patches combined with proper compound application minimize this.
- Surface Build-up: The patch itself has some thickness, requiring careful feathering of the joint compound over a wider area to avoid a noticeable hump.
- Process: Clean area, stick on patch, apply multiple layers of joint compound over the patch, feathering edges, sand, prime, paint.
Backing and New Drywall Piece (Cut-and-Replace Method):
- Description: Involves cutting the damaged area into a clean square/rectangle, installing backing supports (wood strips or metal clips) behind the edges inside the wall cavity, cutting a new piece of drywall to fit the opening, and securing it to the backing with screws.
- Best Use: The standard and most robust method for large holes (over 6 inches) or holes of any size where maximum structural integrity is desired. Also necessary when removing sections due to water damage.
- Advantages:
- Structural Integrity: Provides the strongest, most stable repair, essentially replacing the damaged section with new material supported similarly to the original installation. Restores full rigidity to the wall.
- Scalability: Suitable for holes of virtually any size.
- Flush Finish: When done correctly (using same thickness drywall and proper screw setting), the patch sits perfectly flush before compound application, potentially requiring less compound buildup than adhesive patches.
- Disadvantages:
- More Complex: Requires more steps, including accurate cutting of both the hole and the patch, installing backing, and using drywall screws. More potential points for error.
- More Time-Consuming: Generally takes longer than using an adhesive patch due to the extra steps.
- More Tools Required: Needs a utility knife, potentially a drywall saw, measuring tape, screws, and a drill/driver.
- Process: Cut clean opening, install backing, measure and cut patch, fit patch, secure patch with screws, tape seams with drywall tape and compound, apply finishing coats of compound, sand, prime, paint.
Conclusion: Choose adhesive patches for quick and easy repairs of typical medium-sized holes where convenience is valued. Choose the backing and cut-and-replace method for large holes, areas requiring maximum strength, or when repairing damage that necessitates removal of a section (like water damage). Understanding these two primary hole patching approaches allows you to select the most appropriate drywall repair technique for the scale of the damage.
Safety Precautions for Patching Drywall
While patching drywall is a common DIY task and generally considered safe, it’s important to be aware of potential hazards and take appropriate safety precautions. Working with drywall materials, tools, and potentially interacting with hidden elements within walls requires attention to safety to prevent injuries or health issues. Airborne dust, sharp tools, and the possibility of encountering electrical wiring or plumbing mean that safety should be a priority throughout the drywall repair process. Following basic safety guidelines ensures your project is completed without incident.
Safety Gear for Repairing Drywall
Using the correct Personal Protective Equipment (PPE) is the foundation of safety when repairing drywall. The dust generated, especially during sanding, and the tools used can pose risks to your eyes, lungs, and skin. Always have the following safety gear on hand and use it consistently:
- Eye Protection (Safety Glasses or Goggles): This is non-negotiable. Dust, debris, crumbled gypsum, and flying particles from cutting or sanding can easily injure your eyes. Wear safety glasses with side shields or, even better, goggles that provide a seal around the eyes, especially when sanding overhead (like ceiling repairs). Ensure they meet safety standards (e.g., ANSI Z87.1).
- Respiratory Protection (Dust Mask or Respirator): Drywall compound dust (containing gypsum, silica, mica, etc.) is very fine and can irritate the respiratory system or cause long-term health problems with prolonged exposure.
- For Light Dust/Short Tasks: A disposable N95-rated dust mask can provide basic protection against airborne particulates for quick tasks like filling small holes. Ensure it fits snugly over your nose and mouth.
- For Heavy Sanding/Extended Work: For significant sanding or prolonged work, a reusable respirator with replaceable P100 particulate filters offers much better protection and a more secure seal. This is highly recommended, especially when working in enclosed spaces or sanding large areas.
- Gloves: Protect your hands from cuts when using utility knives or saws, and from skin irritation caused by prolonged contact with wet joint compound (which can be alkaline and drying). Work gloves are good for handling tools and materials, while disposable nitrile or latex gloves can be useful when working with compound to keep hands clean.
- Long Sleeves and Pants: Wearing long sleeves and pants helps protect your skin from scratches and minimizes skin contact with dust and compound, reducing potential irritation.
- Hearing Protection (Optional but Recommended for Power Tools): If using power tools like a rotary tool for cutting or a power sander, consider wearing earplugs or earmuffs to protect your hearing.
Other Safety Considerations:
- Ventilation: Work in a well-ventilated area whenever possible. Open windows and doors. Use a box fan in a window to help exhaust dust outwards, especially during sanding.
- Electrical Safety: Be extremely cautious when cutting or drilling into walls. Always check for electrical wiring first using a reliable stud finder with AC detection, or by carefully making exploratory holes. If working near outlets or switches, consider turning off the power to that circuit at the breaker box as a precaution. Never cut blindly into a wall.
- Plumbing Safety: Similarly, be aware of potential plumbing pipes within walls, especially in kitchens, bathrooms, and laundry areas. Check for pipes before cutting if there’s any possibility they might be present.
- Tool Safety: Use sharp blades in utility knives for cleaner cuts and less force required (reducing slip risk). Handle saws carefully. Use tools according to their intended purpose and manufacturer’s instructions. Keep tools clean and well-maintained.
- Ladder Safety (If Applicable): If repairing holes high on walls or ceilings, use a stable ladder appropriate for the height. Follow ladder safety rules: maintain three points of contact, don’t overreach, ensure the ladder is on a firm, level surface.
- Clean-Up: Clean up dust and debris promptly using a vacuum cleaner with a HEPA filter if possible (to capture fine particles) and wet wiping methods. This minimizes residual dust exposure.
By consistently using the appropriate safety gear and being mindful of potential hazards like hidden utilities and sharp tools, you can ensure your drywall patching project is completed safely and effectively. Prioritizing safety is just as important as using the correct drywall repair techniques.
How to Repair Drywall: Your Go-To Guide Summary
This comprehensive guide has walked you through the essential knowledge and techniques needed to successfully repair holes in drywall, from minor blemishes to significant damage. Understanding how to patch a hole in drywall is a valuable skill, restoring the appearance and integrity of your walls. We’ve covered the importance of identifying the type and size of the hole, selecting the appropriate tools and materials like putty knives, sandpaper, spackle, and joint compound, and choosing the right drywall fixing method.
For small holes (under 1/2 inch), the process involves cleaning the hole, applying lightweight spackle, smoothing it carefully, and sanding lightly once dry. This quick drywall fix restores the surface with minimal effort.
For medium-sized holes (up to 6 inches), the standard approach uses a self-adhesive drywall patch (mesh or metal). This involves cleaning the area, applying the patch securely, and then applying multiple thin layers of joint compound over the patch, feathering the edges wider with each coat for a seamless blend. Taping the edges can provide extra reinforcement.
For large holes (over 6 inches), the most robust drywall repair technique involves cutting out the damaged section cleanly, installing backing (wood strips or clips) for support, cutting and fitting a new piece of drywall of the same thickness, securing it with drywall screws (dimpled correctly), taping the seams with drywall tape and compound, and finishing with additional feathered coats of compound.
We also touched upon advanced techniques like the California Patch for efficient medium hole repair without backing, strategies for handling repairs near corners, and the crucial steps for matching existing wall textures after patching.
Finally, achieving a professional finish requires meticulous attention to finishing steps: sanding the final compound coat perfectly smooth, priming the repaired area to seal it and ensure even paint absorption, and carefully matching both the color and sheen of the existing paint, feathering the application to blend the repair invisibly.
Throughout the process, remember the importance of safety precautions, including using appropriate PPE like eye protection, dust masks/respirators, and gloves, and being cautious of hidden utilities within walls. Comparing materials like spackle vs. joint compound and methods like adhesive patches vs. backing helps in making informed decisions for your specific repair needs. By following these steps and techniques outlined in this drywall patch guide, you can confidently tackle drywall hole repair projects and achieve professional, long-lasting results.
Troubleshooting Common Drywall Hole Patch Issues
Even with careful planning and execution, you might occasionally encounter issues when patching a hole in drywall. Knowing how to troubleshoot these common problems can save you time and frustration, helping you get back on track to achieving a perfect repair. Here are some frequent drywall hole patch issues and how to address them:
- Patch Outline is Visible After Painting (“Ghosting” or “Flashing”):
- Cause: Usually caused by skipping the priming step or using an inadequate primer. The difference in porosity between the joint compound/spackle and the surrounding painted wall causes the paint topcoat to absorb unevenly, resulting in a difference in sheen or color depth that outlines the patch.
- Solution: The best fix is to re-prime the entire patched area (extending well beyond the patch edges) with a quality drywall primer-sealer. Allow it to dry completely, then re-apply the topcoat of paint. Ensure the primer provides a uniform base.
- Hairline Cracks Appearing Around the Patch Edges:
- Cause: Can be due to insufficient reinforcement (e.g., not using tape on larger patches or seams), movement in the wall structure, compound applied too thickly leading to excessive shrinkage, or improper feathering of edges.
- Solution: If the cracks are minor, you might be able to V-groove them slightly with a utility knife, fill them with flexible paintable caulk or fresh joint compound, sand smooth, prime, and repaint. For more persistent cracking, especially on larger patches, it may indicate insufficient backing or taping. You might need to reinforce the seam by applying drywall tape (paper or mesh) over the crack, embedding it in compound, feathering it out, sanding, priming, and repainting. Ensure adequate backing was used for large hole repairs.
- Patch Area Looks Like a Bump or Hump:
- Cause: Applying compound too thickly, insufficient feathering of the edges over a wide enough area, or using a patch that adds too much thickness (like some metal patches if not recessed slightly).
- Solution: This requires more sanding or wider feathering. Sand down the high area carefully, trying to blend it more gradually into the surrounding wall. You may need to apply another very thin coat of compound, feathering it out much wider (using a 12-inch knife) than previous coats. The transition should be extremely gradual over a large area.
- Patch Area Looks Like a Depression or Divot:
- Cause: Oversanding the patch area, insufficient compound applied, or excessive shrinkage of the compound without enough subsequent coats.
- Solution: Apply another thin layer of joint compound specifically to the low area, feathering the edges carefully. Allow it to dry completely, then sand it flush with the surrounding wall, being careful not to oversand again. Prime and repaint.
- Texture Doesn’t Match (on Textured Walls):
- Cause: Incorrect texture product used, improper application technique (wrong nozzle setting, distance, or motion for sprays; incorrect tool or method for hand-applied textures), or applying texture before priming the patch.
- Solution: This is often tricky. If the texture is too light, you might be able to carefully apply a bit more. If it’s too heavy or the wrong pattern, the best solution is often to scrape off the incorrect texture (being careful not to damage the patch underneath), re-prime if necessary, and try again, practicing on cardboard first. Sometimes, slightly mismatching texture can be blended by extending the new texture lightly onto the surrounding area.
- Spackle or Compound Crumbles or Doesn’t Adhere:
- Cause: Applied over a dusty or dirty surface, applied over damp drywall, using old or improperly mixed compound, or applying spackle to too large a hole where compound was needed.
- Solution: Scrape away the failed material completely. Ensure the area is clean, dry, and free of dust. Use fresh, properly mixed compound appropriate for the hole size. For larger holes, ensure proper patching/backing techniques are used.
- Sanding Scuffs Drywall Paper (“Fuzzing”):
- Cause: Using sandpaper that is too coarse, sanding too aggressively, or excessive wet sanding that damages the paper face.
- Solution: Stop sanding immediately if you notice fuzzing. Seal the affected area with a quality primer-sealer. Once dry, the primer should lock down the fibers. Avoid further sanding on that specific spot. If the fuzzing is severe, a very light skim coat of compound might be needed over the primed area before re-priming.
By anticipating these common issues and knowing how to address them, you can tackle your drywall fixing project with greater confidence, ensuring a smooth, durable, and invisible repair even if minor problems arise along the way.