Laminate Flooring Installation: A DIY Guide
Laminate flooring has surged in popularity as a versatile, durable, and cost-effective flooring solution for homeowners. Its ability to mimic the appearance of hardwood, stone, or tile, combined with its relative ease of installation, makes it an attractive option for home improvement enthusiasts. If you’re considering upgrading your floors, learning how to install laminate flooring yourself can be a rewarding and budget-friendly project. This comprehensive guide provides step-by-step instructions, essential preparation tips, and insights into the entire process, from choosing the right materials to maintaining your beautiful new floor. Tackling a DIY laminate flooring installation might seem daunting initially, but with the right knowledge, tools, and patience, achieving professional-looking results is entirely possible. This guide covers everything you need to know, incorporating best practices and addressing common questions related to flooring installation. Whether you’re searching for the best way to install laminate flooring, need flooring installation tips, or simply want a clear laminate flooring installation guide, you’ve come to the right place. We’ll walk you through the guidelines for installing laminate flooring, the necessary steps to install laminate flooring, and various techniques for installing laminate flooring, ensuring you feel confident undertaking this popular home improvement project. Let’s dive into the world of laminate floors and discover how to lay laminate flooring like a pro.
Preparing for Your Flooring Installation
Proper preparation is arguably the most critical phase of any successful laminate flooring installation. Rushing this stage often leads to problems down the line, such as uneven surfaces, squeaking floors, or premature wear. Taking the time to prepare correctly sets the foundation for a smooth installation process and a long-lasting, beautiful floor. Preparation involves several key steps: gathering the necessary tools, allowing the laminate flooring to acclimate to the room’s environment, meticulously preparing the subfloor, and deciding on and installing the appropriate underlayment. Each of these elements plays a vital role in the overall quality and longevity of your new laminate floor. Neglecting any aspect of preparation can compromise the entire project. Think of this phase as laying the groundwork – the stronger the foundation, the more stable and durable the final structure. We will delve into each of these preparatory steps in detail, providing practical advice and answering common questions to ensure your flooring installation project starts on the right foot. Understanding the process of installing laminate flooring begins long before the first plank is laid. This preparation ensures that when you actually install laminate flooring, the process is as efficient and trouble-free as possible.
What Tools Do I Need for Laminate Floor Installation?
Gathering the right tools before you begin is essential for an efficient and professional-looking laminate floor installation. Having everything on hand prevents interruptions and ensures you can perform each step correctly. Here’s a comprehensive list of tools commonly required when you install laminate:
- Measuring Tools:
- Tape Measure: Absolutely essential for measuring the room dimensions, plank lengths, cuts, and expansion gaps. A reliable, locking tape measure of at least 25 feet is recommended.
- Pencil: For marking cut lines on planks and layout lines on the subfloor or underlayment.
- Speed Square or Combination Square: Crucial for marking accurate 90-degree cuts and checking the squareness of corners and planks.
- Cutting Tools:
- Utility Knife: Useful for opening flooring boxes, cutting underlayment, and sometimes scoring laminate for specific types of cuts (though less common for full plank cuts).
- Fine-Tooth Saw: This is critical for cutting laminate planks. Options include:
- Jigsaw: Versatile for straight cuts, curved cuts (around pipes or vents), and L-shaped cuts (for doorways). Use a fine-tooth blade designed for laminate or wood, preferably a down-cutting blade to minimize chipping on the top surface.
- Circular Saw: Efficient for making long, straight cuts. Again, use a fine-tooth carbide-tipped blade. Cut with the finished side facing down to minimize chipping.
- Miter Saw (Chop Saw): Ideal for making clean, precise 90-degree and angled cuts at the ends of planks. Highly recommended for speed and accuracy, especially for end-of-row cuts.
- Laminate Flooring Cutter: A manual, guillotine-style cutter specifically designed for laminate. It produces clean cuts quickly and without dust, making it a great (though sometimes costly) option for DIYers doing a large area.
- Coping Saw or Oscillating Multi-Tool: Excellent for intricate cuts, such as undercutting door jambs or fitting around complex shapes.
- Installation Tools:
- Tapping Block: A purpose-made block (usually plastic or dense nylon) used with a hammer or mallet to gently tap planks together, ensuring tight seams without damaging the tongue or groove. Never hit the planks directly with a hammer.
- Pull Bar (Last Row Puller): A metal bar with a hook on one end and a flat surface on the other. Used to pull the last plank in a row tight against the previous one, especially near walls where a tapping block won’t fit.
- Spacers: Small wedges (often plastic or wood) placed between the flooring planks and the walls/vertical obstacles to maintain the necessary expansion gap during installation. Typically 1/4″ to 3/8″ (6-10mm). You’ll need quite a few (20-40 depending on room size).
- Rubber Mallet or Hammer: Used gently with the tapping block and pull bar. A rubber mallet is often preferred as it’s less likely to damage tools or flooring.
- Safety Equipment:
- Safety Glasses: Essential to protect your eyes from flying debris during cutting and installation.
- Work Gloves: Protect your hands from sharp edges and splinters.
- Knee Pads: Laminate installation involves a lot of kneeling. Knee pads significantly improve comfort and prevent soreness.
- Dust Mask: Important when cutting laminate, especially with power saws, to avoid inhaling fine dust particles.
- Subfloor Preparation Tools (if needed):
- Broom, Dustpan, and Vacuum Cleaner: For thoroughly cleaning the subfloor.
- Scraper: For removing old adhesive, paint drips, or high spots.
- Level (4-6 foot): To check the subfloor for flatness.
- Pry Bar: For removing old baseboards or trim.
- Hammer and Nail Set: For securing loose subfloor panels or driving down protruding nails/staples.
- Floor Patching Compound and Trowel: For filling low spots in the subfloor.
- Belt Sander or Floor Grinder (rental): For leveling high spots, particularly on concrete.
- Moisture Meter: Especially important for concrete subfloors to check moisture content.
Having these tools ready streamlines the laminate flooring installation process, making it safer and more likely to result in a high-quality finish. This preparation is a key part of understanding how to install laminate flooring effectively.
How Should I Acclimate Laminate Flooring Before Installing?
Acclimation is a crucial step often overlooked by beginners tackling a DIY laminate flooring project. Laminate flooring, typically made with a core of high-density fiberboard (HDF), is susceptible to changes in temperature and humidity. It can expand or contract slightly based on the ambient conditions. Installing planks immediately after bringing them into the house, without allowing them to adjust to the room’s environment, can lead to problems later, such as buckling (if the planks expand after installation) or gapping (if they contract). Proper acclimation ensures the flooring reaches equilibrium with the environment where it will be installed, minimizing dimensional changes after installation.
Here’s how to properly acclimate your laminate flooring:
- Transport and Storage: Bring the unopened boxes of laminate flooring into the actual room (or rooms) where they will be installed. Do not store them in a garage, basement, or shed, as the temperature and humidity levels in these areas can differ significantly from the living space.
- Stacking: Lay the boxes flat on the floor, ideally near the center of the room. Stack them no more than three or four boxes high, leaving air space between stacks if possible. Some manufacturers recommend crisscrossing the stacks to improve air circulation around the boxes. Do not stand the boxes on end.
- Keep Boxes Sealed: Leave the flooring inside its original packaging during the acclimation period. The plastic wrapping helps the planks adjust more gradually.
- Maintain Normal Conditions: Ensure the room’s temperature and humidity are maintained at normal, year-round living conditions during acclimation. This typically means a temperature range between 60-80°F (15-27°C) and a relative humidity level between 35-65%. Run your heating or air conditioning system as you normally would.
- Duration: The required acclimation time is specified by the flooring manufacturer and is usually found in the installation instructions included in the box. As a general rule, allow at least 48 hours (two full days) for the flooring to acclimate. For environments with significant temperature or humidity differences compared to where the flooring was stored previously, or for wider/thicker planks, extending this period to 72 hours or more might be beneficial. Always prioritize the manufacturer’s specific guidelines for installing laminate flooring.
- Check Conditions: Before starting the install laminate flooring process after the acclimation period, double-check that the room’s temperature and humidity are still within the acceptable range specified by the manufacturer.
Skipping or rushing acclimation is one of the most common mistakes when installing laminate floors. Taking these simple steps is vital for ensuring the stability and longevity of your new laminate floors, preventing issues that can be difficult and costly to fix later. It’s a fundamental part of the laminate flooring installation tips for a successful outcome.
Subfloor Prep: What is the Best Way?
A clean, dry, and level subfloor is the cornerstone of a successful laminate flooring installation. The best way to install laminate flooring always starts with meticulous subfloor preparation. Laminate flooring is a floating floor system, meaning it doesn’t attach directly to the subfloor (except possibly at transition strips). However, it relies entirely on the subfloor for support and stability. Any imperfections in the subfloor can telegraph through to the laminate, causing unevenness, bouncing, squeaking, and potentially damaging the locking mechanisms over time.
Here’s a breakdown of the best way to prepare your subfloor:
- Identify Your Subfloor Type: Subfloors are typically either wood-based (plywood, OSB – Oriented Strand Board, particleboard, existing hardwood) or concrete slabs. Preparation methods may vary slightly depending on the type.
- Clean Thoroughly: The subfloor must be completely clean.
- Remove any existing soft flooring like carpet, vinyl sheet goods, or old laminate, including padding and staples. Note: Some thin, fully adhered vinyl or linoleum might be acceptable to leave in place if perfectly flat and secure, but check manufacturer instructions. Never install laminate over carpet.
- Sweep and vacuum meticulously to remove all dust, dirt, and debris. Any small particle left behind can cause issues.
- Scrape off any paint drips, drywall compound, old adhesive, or other protrusions using a floor scraper.
- Ensure it’s Dry: Moisture is a major enemy of laminate flooring.
- Wood Subfloors: Check for any signs of water damage, leaks, mold, or mildew. Repair any sources of moisture and replace damaged sections of the subfloor. Ensure crawl spaces or basements below are dry and well-ventilated. Use a wood moisture meter if unsure; moisture content should generally be below 12-14%, but check flooring manufacturer specs.
- Concrete Subfloors: Concrete holds moisture and requires careful testing. Allow newly poured concrete to cure fully (typically at least 60-90 days). Use a concrete moisture meter or perform a calcium chloride test or relative humidity (RH) test (in-situ probes) according to ASTM standards. The acceptable moisture levels will be specified by the laminate flooring manufacturer (e.g., typically below 3 lbs/1000 sq ft/24 hrs for calcium chloride, or below 75-85% RH). If moisture levels are too high, address the source or consider sealing the concrete before proceeding. A moisture barrier (usually part of the underlayment) is almost always required over concrete.
- Check for Levelness (Flatness): This is critical. Laminate flooring requires a flat subfloor, not necessarily perfectly level (like a pool table), but flat within certain tolerances.
- Use a long straightedge (at least 6-10 feet) or a level across the subfloor in multiple directions.
- Look for gaps between the straightedge and the floor. Most manufacturers specify a flatness tolerance, commonly no more than 3/16 inch variation over a 10-foot span, or 1/8 inch over a 6-foot span.
- Addressing High Spots: On wood subfloors, high spots might be protruding nails/screws (hammer them down or replace), or warped panels (sanding or planing might work, but replacing the panel may be necessary). On concrete, high spots can be ground down using a concrete grinder (rentable).
- Addressing Low Spots: On wood subfloors, low spots can be filled with layers of roofing felt or shims for minor dips, or a cement-based floor patching compound/leveler for larger areas. Ensure the patch is feathered smoothly. On concrete, use a self-leveling underlayment compound for significant low areas or general unevenness. Follow the compound manufacturer’s instructions carefully regarding mixing, pouring, and drying time.
- Ensure Structural Soundness: The subfloor must be solid. Walk over the entire area, checking for excessive deflection (bounce), squeaks, or loose panels.
- Re-secure loose wood panels to the joists using screws (screws hold better than nails and are less likely to pop).
- Add blocking between joists or reinforce the subfloor if excessive deflection is present. Addressing squeaks now is much easier than after the laminate is installed.
Proper subfloor preparation, while potentially time-consuming, is non-negotiable for a quality flooring installation. It directly impacts how your floor looks, feels, and performs over time. Taking these steps ensures your installing laminate flooring project is built on a solid foundation.
Do I Need Underlayment for Laminate Floors?
Yes, in almost all cases, you need underlayment when installing laminate flooring. Underlayment is a thin layer of material (typically foam, felt, rubber, or cork) installed directly on top of the subfloor before laying the laminate planks. It serves several crucial functions and is considered an integral part of the laminate flooring system. Skipping underlayment (unless your laminate has it pre-attached) is generally not recommended and can void the flooring warranty.
Here’s why underlayment is essential:
- Moisture Barrier: This is particularly critical when installing over concrete subfloors, which can transmit moisture vapor. Many underlayments come with an integrated vapor barrier (usually a thin plastic film). If your chosen underlayment doesn’t have one built-in, and you’re installing over concrete or a crawl space, you’ll need to install a separate 6-mil polyethylene vapor barrier first, overlapping seams by 6-8 inches and taping them with moisture-resistant tape. Even on wood subfloors, a moisture barrier can offer extra protection, especially in potentially damp areas like basements or bathrooms (though laminate itself isn’t ideal for very wet areas).
- Sound Absorption: Laminate flooring can be noisy to walk on, sometimes producing a hollow or clicking sound. Underlayment helps dampen impact sound (footsteps) and transmission sound (noise traveling to the room below). Thicker or denser underlayments (like felt or rubber) generally offer better acoustic performance. This is a significant benefit for comfort, especially in multi-story homes or apartments.
- Minor Subfloor Imperfection Correction: While underlayment cannot fix significant subfloor unevenness (that requires proper subfloor prep), it can smooth out very minor imperfections, textures, or irregularities in the subfloor surface, providing a smoother base for the laminate planks.
- Cushioning and Comfort: Underlayment provides a slight cushioning effect underfoot, making the floor more comfortable to walk and stand on. It reduces the hard feel often associated with floating floors.
- Thermal Insulation: Some underlayments offer a degree of thermal insulation, helping the floor feel slightly warmer, especially over cold concrete slabs or crawl spaces.
- Support for Locking System: The underlayment provides a consistent, slightly forgiving surface that helps support the laminate planks’ click-lock mechanisms, reducing stress on the joints.
Types of Underlayment:
- Standard Foam: The most basic and affordable option. Provides minimal cushioning and sound absorption. Often comes with an attached vapor barrier film. Suitable for budget projects on wood subfloors.
- Combination Foam (Upgraded Foam): Offers better density, improved sound dampening, and often includes features like overlapping film edges with adhesive strips for easier sealing of seams. A good middle-ground option.
- Felt Underlayment: Made from recycled fibers, felt is dense and offers excellent sound absorption properties. It’s often thicker and provides good insulation.
- Cork Underlayment: A natural and eco-friendly option. Cork is excellent at absorbing sound and providing thermal insulation. It’s generally more expensive but offers premium performance. It may require a separate vapor barrier.
- Rubber Underlayment: Offers superior sound dampening and durability but is typically the most expensive option. Often used in commercial settings or high-end residential projects.
Pre-Attached Underlayment: Some laminate flooring products come with underlayment already attached to the back of each plank. This simplifies the installation process as it eliminates the separate step of rolling out and taping underlayment. However, check manufacturer instructions carefully. Even with pre-attached underlayment, a separate 6-mil poly vapor barrier might still be required when installing over concrete subfloors. Do not install an additional layer of underlayment if your planks already have it attached, as this can make the floor feel too spongy and potentially compromise the locking system.
In summary, unless your laminate flooring specifically includes a pre-attached pad suitable for your subfloor type, installing the correct underlayment is a mandatory step in the laminate floor installation process. It enhances performance, comfort, and longevity, making it a vital component of any quality flooring installation.
How to Install Laminate Flooring: Step-by-Step Instructions
With preparation complete – tools gathered, flooring acclimated, subfloor prepped, and underlayment chosen (and possibly installed) – you’re ready to begin the core task: the actual how to install laminate flooring. This section provides detailed, step-by-step instructions for laying your new floor. Remember to always consult the specific instructions provided by your laminate flooring manufacturer, as details like locking mechanisms can vary slightly between brands. Following these general steps to install laminate flooring combined with your manufacturer’s guidelines for installing laminate flooring will lead to a successful DIY laminate flooring project.
Laying Laminate
The process of laying laminate involves careful planning, precise measurements, and methodical work. Getting the first few rows right is crucial, as they set the pattern for the entire room.
- Install Underlayment (if not pre-attached): If your laminate doesn’t have attached padding and you haven’t already done so, install the underlayment now.
- Roll out the underlayment according to its instructions. Typically, you lay it parallel to the direction you plan to install the laminate planks.
- Butt the edges of adjacent rows together; do not overlap them unless the product has specific overlapping flaps for sealing.
- Tape the seams using the manufacturer-recommended tape (often packing tape or a specialized underlayment tape) to prevent shifting and create a continuous layer.
- If a separate vapor barrier is needed (e.g., over concrete and not integrated into the underlayment), install it first, overlapping seams by 6-8 inches and taping them securely. Run the vapor barrier up the walls an inch or two; it will be covered by trim later. Trim the underlayment close to the walls.
- Plan Your Layout:
- Direction: Decide which way the planks will run. Generally, laminate looks best when installed parallel to the longest wall of the room or parallel to the main source of light (e.g., a large window). Installing parallel to the longest wall can make a room feel larger.
- Starting Wall: Choose a starting wall. Ideally, it should be the longest, straightest exterior wall.
- Measure Room Width: Measure the width of the room perpendicular to the direction you’ll be laying planks. Divide this measurement by the width of a single laminate plank. This tells you how many full rows you’ll have and the width of the last row.
- Avoid Narrow Last Row: If the calculation shows your last row will be very narrow (e.g., less than 2-3 inches or half a plank width, check manufacturer minimums), it’s best to rip (cut lengthwise) the planks in the first row narrower as well. This balances the look, ensuring both the first and last rows are roughly the same partial width. For example, if the last row calculates to be 1 inch wide, and your planks are 6 inches wide, you’d add the 1 inch to the 6 inches (total 7 inches) and divide by two (3.5 inches). You would then rip your first row of planks to 3.5 inches wide, and your last row would naturally end up being 3.5 inches wide as well.
- Set Up Expansion Gaps: Laminate flooring needs space to expand and contract with changes in temperature and humidity. An expansion gap must be left around the entire perimeter of the room, including against walls, cabinets, pipes, and any other vertical obstructions.
- The required gap size is specified by the manufacturer, typically ranging from 1/4 inch to 3/8 inch (6-10mm). Wider gaps might be needed for very large rooms.
- Use the spacers you gathered earlier. Place them between the first row of planks and the starting wall. You’ll also place spacers along the ends of the rows.
- Lay the First Row: This is the most critical row. It must be perfectly straight.
- Most laminate planks have a tongue edge and a groove edge. For the first row against the wall, you typically need to trim off the tongue edge of the planks so that a solid, uncut edge faces the wall (leaving the groove edge exposed towards the room). Use a circular saw or jigsaw for this. (Alternatively, some systems may require starting with the tongue facing the wall – always check manufacturer instructions).
- Place the first plank in a corner (e.g., top left), ensuring spacers are between the plank and both walls (long edge and short end).
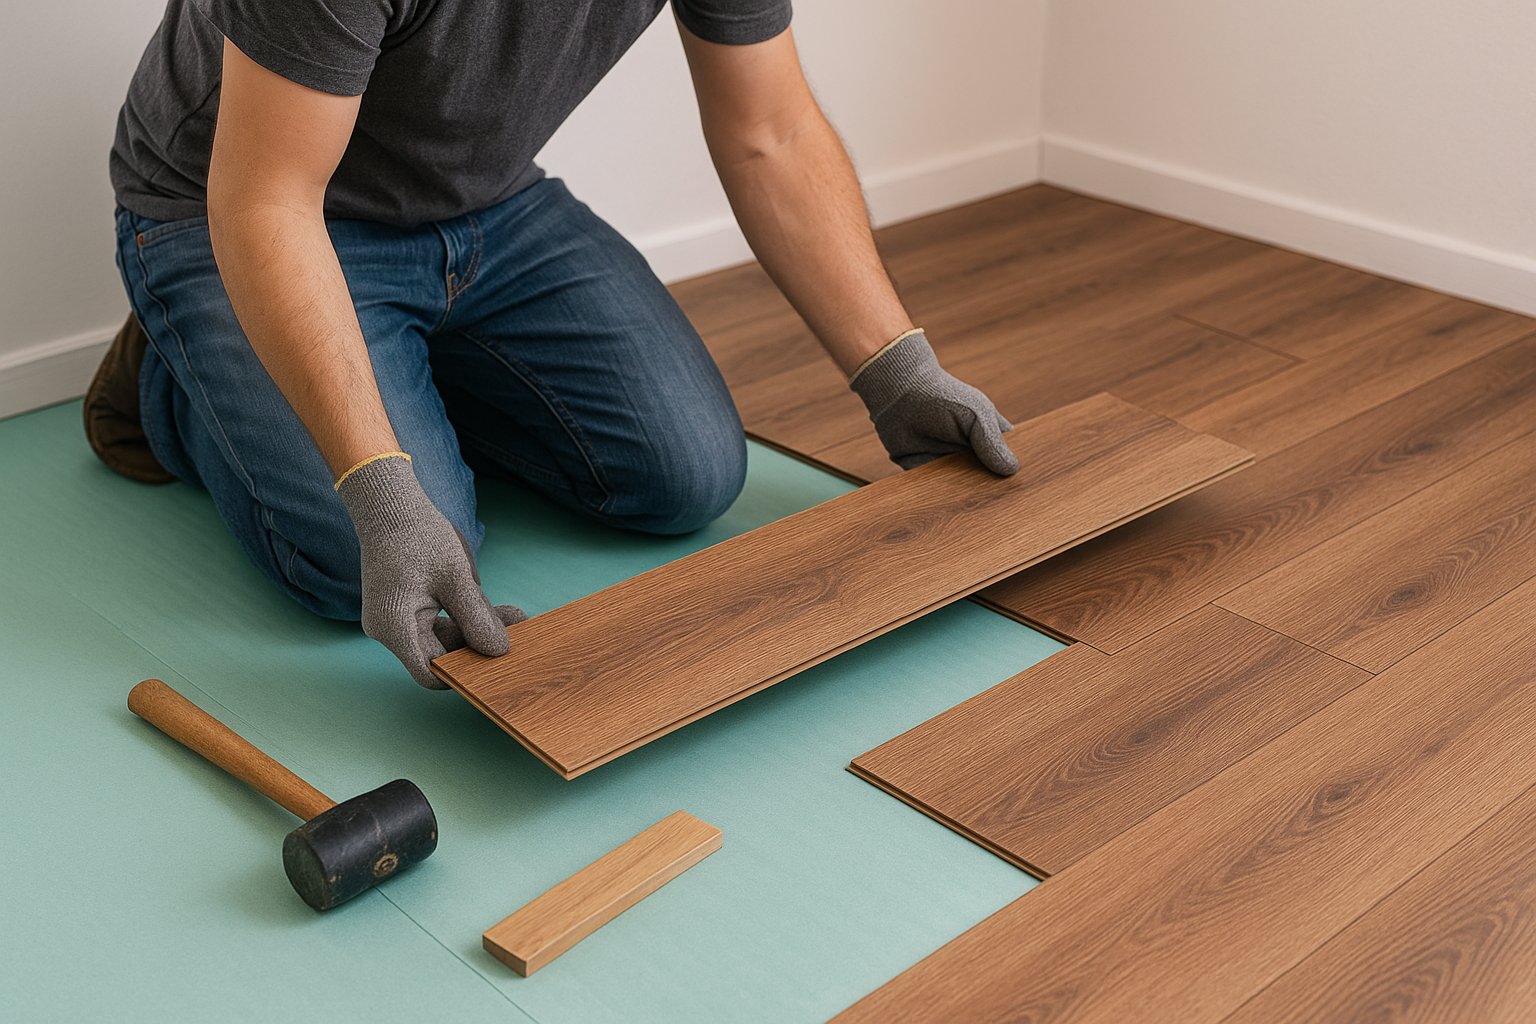
- Install the next plank in the first row by engaging its short end (end joint) with the previous plank. Depending on the locking system, this might involve angling the plank down, tapping it horizontally, or a combination. Use the tapping block and mallet gently if needed to ensure the end joint is tight and flush.
- Continue laying planks end-to-end until you reach the end of the first row.
- Cut the Last Plank of the First Row:
- Measure the distance from the last full plank to the wall, remembering to subtract the required expansion gap space.
- Mark this measurement on a new plank (measure from the correct end, considering the tongue/groove orientation).
- Cut the plank using your chosen saw. Ensure a square cut.
- Install this cut piece to finish the first row. The leftover piece from this cut (if it’s long enough, typically at least 12-16 inches) can often be used to start the second row, helping to stagger the joints.
- Start the Second and Subsequent Rows:
- Stagger Joints: It’s crucial to stagger the end joints between adjacent rows. This provides structural stability and looks aesthetically pleasing (like brickwork). The end joints should ideally be offset by at least 12-16 inches (or as recommended by the manufacturer) from the joints in the previous row. Avoid H-joints (where joints align every other row) and joints closer than about 6-8 inches.
- Use the leftover piece from the end of the first row to start the second row, provided it meets the minimum stagger length requirement. If not, cut a new plank to the appropriate length (e.g., 1/3 or 1/2 plank length) to start the row and achieve the desired stagger.
- Install the first plank of the second row by angling its long tongue edge into the groove of the first row planks. Lower the plank flat to the floor to lock it in place. Ensure there’s no gap along the long seam.
- Install the second plank of the second row. First, engage its long tongue edge into the groove of the first row, keeping it slightly away from the previous plank in the second row. Then, slide it horizontally until its short end joint aligns with the previous plank’s short end joint. Lock the short end joint (using angling or tapping, per manufacturer instructions). You might need the tapping block along the long edge and/or short edge to ensure both seams are tight.
- Continue across the room, row by row, always maintaining the expansion gap along the walls and ensuring joints are properly staggered. Use the pull bar for tightening the last plank in each row near the wall.
This methodical process of laying laminate flooring forms the bulk of the flooring installation. Patience and attention to detail, especially with staggering joints and maintaining expansion gaps, are key to success.
What Are the Techniques for Installing Laminate Flooring Planks?
Laminate flooring planks are designed to join together using interlocking tongue-and-groove edges, creating a “floating floor” that doesn’t require glue or nails (for the main field of flooring). Understanding the specific locking mechanism of your chosen product is key to a smooth installation. While manufacturers might have proprietary names for their systems, most fall into a few common categories. Here are the primary techniques for installing laminate flooring planks:
- Angle-Angle System:
- Description: This is one of the most common systems. Both the long edge and the short end of the plank need to be angled to lock into place.
- Technique:
- To connect the long edge: Hold the new plank at a slight angle (e.g., 20-30 degrees) and insert its tongue into the groove of the already installed row. Lower the plank gently until it clicks into place and lies flat.
- To connect the short end: Before laying the plank flat, while it’s still slightly angled on the long edge, align its short tongue with the short groove of the previously laid plank in the same row. Slide it close, then push down while applying slight forward pressure. It should click together. Some angle-angle systems require lifting the previously laid plank slightly along with the new plank to engage the end joint before lowering both together.
- Tips: This method often requires working row by row. It can sometimes be tricky to get both joints engaged perfectly simultaneously. Gentle tapping with a block and mallet might be needed on the long edge after lowering to ensure a tight fit.
- Angle-Drop (or Angle-Tap) System:
- Description: This system simplifies the end-joint connection. The long edge is installed by angling, but the short end simply drops or requires a light tap to lock.
- Technique:
- Engage the long tongue edge of the new plank into the groove of the previous row at an angle, just like the angle-angle system.
- Slide the plank horizontally until its short end is positioned directly over the groove of the preceding plank in the same row.
- Lower the plank flat. The end joint is designed to lock automatically as it drops into place, or it may require a gentle downward tap with a mallet directly on the seam (using a tapping block is safer) to fully engage.
- Tips: This system is generally considered easier and faster than angle-angle, especially for DIYers. It reduces the need for precise simultaneous alignment of both joints.
- Tap-Lock (or Horizontal Engagement) System:
- Description: These systems allow planks to be joined together horizontally, without significant angling. This can be useful in tight spaces like under radiators or door jambs where angling is difficult.
- Technique:
- Position the new plank flat on the floor. Align its long edge tongue (which might be a specialized locking profile) with the groove of the previous row.
- Use a tapping block and mallet to gently tap along the long edge of the new plank, driving it horizontally into the previous row until the joint locks tightly.
- Similarly, align the short end tongue with the short end groove of the preceding plank in the same row. Use the tapping block and mallet to tap the short end horizontally until that joint locks tightly.
- Tips: Requires careful use of the tapping block to avoid damaging the plank edges. Follow manufacturer guidance on the force needed. Some systems might primarily use tap-lock for end joints while still using angle engagement for long edges.
General Techniques and Best Practices:
- Read the Instructions: Always prioritize the specific instructions provided by the manufacturer of your laminate flooring. They will detail the exact technique required for their locking system.
- Use the Right Tools: Employ a tapping block and pull bar specifically designed for laminate flooring. Never hit the planks directly with a hammer or mallet, as this will damage the edges and locking mechanism.
- Ensure Joints are Tight: Check visually and by feel that each joint (long and short) is fully engaged, tight, and flush. There should be no gaps or height differences between planks. Poorly locked joints can lead to squeaking, movement, and potential damage later.
- Work from Left to Right (Usually): Most systems are designed for right-handed installers working from left to right across the room, but check if your product specifies otherwise.
- Inspect Planks: Before installing each plank, briefly inspect it for any damage or defects.
Understanding these different ways to install laminate flooring planks helps you adapt to the specific product you’re using. The goal is always to achieve secure, seamless joints throughout the flooring installation. Mastering the locking mechanism is a core part of learning how to do laminate flooring correctly.
How Do You Cut Laminate Flooring?
Cutting laminate flooring accurately and cleanly is essential for fitting planks at the end of rows, around obstacles, and along walls for the first and last rows (if ripping is needed). Laminate’s wear layer is tough, and the core is dense, so using the right tools and techniques is important to avoid chipping, splintering, or inaccurate cuts. Here’s how to cut laminate flooring effectively:
Tools for Cutting:
- Jigsaw: Very versatile. Good for straight cuts, curves (around pipes, vents), L-shapes (doorways), and notches.
- Blade: Use a fine-tooth blade specifically designed for laminate or fine woodworking. Down-cutting (reverse-tooth) blades are often recommended as they cut on the downstroke, minimizing chipping on the visible top surface when cutting with the finished side up. Alternatively, cut with the finished side down using a standard blade.
- Technique: Clamp the plank securely. Mark your cut line clearly. Guide the saw slowly and steadily along the line. Using masking tape along the cut line can also help reduce chipping.
- Circular Saw: Excellent for long, straight cuts, such as ripping the first or last row of planks lengthwise.
- Blade: Use a fine-tooth carbide-tipped blade (60-80 teeth or more is ideal for clean cuts in laminate).
- Technique: Set the blade depth just slightly more than the thickness of the laminate plank. Always cut with the finished side facing DOWN when using a circular saw to minimize chipping on the top surface. Clamp the plank securely and use a straightedge guide for perfectly straight cuts.
- Miter Saw (Chop Saw): The best tool for quick, clean, accurate cross-cuts (cutting planks to length at the end of rows) at 90 degrees or other angles.
- Blade: Use a fine-tooth carbide-tipped blade suitable for laminate or finished plywood.
- Technique: Place the plank firmly against the saw’s fence. Lower the blade slowly and smoothly through the material. For minimizing chipping on the top surface, some recommend scoring the cut line lightly with a utility knife first, or placing masking tape over the cut line. Some installers find that letting the blade reach full speed before starting the cut, and making a slow, controlled cut, works best. The direction of cut (finished side up or down) might depend on the saw and blade, so a test cut is wise.
- Laminate Flooring Cutter: A manual, guillotine-style cutter.
- Blade: A long, sharp blade that shears through the laminate.
- Technique: Mark the plank, position it under the blade, and pull the handle down firmly.
- Pros: Produces no dust, is quiet, and very fast for cross-cuts.
- Cons: Can be expensive, primarily only makes straight cross-cuts (not ripping or curves), may sometimes slightly compress the edge on thicker laminates.
- Utility Knife and Straightedge: Can be used for scoring and snapping very thin laminate or for cutting underlayment, but generally not suitable for cutting standard thickness laminate planks cleanly.
Steps for Cutting:
- Measure Carefully: Double-check your measurements before marking the plank. Remember the “measure twice, cut once” mantra. Crucially, remember to account for the required expansion gap when measuring pieces that will sit against a wall or obstacle.
- Mark Clearly: Use a pencil and a speed square or combination square to mark a precise, straight line on the plank. Indicate which side of the line is the waste piece. Consider which side of the plank should face up or down depending on the saw you are using to minimize visible chipping.
- Secure the Plank: Clamp the plank firmly to a workbench or sawhorses before cutting with power saws. This ensures safety and accuracy. For miter saws, the saw’s built-in clamps and fence provide security.
- Wear Safety Gear: Always wear safety glasses when cutting laminate. A dust mask is also highly recommended, especially with power saws.
- Make the Cut: Use a smooth, controlled motion. Don’t force the saw; let the blade do the work.
- Check the Cut: After cutting, check the edge for excessive chipping or splintering. A slightly rough edge is usually acceptable if it will be hidden under trim, but strive for clean cuts, especially on visible edges or joints.
Knowing how to cut laminate flooring properly using the appropriate tools is a fundamental skill for any laminate floor installation. It ensures planks fit correctly and contributes significantly to the professional appearance of your finished floor.
Install Laminate Around Doorways and Obstacles?
Installing laminate flooring in a perfectly square, empty room is straightforward. However, most rooms have doorways, vents, pipes, cabinets, fireplaces, or other obstacles that require careful cutting and fitting. Handling these areas properly is crucial for a professional finish. Here’s how to install laminate around common obstacles:
1. Doorways and Door Jambs:
- The Challenge: You need to run the laminate planks under the door casing (trim) and jamb for a clean, seamless look, while still maintaining the expansion gap under the trim. Simply cutting the plank around the shape of the trim leaves an unsightly gap.
- The Technique: Undercutting:
- Take a scrap piece of laminate flooring and a piece of the underlayment. Place them flat on the subfloor next to the door jamb and casing.
- Use a handsaw (like a flush-cut dovetail saw) or an oscillating multi-tool with a flush-cut blade. Rest the saw blade flat on top of the scrap laminate/underlayment stack and carefully cut horizontally through the bottom of the door jamb and casing.
- Remove the cut-out wood pieces. This creates a space underneath the trim.
- Now, when you lay the laminate plank, you can slide it directly under the trimmed jamb and casing. Measure and cut the plank to fit snugly into this space, still ensuring you maintain the required expansion gap against the wall stud behind the jamb (it will be hidden).
- Transitions: At doorways leading to other rooms or different flooring types, you’ll likely need a transition strip (e.g., T-molding, reducer) which will be installed later, after the main flooring is laid. Plan for the space required by the transition strip’s track or base.
2. Floor Vents (HVAC Registers):
- The Challenge: You need to cut a hole in a plank (or across multiple planks) to match the vent opening.
- The Technique:
- Lay planks up to the vent location.
- Place the plank(s) that will cover the vent area in position (without locking them in yet).
- Carefully measure and mark the exact location of the vent opening onto the plank(s). Remember to account for the expansion gap around the duct opening itself (usually about 1/4 inch on all sides).
- Drill starter holes inside the corners of your marked rectangle using a drill bit large enough for your jigsaw blade.
- Use a jigsaw to carefully cut out the marked rectangle.
- Install the cut plank(s).
- Later, you can install the vent cover. Some covers are drop-in style, while others might require a frame or specific installation method that integrates with the flooring. Flush-mount vents often look best but require more precise cutting.
3. Pipes (e.g., Radiator Pipes):
- The Challenge: Cutting precise circular holes for pipes and maintaining expansion gaps.
- The Technique:
- Lay planks up to the pipe location.
- Position the plank that will contain the pipe. Mark the center point of the pipe on the plank. Also mark where the pipe falls relative to the long edge of the plank.
- Drill a hole at the marked center point. The hole diameter should be the pipe diameter PLUS twice the expansion gap (e.g., pipe diameter + 1/2 inch if using 1/4 inch gaps). A spade bit or Forstner bit works well for clean holes.
- From the drilled hole, make two parallel cuts with a jigsaw straight out to the edge of the plank (the edge closest to the pipe). This creates a small removable “key” piece with a semi-circle cut out.
- Install the main part of the plank around the pipe.
- Apply a small amount of wood glue to the edges of the cut-out key piece (but not where it touches the pipe or subfloor). Fit the key piece back into place behind the pipe.
- Wipe away any excess glue immediately.
- Use decorative pipe collars (escutcheons) later to cover the expansion gap around the pipe for a finished look.
4. Fixed Cabinets, Islands, or Fireplace Hearths:
- The Challenge: You need to cut the flooring around these fixed objects, maintaining the expansion gap.
- The Technique:
- Treat these like walls. Cut the laminate planks to follow the contour of the obstacle, leaving the required expansion gap between the plank edge and the object.
- Use a jigsaw or coping saw for complex shapes. Making a cardboard template first can be helpful.
- The expansion gap will later be covered by trim (like quarter round or shoe molding) or flexible caulking specifically designed for flooring in some cases (e.g., around a stone hearth where trim might not be suitable). Never install laminate under kitchen cabinets; install cabinets first, then floor up to them leaving the gap.
Fitting laminate around obstacles requires patience and careful measurement. These flooring installation tips for tricky areas are essential for achieving a polished, professional result when you install flooring. It’s often these details that distinguish a DIY job from a professional one during installing laminate flooring.
What is the Process of Installing Laminate Flooring Trim? (Laying Laminate Steps)
Once all the laminate planks are laid across the main floor area, the final step in the laying laminate steps is installing the trim. Trim pieces serve both functional and aesthetic purposes: they cover the necessary expansion gaps left around the perimeter and at transitions, and they provide a clean, finished edge to the installation. Neglecting trim work leaves the job looking incomplete and exposes the unsightly expansion gaps.
Here’s the process for installing laminate flooring trim:
- Choose the Right Trim: Different situations require different types of trim:
- Baseboards: These run along the bottom of walls. If you removed existing baseboards before installation, you can now reinstall them (or install new, taller ones). The baseboard sits on top of the laminate flooring, covering the expansion gap along the wall. If your existing baseboards were left in place and undercut, you might not need additional trim, but often a smaller molding is still used.
- Quarter Round or Shoe Molding: If you didn’t remove the baseboards (or if there’s still a small gap visible after reinstalling them), quarter round or shoe molding is used. It’s a small, flexible trim piece installed against the baseboard, resting on the laminate floor and covering the expansion gap. Shoe molding has a slightly flatter profile than quarter round and is often preferred aesthetically.
- T-Molding: Used to transition between laminate flooring and another flooring type of approximately the same height (e.g., laminate to tile or hardwood). It’s shaped like a ‘T’, with the top covering the seam and expansion gap, and the stem fitting into a gap between the two floors (often held by a metal track screwed or glued to the subfloor). An expansion gap must be left under both sides of the T-molding top.
- Reducer Strip: Used to transition between laminate flooring and a lower flooring surface (e.g., laminate to vinyl sheet or concrete). It slopes down from the laminate edge to the lower floor, covering the gap. Usually installed with a track or adhesive.
- End Cap (or Threshold Molding): Used to terminate the laminate flooring against a vertical surface where baseboard/quarter round isn’t appropriate, such as against sliding glass door tracks, fireplace hearths, or at exterior doorways. It provides a clean, finished edge and covers the expansion gap.
- Measure and Cut Trim:
- Measure the lengths needed for each section of wall or transition.
- Cut the trim pieces using a miter saw for clean, precise cuts, especially for corners. Baseboards, quarter round, and shoe molding typically require 45-degree miter cuts for inside and outside corners.
- For long walls requiring multiple pieces of trim, use a scarf joint (cutting the ends of joining pieces at opposing 45-degree angles) for a less noticeable seam than a butt joint.
- When cutting transition pieces (T-molding, reducers, end caps), cut them to the exact length of the doorway or transition area.
- Install the Trim:
- Baseboards, Quarter Round, Shoe Molding:
- Position the trim piece in place, ensuring it covers the expansion gap but does not press down tightly on the laminate floor. The floor needs to be able to move slightly underneath the trim. There should be minimal downward pressure.
- Crucially, nail the trim to the wall (baseboard or wall plate), NOT into the laminate flooring or subfloor. Use a finish nailer (brad nailer or pin nailer) with appropriate length nails, or pre-drill and use finish nails driven with a hammer and nail set. Nailing into the floor would prevent the necessary expansion and contraction, potentially causing buckling.
- Transition Strips (T-Molding, Reducers, End Caps):
- These often come with a metal or plastic track. Cut the track to length and secure it to the subfloor in the gap between the flooring surfaces using screws or adhesive, following the manufacturer’s instructions. Ensure the track is centered in the gap.
- Leave the required expansion space between the edge of the laminate flooring and the track/center of the transition.
- Snap or press the transition molding piece into the track. Some types might require adhesive instead of a track. Again, ensure the molding allows the laminate floor to float freely beneath it.
- Baseboards, Quarter Round, Shoe Molding:
- Finishing Touches:
- Fill nail holes in the trim with wood putty or painter’s caulk that matches the trim color.
- If desired, caulk the top edge where the baseboard meets the wall for a seamless look. Do not caulk the bottom edge where the trim meets the laminate floor, as this could restrict movement.
- Touch up paint on the trim as needed.
Installing trim properly completes the laminate floor installation process, hiding gaps and creating crisp edges. It’s a detailed step that significantly impacts the final appearance of your home improvement project. Remember the cardinal rule: attach trim to the walls, not the floor.
How to Finish the Laminate Installation?
You’ve laid all the planks and installed the trim – congratulations, the main work of your laminate flooring installation is complete! However, there are a few final steps to truly finish the job and prepare your new floor for use.
- Remove All Spacers: Go around the perimeter of the room and remove all the expansion gap spacers you placed against the walls and obstacles. These are no longer needed now that the trim is installed (or about to be, if you haven’t done it yet – trim installation is often considered part of this finishing phase).
- Install Transition Strips: If you haven’t already installed T-moldings, reducers, or end caps in doorways or where the laminate meets other flooring types or vertical surfaces, do so now following the methods described in the trim installation section. Ensure they are securely in place and allow the laminate to float.
- Install Vent Covers and Other Fixtures: Reinstall any floor vent covers. If you installed new flush-mount vents, ensure they are properly seated. Reattach any other fixtures that were removed or worked around.
- Thorough Cleaning: This is an important step. The installation process inevitably creates dust (especially from cutting) and leaves footprints and smudges.
- First, sweep the entire floor thoroughly with a soft-bristle broom to remove larger debris and dust particles.
- Next, vacuum the floor carefully using a vacuum cleaner with a hard floor attachment (preferably one without a beater bar, or with the beater bar turned off, to avoid scratching the surface). Pay attention to the edges and corners.
- Finally, clean the floor following the laminate manufacturer’s specific recommendations for initial cleaning. This usually involves using a slightly damp microfiber mop. Use plain water or a manufacturer-approved laminate floor cleaner. Never saturate the floor with water. Wring the mop out thoroughly so it’s only damp, not wet. Avoid soap-based detergents, wax, polish, or abrasive cleaners, as these can damage the finish or leave a dulling residue.
- Final Inspection: Walk over the entire floor. Look closely at the seams to ensure they are tight and level. Check for any planks that seem loose or make excessive noise (minor sounds are normal initially as the floor settles). Inspect the trim and transition installations for neatness and proper function. Address any minor issues found.
- Install Furniture Pads: Before moving furniture back into the room, apply felt or soft plastic protective pads to the bottom of all furniture legs (chairs, tables, sofas, cabinets, etc.). This is crucial to prevent scratches and scuffs on your new laminate floor.
- Use Walk-Off Mats: Place walk-off mats or rugs at all exterior entrances to trap dirt, grit, and moisture before they reach the laminate floor. This significantly helps in maintaining the floor’s appearance and longevity.
Completing these finishing steps ensures your install laminate floors project not only looks great but is also ready for everyday life. Proper initial cleaning and taking preventative measures like using furniture pads set the stage for easy long-term maintenance. Your flooring installation is now truly complete.
Laminate Flooring Tips
Beyond the step-by-step instructions, several tips and best practices can help ensure your laminate flooring installation goes smoothly and results in a floor you can be proud of for years to come. These laminate flooring tips cover common pitfalls, ways to simplify the process, adherence to guidelines, and the critical aspect of handling expansion gaps. Incorporating this advice can make the difference between an average DIY job and a truly professional-looking outcome. These flooring installation tips and flooring tips in general are gathered from experience and manufacturer recommendations.
What Are Common Mistakes When Installing Laminate Floors?
Even though laminate flooring is considered DIY-friendly, several common mistakes can compromise the quality and longevity of the installation. Being aware of these pitfalls can help you avoid them:
- Inadequate Subfloor Preparation: This is perhaps the most frequent and critical error. Installing over an uneven, dirty, or damp subfloor leads to numerous problems: clicking sounds, bouncing or spongy feel, visible gaps or peaking at seams, and potential locking system failure. Avoidance: Take the time to thoroughly clean, dry, and level the subfloor according to manufacturer specifications (typically flat within 3/16″ over 10 feet).
- Skipping or Insufficient Acclimation: Failing to let the laminate planks adjust to the room’s temperature and humidity for at least 48 hours (or manufacturer’s recommendation) before installation. Avoidance: Acclimate the flooring in the installation room, stacked properly in unopened boxes, under normal living conditions.
- Forgetting or Insufficient Expansion Gaps: Not leaving the required gap (usually 1/4″ to 3/8″) around the entire perimeter (walls, cabinets, pipes, etc.) and at transitions. Laminate expands and contracts; without space, it can buckle or warp. Avoidance: Use spacers consistently during installation and ensure trim covers the gap without pinching the floor. Remember gaps are needed around all fixed objects.
- Improper Underlayment: Using the wrong type of underlayment, skipping it altogether (when not pre-attached), installing it incorrectly (e.g., overlapping seams that shouldn’t be), or using double layers (e.g., adding separate underlayment when planks have it attached). Avoidance: Choose the correct underlayment for your subfloor type (especially regarding moisture barriers on concrete) and install it precisely according to instructions. Always check if a separate vapor barrier is needed even with attached pads over concrete.
- Poor Joint Staggering: Aligning end joints too closely (less than 6-12 inches, check specs) or creating noticeable patterns like H-joints (where joints align every other row). This weakens the floor structurally and looks unnatural. Avoidance: Plan your layout to ensure random and sufficient staggering of end joints, typically by at least 1/3 of a plank length.
- Damaging Planks During Installation: Hitting planks directly with a hammer, using excessive force with the tapping block, or forcing joints together improperly. This can damage the delicate tongue-and-groove locking mechanism or chip the plank edges. Avoidance: Use the proper tools (tapping block, pull bar, mallet) gently and correctly. Let the locking mechanism do the work; don’t force it.
- Incorrect Starting Row: Starting with a crooked first row. Any deviation will be magnified across the room, resulting in skewed lines and difficulty locking subsequent rows. Avoidance: Measure carefully and ensure the first row is perfectly straight, even if the starting wall isn’t. You might need to scribe the first row to match an uneven wall while keeping the outward edge straight.
- Ignoring Manufacturer Instructions: Assuming all laminate installs the same way. Different brands have unique locking systems, acclimation times, expansion gap requirements, and subfloor/underlayment specifications. Avoidance: Read and meticulously follow the specific instructions that come with your chosen laminate flooring. Keep them handy throughout the installation.
- Nailing Trim to the Floor: Attaching baseboards or quarter round by nailing through the trim into the laminate flooring. This pins the floating floor down, preventing expansion and contraction. Avoidance: Always nail trim horizontally into the wall or baseboard, never vertically into the flooring.
- Installing in Unsuitable Areas: Laying standard laminate in high-moisture areas like full bathrooms with showers or tubs. Most laminate is not waterproof and can be damaged by excessive moisture or standing water. Avoidance: Choose flooring appropriate for the room’s conditions. Look for specific “water-resistant” or “waterproof” laminate options if needed for kitchens or half-baths, and follow manufacturer guidelines strictly for those applications.
Avoiding these common mistakes when installing laminate floors is crucial for a successful DIY laminate flooring project and ensures your new laminate floors perform as expected.
How Can I Ensure an Easy Laminate Flooring Installation?
While “easy” is relative and depends on your DIY skills and the complexity of the room, several strategies can make the laminate flooring installation process smoother and less stressful:
- Choose the Right Product: Some laminate flooring systems are inherently easier to install than others. Look for products with user-friendly locking mechanisms (like angle-drop systems) and clear instructions. Laminate with pre-attached underlayment can also simplify the process by eliminating a step.
- Thorough Preparation: This cannot be overstated. A well-prepared subfloor makes laying the planks much easier. Having all tools organized and ready before you start prevents frustrating interruptions.
- Read Instructions BEFORE You Start: Don’t wait until you hit a snag. Read the manufacturer’s instructions from beginning to end before opening the first box. Watch online videos specific to your brand or locking type if available. Understanding the whole process upfront builds confidence.
- Start Small (Optional): If you’re nervous, consider starting in a smaller, simpler room (like a closet or small bedroom) to get the hang of the techniques before tackling a large, complex living area.
- Get the First Row Perfect: Invest extra time ensuring the first row is absolutely straight and correctly spaced from the wall. Use a chalk line if necessary. A straight start makes subsequent rows much easier to install.
- Work Methodically: Don’t rush. Work plank by plank, row by row. Check each joint for tightness before moving on. Maintain consistent staggering and expansion gaps.
- Have a Helper: While possible to do alone, having a second person can make the job much easier and faster. They can help with measuring, cutting, bringing planks, holding rows in place, and providing an extra set of eyes.
- Use the Right Tools: Invest in or rent the proper tools. A miter saw makes end cuts much faster and cleaner than a jigsaw alone. A laminate cutter eliminates dust. Using the correct tapping block and pull bar prevents damage. Knee pads save your knees!
- Plan for Obstacles: Think through how you’ll handle doorways, vents, and corners before you reach them. Undercutting door jambs in advance saves time later.
- Keep the Work Area Clean: Regularly sweep up dust and debris as you work. This prevents particles from getting into the joints or scratching the planks.
- Don’t Be Afraid to Re-do: If a joint doesn’t seem right or a row looks crooked, it’s often possible (especially in the early stages) to carefully unlock and reposition the planks. It’s better to fix mistakes early than to live with them or have problems later.
- Take Breaks: Installing flooring can be physically demanding. Take regular breaks to rest your back and knees, review your progress, and maintain focus.
By following these tips for installing laminate flooring, you can significantly increase your chances of having an easy laminate flooring installation experience, or at least a more manageable and successful one.
Are There Specific Guidelines for Installing Laminate Flooring?
Yes, there are absolutely specific guidelines for installing laminate flooring, and adhering to them is crucial for both the performance of the floor and the validity of the manufacturer’s warranty. While general best practices apply across most laminate products, the most important guidelines are always those provided by the manufacturer of the specific flooring you purchased.
Here are the key areas where specific guidelines are typically provided:
- Manufacturer’s Instructions: This is the primary source of guidelines. Always read and follow the printed instructions included in the flooring boxes. These cover everything from acclimation to subfloor requirements to the exact method for engaging the locking system. Failure to follow these can void the warranty.
- Acclimation: Manufacturers specify the minimum time (e.g., 48 hours, 72 hours) and conditions (temperature range, humidity range, stacking method) required for proper acclimation.
- Subfloor Requirements:
- Type: Guidelines specify acceptable subfloor materials (e.g., plywood, OSB, concrete, existing vinyl). They often state what not to install over (e.g., carpet, cushioned vinyl, perimeter-glued vinyl).
- Flatness: A specific tolerance for subfloor flatness is always given (e.g., must not vary more than 3/16 inch in 10 feet).
- Moisture: Maximum allowable moisture content for wood subfloors and concrete subfloors (using specific test methods like Calcium Chloride or RH testing) is defined.
- Underlayment and Vapor Barrier: Guidelines dictate whether underlayment is required, what types are acceptable, and if/when a separate vapor barrier (typically 6-mil poly) is necessary (almost always over concrete, sometimes over crawl spaces). If the laminate has pre-attached padding, the instructions will clarify if additional underlayment or vapor barriers are needed.
- Expansion Gaps: The required size of the expansion gap around the perimeter and fixed objects is specified (e.g., 1/4″, 3/8″, sometimes larger for large rooms). Guidelines may also state the maximum continuous run length before an intermediate expansion joint (using T-molding) is required, especially in very long rooms or complex layouts.
- Layout and Staggering: Minimum required offset (stagger) for end joints between adjacent rows is usually specified (e.g., minimum 8 inches, 12 inches, or 1/3 plank length). Recommendations for layout direction might also be included.
- Locking Mechanism: Instructions detail precisely how to engage the tongue-and-groove system (e.g., angle-angle, angle-drop, tapping method).
- Cutting: Recommendations for saw blades or cutting techniques to minimize chipping might be provided.
- Transitions and Trim: Guidelines on how to handle transitions to other flooring types and how trim should be installed (nailed to wall, not floor) are standard.
- Installation Area Limitations: Manufacturers often specify that their standard laminate products are not suitable for high-moisture areas like bathrooms with showers/tubs unless it’s a specifically designated water-resistant or waterproof product line with its own unique installation guidelines (which might include sealing perimeters).
- Radiant Heat Systems: If installing over radiant heat, specific guidelines must be followed regarding the type of system, maximum surface temperature, and operational procedures before, during, and after installation.
Adhering to these specific guidelines for installing laminate flooring provided by the manufacturer is not just recommended; it’s essential for ensuring your floor performs correctly, looks great, and remains covered by warranty. These form the backbone of any reliable laminate flooring installation guide.
How to Handle Expansion Gaps for Laminate?
Properly handling expansion gaps is one of the most critical aspects of a successful laminate flooring installation. Laminate flooring’s core material (usually HDF) naturally expands and contracts in response to changes in ambient temperature and humidity. Without adequate space to move, the floor can buckle (lift up) when it expands or develop gaps between planks when it contracts excessively.
Here’s how to correctly handle expansion gaps:
- Understand the Requirement: Recognize that the expansion gap is non-negotiable. It’s required around the entire perimeter of the installation. This includes along all walls, around kitchen islands, cabinets, support columns, pipes, floor vents, door jambs, fireplace hearths, and at transitions to other flooring types.
- Know the Size: Consult your laminate manufacturer’s instructions for the specific required gap size. It’s typically between 1/4 inch (6mm) and 3/8 inch (10mm), but can sometimes be larger (e.g., 1/2 inch) for very large rooms or specific products. Using a gap smaller than recommended is risky.
- Use Spacers During Installation: The easiest way to maintain a consistent gap while laying the planks is to use spacers. These are small wedges (often plastic, sometimes wood) that you place between the edge of the laminate planks and the wall or obstacle.
- Place spacers along the starting wall before laying the first row.
- Place spacers at the end of each row.
- Place spacers along the finishing wall as you approach it.
- Use enough spacers to prevent the flooring from shifting and closing the gap as you work (e.g., every couple of feet along walls and at corners).
- Maintain Gaps at Obstacles: When cutting planks to fit around obstacles (pipes, vents, etc.), remember to cut the opening slightly larger than the obstacle itself to allow for expansion around it. The same gap size required at the perimeter should generally be maintained around internal obstacles.
- Intermediate Expansion Joints (T-Molding): For very large rooms or long continuous runs, manufacturers often specify a maximum length or area (e.g., over 30-40 feet in length or width, or areas exceeding a certain square footage) that can be installed without an intermediate expansion joint. This joint is typically created using a T-molding installed in a straight line across the floor (often in a doorway or a less conspicuous location), effectively dividing the large area into smaller sections that can expand and contract independently. Check your manufacturer’s guidelines for these limits.
- Covering the Gaps: The expansion gaps are necessary for function but are not meant to be visible in the finished installation. They are covered by:
- Baseboards and/or Quarter Round/Shoe Molding: Along walls, these trim pieces are installed over the edge of the laminate, covering the gap. Remember to nail the trim to the wall, not the floor.
- Transition Strips (T-Molding, Reducers, End Caps): Used at doorways, against sliding doors, or when meeting other flooring types. These are designed to cover the gap while allowing movement.
- Pipe Collars (Escutcheons): Decorative rings that fit around pipes to cover the expansion gap drilled around them.
- Flexible Caulking (Specific Cases): In some situations where traditional trim isn’t feasible or desired (e.g., against a rough stone fireplace hearth), a 100% silicone or flexible flooring caulk might be used carefully in the gap. However, ensure it remains flexible and doesn’t restrict floor movement. Check manufacturer recommendations before using caulk.
- Remove Spacers Before Trim: Once the flooring installation is complete (or just before installing the final trim), remove all the spacers.
Correctly managing expansion gaps is fundamental to the “floating floor” concept. It ensures the floor can adapt to environmental changes without damage, preserving the integrity and appearance of your installing laminate flooring project for the long term. It’s a key detail in any laminate flooring guide.
Advanced Flooring Tips
Once you’ve mastered the basics of how to install laminate flooring, a few advanced tips can elevate your installation, help you tackle more complex situations, and achieve an even more professional finish. These advanced flooring tips go beyond the standard flooring installation tips.
- Planning for Complex Layouts: In rooms with multiple doorways, angles, or alcoves, spend extra time planning your starting point and plank direction. Aim to minimize awkward cuts and ensure continuous flow where possible. Sometimes starting in the middle of a complex area (using spline joints if necessary, though less common with modern click systems) or dry-laying several rows can help visualize the best approach.
- Working with Uneven Walls: Walls are rarely perfectly straight. If your starting wall is significantly bowed or uneven, simply placing the first row against it will result in a crooked installation.
- Scribing: Measure the widest gap between a straight chalk line (snapped where the first row’s outer edge should be) and the uneven wall. Set a compass or scribing tool to this width. Run the guide point of the compass along the wall while the pencil marks the corresponding contour onto the first row of planks (laid out but not locked). Cut along this scribed line with a jigsaw. This custom-fits the first row to the wall while ensuring its outward-facing edge (which subsequent rows lock into) is perfectly straight.
- Pattern Matching (Less Common with Laminate): While laminate often mimics natural wood with random patterns, some designs might have repeating patterns or specific visual features you want to manage. Be mindful of placing planks with identical prominent features (like large knots or color streaks) too close together. Mix planks from several different boxes during installation to ensure a more random and natural appearance.
- Installing on Stairs (Use Appropriate Products/Methods): Standard floating laminate installation methods are not suitable for stairs due to safety and movement issues. If you want laminate on stairs:
- You must use laminate products specifically designated as suitable for stairs by the manufacturer.
- Installation typically requires full glue-down of the laminate treads and risers directly to the stair structure.
- Specialized stair nosing pieces are required for the front edge of each step for safety and a finished look.
- This is a more advanced installation that requires careful cutting, gluing, and specific stair components. It’s often best left to professionals unless you have prior experience. Never float laminate on stairs.
- Enhanced Soundproofing: If reducing noise transmission is a high priority (e.g., in apartments or second floors), invest in a high-quality acoustic underlayment (dense felt, rubber, or thick cork). Ensure seams are well-taped. Some advanced techniques involve adding mass-loaded vinyl (MLV) or sound-dampening subfloor panels beneath the standard underlayment, but this adds significant complexity and cost and requires careful planning regarding floor height.
- Seamless Transitions Without T-Molding (Use with Caution): In some cases, experienced installers might run laminate continuously through doorways into adjacent rooms without using T-moldings, provided the total continuous area doesn’t exceed manufacturer limits and the layout allows for it. This requires meticulous planning, ensuring planks align perfectly through the doorway, and often involves undercutting both sides of the door jambs extensively. It carries a higher risk of buckling if expansion limits are pushed. It’s generally safer and recommended practice, especially for DIY, to use T-moldings in doorways.
- Dealing with Out-of-Square Corners: If room corners are not perfect 90-degree angles, your miter cuts for trim (baseboards, quarter round) will need to be adjusted accordingly. Use an angle finder tool to determine the actual corner angle, then bisect that angle to find the correct miter setting for each piece of trim meeting at that corner (e.g., for a 92-degree corner, each piece needs a 46-degree cut).
These advanced techniques require more skill, planning, and sometimes specialized tools. While not always necessary for a standard laminate installation, they can be useful for achieving superior results in challenging situations.
Flooring Guide Summary
This comprehensive flooring guide has walked you through the entire process of how to install laminate flooring, from initial planning to final touches. Let’s summarize the key stages and takeaways for a successful DIY laminate flooring project:
- Preparation is Paramount:
- Acclimation: Allow flooring to adjust to room conditions for at least 48 hours.
- Subfloor: Ensure the subfloor is clean, dry, structurally sound, and flat within manufacturer tolerances (typically 3/16″ over 10′). Address moisture issues, especially on concrete.
- Underlayment: Use the correct type (with vapor barrier if needed) unless flooring has it pre-attached. Install properly, taping seams.
- Tools: Gather all necessary measuring, cutting, installation, and safety tools beforehand.
- Installation Process:
- Layout: Plan plank direction and starting wall. Check for potential narrow last row and adjust the first row width if needed.
- Expansion Gaps: Maintain the manufacturer-specified gap (e.g., 1/4″-3/8″) around the entire perimeter and all fixed objects using spacers.
- First Row: Ensure it’s perfectly straight. Trim tongue edge if needed (check instructions).
- Laying Planks: Engage locking systems correctly (angle-angle, angle-drop, tap). Stagger end joints adequately (e.g., 12″+ offset). Use tapping block/pull bar gently.
- Cutting: Use appropriate saws (jigsaw, circular, miter, laminate cutter) and blades for clean, accurate cuts. Remember safety gear. Cut finished side down with circular saw, often up with jigsaw (using down-cut blade).
- Obstacles: Undercut door jambs. Carefully cut around vents, pipes, etc., maintaining expansion gaps.
- Finishing:
- Trim: Install baseboards, quarter round/shoe molding, and transition strips (T-molding, reducers, end caps) to cover expansion gaps. Nail trim to walls, NOT the floor.
- Clean-up: Remove spacers, clean the floor thoroughly using manufacturer-approved methods (sweep, vacuum, damp mop).
- Protection: Apply felt pads to furniture legs. Use walk-off mats at entrances.
- Key Principles:
- Follow Manufacturer Instructions: Your specific product’s guide is the ultimate authority.
- Float the Floor: Do not nail, screw, or glue the main field of laminate planks to the subfloor. Allow it to move.
- Patience and Precision: Take your time, measure carefully, and ensure joints are tight and rows are straight.
By following these steps and guidelines detailed in this laminate flooring guide, you can confidently tackle your flooring installation project and achieve durable, beautiful results. Learning how to lay laminate is a manageable skill for many homeowners, offering significant savings and satisfaction.
DIY Laminate Flooring
One of the primary appeals of laminate flooring is its suitability for do-it-yourself installation. Many homeowners choose to install laminate flooring themselves to save money and gain the satisfaction of completing a significant home improvement project. The click-lock installation systems used by most modern laminates are specifically designed to be accessible to those with moderate DIY skills. This section explores the cost-effectiveness of DIY laminate flooring versus hiring professionals and helps you decide which route is best for your situation. Undertaking a DIY laminate flooring installation can be a rewarding experience, transforming the look and feel of your home.
Is DIY Laminate Flooring Installation Cost-Effective?
For many homeowners, the answer is a resounding yes. DIY laminate flooring installation can be significantly more cost-effective than hiring professionals. Here’s a breakdown of the cost factors:
- Material Costs: This cost is the same whether you DIY or hire a pro. You’ll need to purchase the laminate flooring planks, underlayment (if not attached), transition strips, and possibly trim like quarter round. Prices for laminate vary widely based on quality, thickness, brand, AC rating, and style, typically ranging from $1 to $5+ per square foot. Underlayment adds roughly $0.30 to $1.00+ per square foot.
- Tool Costs: If you’re doing a DIY installation, you’ll need the necessary tools. If you already own basic tools like a tape measure, hammer, and utility knife, the main costs will be for specialized items:
- Cutting Tool: Renting or buying a miter saw ($100-$300+ purchase, ~$30-$50/day rental), laminate cutter ($100-$200+ purchase, ~$20-$40/day rental), or using a jigsaw/circular saw you might already own (blades are inexpensive).
- Installation Kit: Tapping block, pull bar, and spacers often come in a kit ($15-$30).
- Safety Gear: Glasses, gloves, knee pads, dust mask (relatively inexpensive).
- Subfloor Prep Tools (if needed): Renting grinders or sanders, purchasing patching compound can add costs if significant prep is required.
- Total Tool Cost: For a typical project, if you need to buy/rent several key items, tool costs might range from $50 to $250+. This is a one-time or short-term cost, and tools can be reused for future projects.
- Labor Costs (The Big Savings): This is where DIY shines. Professional flooring installation labor costs vary by location but typically range from $1.50 to $4.00+ per square foot just for basic laminate installation. Costs can increase for complex layouts, significant subfloor preparation, removal of old flooring, stair installation, or extensive trim work.
- Example: For a 500 square foot area, professional labor could cost anywhere from $750 to $2000+, in addition to material costs. By doing it yourself, you save this entire labor cost.
Cost-Effectiveness Calculation:
Compare the potential labor savings ($750-$2000+ in the example) to your estimated tool costs ($50-$250+). The net savings are substantial, often running into many hundreds or even thousands of dollars, especially for larger projects.
Factors Affecting DIY Cost-Effectiveness:
- Project Size: The larger the area, the greater the potential labor savings.
- Your Skill Level & Time: If you lack basic skills or the project requires extensive subfloor repair you can’t handle, DIY might become frustrating or lead to costly mistakes. Value your time – DIY takes longer than hiring pros.
- Tool Availability: If you need to buy many expensive tools for a small project, the savings diminish. Renting is often a good compromise.
- Complexity: Simple square rooms are easier and faster than rooms with many angles, obstacles, or stairs.
Conclusion: Generally, DIY laminate flooring installation is highly cost-effective, offering significant savings compared to professional installation, provided you have the basic skills, time, patience, and necessary tools (or can rent them affordably). The primary investment is your own time and effort.
When Should You Hire Professionals for Flooring Installation?
While DIY laminate flooring is achievable for many, there are situations where hiring professional installers is the wiser choice. Professionals bring experience, specialized tools, efficiency, and often offer warranties on their workmanship. Consider hiring pros for your flooring installation if:
- Significant Subfloor Issues: If your subfloor requires extensive leveling (e.g., pouring large amounts of self-leveling compound), structural repairs, or major moisture remediation, professionals have the expertise and equipment to handle this correctly. Poor subfloor prep by a novice can ruin the entire job.
- Complex Room Layout: Rooms with many angles, curves, alcoves, multiple levels, or intricate patterns can be challenging for DIYers. Professionals are adept at handling complex cuts and layouts efficiently.
- Stair Installation: Installing laminate on stairs requires specific techniques (usually glue-down), specialized stair nosing components, and precise cutting. Due to safety implications and complexity, this is often best left to experienced installers.
- Lack of Time: A DIY installation takes considerable time, especially for larger areas or if you’re learning as you go. If you have a tight deadline or simply don’t have multiple days or weekends to dedicate to the project, hiring pros who can often complete the job much faster is beneficial.
- Lack of Necessary Tools and Unwillingness to Purchase/Rent: If you don’t own basic power tools and aren’t comfortable buying or renting saws, installation kits, etc., the cost and learning curve might outweigh the savings.
- Physical Limitations: Laminate installation involves a lot of kneeling, bending, lifting, and precise cutting. If you have physical limitations that make this difficult or unsafe, hiring professionals is recommended.
- Desire for Professional Finish and Warranty: While DIY can achieve great results, professionals often achieve a higher level of finish, especially with trim work and complex cuts. Reputable installers usually warranty their labor, providing recourse if installation-related issues arise later (material warranties still depend on proper installation, however).
- High-End Materials: If you’ve invested in very expensive laminate flooring, you might prefer the peace of mind that comes with professional installation to ensure it’s done perfectly and the material warranty isn’t compromised by installation errors.
- Low Confidence or High Stress: If the thought of tackling the project fills you with anxiety or you lack confidence in your DIY abilities, hiring it out can save you stress and potential frustration.
Finding a Good Installer: If you decide to hire out, get multiple quotes, check references and reviews, verify insurance and licensing (if applicable in your area), and get a detailed written contract outlining the scope of work, materials, timeline, and costs.
Ultimately, the decision between DIY laminate flooring and hiring pros depends on your budget, skills, time availability, project complexity, and comfort level. Weigh the pros and cons carefully based on your specific circumstances.
Home Improvement Gains
Installing new flooring, whether DIY or professionally done, is a significant home improvement project that offers numerous benefits beyond just covering the subfloor. New laminate flooring can dramatically transform the aesthetics and functionality of your space, contributing to both personal enjoyment and potential property value.
- Enhanced Aesthetics: This is often the primary motivation. Old, worn-out carpet, dated vinyl, or damaged floors can make an entire house feel tired. Replacing them with fresh, modern laminate flooring instantly updates the look and feel of a room. Laminate offers a vast array of styles, colors, and textures mimicking wood, stone, or tile, allowing you to achieve nearly any desired look, from rustic farmhouse to sleek contemporary.
- Increased Property Value: New flooring is consistently ranked as one of the home improvements that provide a good return on investment (ROI). Buyers often prefer hard surface flooring over carpet, and updated floors make a strong positive impression. While laminate might not add as much value as genuine hardwood in some markets, attractive, well-installed laminate is a definite plus compared to old or damaged flooring, potentially increasing resale value and making the home more marketable.
- Improved Functionality and Durability: Laminate flooring is known for its durability and resistance to scratches, stains, and fading, especially higher-quality products with good AC ratings. This makes it a practical choice for busy households with pets or children. It’s generally easier to clean than carpet.
- Better Indoor Air Quality: Unlike carpet, which can trap dust, allergens, pet dander, and mold spores, laminate flooring provides a hard surface that doesn’t harbor these irritants as easily. Regular cleaning can maintain better indoor air quality, which is beneficial for allergy and asthma sufferers.
- Personal Satisfaction (DIY Gain): For those who undertake a DIY laminate flooring installation, there’s a significant sense of accomplishment and pride in completing a major project yourself. Seeing the tangible results of your effort and knowing you saved money adds to the satisfaction.
- Cost-Effective Upgrade: Compared to options like solid hardwood or natural stone tile, laminate provides a similar aesthetic at a much lower price point for both materials and installation (especially DIY), making it an accessible way to achieve a high-impact home improvement.
Investing in new flooring like laminate is more than just a maintenance task; it’s an upgrade that enhances your living environment daily and can provide tangible financial benefits when it’s time to sell. The visual and practical gains make it a popular choice for homeowners looking to improve their space.
Post-Installation: Cleaning and Repairing Laminate Flooring
Your beautiful new laminate floor is installed! Now, the focus shifts to keeping it looking great for years to come. Proper care and maintenance are essential for preserving the appearance and longevity of laminate flooring. Luckily, laminate is relatively low-maintenance compared to some other flooring types. This section covers the best way to clean laminate flooring, how to repair scratches or damage, and whether removing laminate flooring is feasible if needed. Following these post-installation guidelines ensures your laminate floors remain a highlight of your home.
What is the Best Way to Clean Laminate Flooring After Installation?
Proper cleaning laminate flooring techniques are crucial to avoid damage. Water is the main enemy, as excessive moisture can seep into seams and cause planks to swell, warp, or buckle. Harsh chemicals and abrasive tools can also damage the protective wear layer.
Initial Cleaning (Immediately After Installation):
- As mentioned in the finishing steps, start by thoroughly sweeping with a soft broom or dust mopping to remove all installation debris and dust.
- Follow up with a vacuum cleaner using a hard floor attachment (no beater bar).
- Perform a final clean using a microfiber mop that is only slightly damp (well wrung-out). You can use plain water or, preferably, a pH-neutral cleaner specifically formulated and approved by the laminate manufacturer. Spray the cleaner lightly onto the mop head, not directly onto the floor.
Regular Cleaning Routine:
- Frequent Dusting/Sweeping: The best defense against scratches and dullness is to remove dirt and grit regularly. Sweep, dust mop (microfiber dust mops are excellent), or vacuum (hard floor setting, no beater bar) daily or every few days, depending on foot traffic.
- Spot Cleaning: Clean up spills immediately using a slightly damp cloth or paper towel. Don’t let liquids sit on the floor. For sticky spots or tougher marks, use a cloth dampened with the manufacturer-approved cleaner or a mixture of water and a tiny amount of vinegar (test in an inconspicuous area first). Rub gently.
- Occasional Damp Mopping: For a deeper clean, damp mop the floor as needed (e.g., weekly or bi-weekly). Again, use a microfiber mop wrung out until it’s almost dry. Use only water or the recommended laminate cleaner. Mop in the direction of the planks. Avoid soaking the floor – it should dry within a minute or two.
- Avoid:
- Excessive Water: Never flood the floor or use a soaking wet mop.
- Steam Cleaners: The heat and moisture from steam cleaners can damage laminate flooring and often void warranties.
- Abrasive Cleaners: Avoid powders, steel wool, or scouring pads.
- Wax or Polish: Laminate flooring has a protective wear layer; waxes and polishes are unnecessary and can create a dull, slippery buildup that’s difficult to remove.
- Oil Soaps or Strong Detergents: These can leave residues or damage the finish. Stick to manufacturer-approved cleaners or plain water.
Preventative Measures:
- Use walk-off mats at entrances.
- Apply felt pads under furniture legs.
- Lift, don’t drag, heavy furniture.
- Trim pet nails regularly.
Following these steps is the best way to clean laminate flooring and maintain its beauty without causing harm. Always refer to your specific laminate manufacturer’s care guide for the most accurate recommendations.
How Do You Repair Scratches or Damage on Laminate Floors?
Despite laminate’s durability, accidents happen, and scratches or minor damage can occur. Repairing laminate flooring depends on the severity of the damage:
Minor Scratches or Scuffs:
- Cleaning: Sometimes, what looks like a scratch is just a scuff mark or residue. Try cleaning the area first with a damp microfiber cloth and approved cleaner.
- Repair Kits/Markers: For light surface scratches that haven’t penetrated the wear layer deeply, laminate floor repair kits are available. These usually include wax sticks or putty in various colors matching common laminate finishes, along with markers or crayons.
- Clean the scratch area thoroughly.
- Select the wax stick or marker color that most closely matches your floor.
- Rub the wax stick firmly over the scratch until it’s filled, or use the marker to color it in.
- Use the leveling tool often included in kits (or a plastic putty knife) to gently scrape away excess wax, making it flush with the floor surface.
- Buff the area gently with a soft, clean cloth.
- Test in an inconspicuous area first if possible.
Deeper Scratches, Gouges, or Chips:
- Fillers/Putty: For deeper gouges or chips that go through the wear layer into the decorative layer or core, the wax/putty from repair kits can still be used. You might need to layer it carefully or mix colors to get a good match. It may not be a perfect repair, but it can make the damage much less noticeable and help seal the core from moisture.
- Plank Replacement: This is the most effective but also the most involved method for significant damage like deep gouges, burns, water damage (swelling), or cracked planks. Because laminate is a floating floor with interlocking planks, replacing a single plank in the middle of the floor is challenging.
- Process:
- Carefully remove the baseboard or trim along the wall closest to the damaged plank, starting from the end of the installation.
- Methodically unlock and remove the rows of planks one by one, working from the wall inwards, until you reach the row containing the damaged plank. Keep track of the order and orientation of the planks you remove.
- Remove the damaged plank.
- Insert a new, identical plank (hopefully, you saved extras from the original installation!).
- Reinstall the previously removed planks in reverse order, locking them back into place row by row until you reach the wall.
- Reinstall the baseboard or trim.
- Alternative (Advanced): Some professionals have techniques to cut out and replace a single plank without disassembling the floor, involving precise cutting of the damaged plank’s locking mechanism and gluing a new plank (with modified edges) into place. This is difficult to do correctly without experience and carries risks.
- Prevention: Always save several extra boxes/planks from your original installation batch. Dye lots can vary, making it hard to find an exact match later if needed for repairs.
- Process:
For minor issues, repair kits offer a simple laminate flooring tip for quick fixes. For major damage, plank replacement is often necessary, highlighting the importance of saving extra material.
Can You Remove Laminate Flooring Easily?
Yes, one of the advantages of floating laminate floors is that removing laminate flooring is generally much easier and less messy than removing flooring types that are glued or nailed down, like traditional hardwood, tile, or glued vinyl.
The Removal Process:
- Prepare the Room: Clear all furniture and objects from the floor.
- Remove Trim: Carefully pry off the baseboards, quarter round, shoe molding, and any transition strips around the perimeter of the room and in doorways. Use a pry bar with a putty knife or thin piece of wood behind it to protect the wall from damage. Remove any nails left in the walls or trim.
- Start Disassembly: Choose a starting point, usually along the wall where the installation finished (the last row laid).
- Lift and Unlock: Gently lift the edge of the first plank in the last row at an angle. This should disengage its long edge joint from the previous row. Slide it out.
- Disconnect End Joints: Once the long edge is free, the short end joint connecting it to the next plank in the same row should disconnect easily, often by simply lifting or sliding.
- Work Backwards: Continue removing planks row by row, working back towards the starting wall of the original installation. Most click-lock systems disengage relatively easily when lifted at the correct angle. Some might require a slight wiggle or tap.
- Underlayment: Once all laminate planks are removed, roll up or remove the underlayment and any separate vapor barrier film.
- Clean Up: Sweep or vacuum the subfloor to remove any remaining debris.
Ease of Removal Factors:
- Locking System: Some locking systems might be slightly trickier to unlock than others, but most are designed for potential disassembly.
- Condition: If the floor has suffered significant water damage and swelling, planks might be harder to separate.
- Care: Work carefully to avoid unnecessarily damaging the planks, especially if you hope to reuse them elsewhere (e.g., in a shed or basement) or sell/donate them. While reusable, repeated installation/removal can stress the locking mechanisms.
Compared to the labor-intensive and often destructive removal of glued-down floors or tile (which involves scraping, chipping, and dealing with adhesive residue or thin-set mortar), removing floating laminate is a relatively straightforward process suitable for DIY. This ease of removal adds to its appeal for renters (where allowed) or those who anticipate changing flooring styles in the future.
Maintaining Your New Floor
Maintaining your new laminate floor involves consistent, simple practices that protect it from damage and keep it looking its best. Long-term care builds upon the cleaning methods already discussed.
- Consistent Cleaning Routine: Stick to regular sweeping, dust mopping, or vacuuming (hard floor setting) to remove abrasive grit. Damp mop only when necessary, using approved cleaners and minimal moisture.
- Protect from Scratches:
- Furniture Pads: Keep felt pads on all furniture legs and check/replace them periodically as they wear out or collect grit.
- Lift Furniture: Never drag heavy furniture across the floor. Lift it or use furniture sliders designed for hard surfaces.
- Pet Nails: Keep pets’ nails trimmed.
- Shoes: Consider a “no shoes indoors” policy, or at least avoid high heels or shoes with embedded rocks/gravel.
- Manage Spills and Moisture:
- Wipe Spills Immediately: Don’t let liquids sit on the surface, especially near seams.
- Use Mats: Place walk-off mats at all exterior doors to trap dirt and moisture. Use mats in potentially wet areas like near sinks or pet bowls (ensure mats are breathable and don’t trap moisture underneath). Avoid rubber-backed mats that might discolor the floor.
- Humidity Control: Maintain stable indoor humidity levels (typically 35-65%) year-round using humidifiers or dehumidifiers if necessary. Extreme humidity swings can cause excessive expansion or contraction.
- Protect from Sunlight: Prolonged, direct exposure to strong sunlight can cause some laminate flooring to fade over time. Use curtains, blinds, or UV-protective window film to minimize direct sunlight exposure, especially during peak hours. Occasionally rearranging rugs and furniture can also help ensure even light exposure.
- Regular Inspection: Periodically check for any signs of wear, damage, or loose trim. Addressing small issues promptly can prevent them from becoming bigger problems.
By incorporating these simple maintaining your new floor habits into your routine, you can ensure your laminate flooring investment remains beautiful and functional for its intended lifespan. Proper care is key to enjoying your laminate floors for many years.
Flooring Laminate Choices and Considerations?
Before you even get to the how to install laminate flooring stage, selecting the right laminate product for your needs and preferences is crucial. The term flooring laminate encompasses a wide range of products varying in durability, appearance, water resistance, and price. Understanding these differences and considering key factors will help you make an informed choice that aligns with your lifestyle, budget, and aesthetic goals. This involves comparing laminate to other flooring types and knowing what specific features to look for in the laminate itself.
How Does Laminate Compare to Other Flooring Types?
Laminate flooring occupies a popular niche in the market, offering a balance of features. Here’s how it generally compares to other common flooring options:
Laminate vs. Solid Hardwood:
- Appearance: Laminate mimics hardwood very effectively using a photographic layer, but lacks the unique grain variation and feel of real wood. Hardwood is authentic wood throughout.
- Durability: High-quality laminate is often more scratch and dent resistant than many hardwoods due to its tough wear layer. Hardwood can be scratched/dented more easily but can be sanded and refinished multiple times; laminate cannot.
- Water Resistance: Standard laminate is susceptible to water damage. Hardwood is also sensitive to moisture but can sometimes tolerate minor spills better if sealed well. Neither is ideal for wet areas. (Some newer laminates offer enhanced water resistance).
- Installation: Laminate’s click-lock floating system is much easier for DIY than nail-down or glue-down hardwood installation.
- Cost: Laminate is significantly less expensive than solid hardwood for both materials and installation.
- Maintenance: Both require similar cleaning (sweeping, damp mop). Hardwood may require periodic resealing or refinishing.
Laminate vs. Engineered Hardwood:
- Appearance: Engineered hardwood has a real wood veneer top layer, offering authentic wood look and feel, often indistinguishable from solid hardwood. Laminate is a photographic image.
- Durability: Laminate’s wear layer is typically tougher against scratches. Engineered hardwood’s top layer behaves like solid wood (can scratch/dent) but its core offers more dimensional stability than solid wood. Some engineered woods can be refinished once or twice; laminate cannot.
- Water Resistance: Similar limitations to laminate and solid hardwood for standard products. Both are better than standard laminate in terms of core stability with humidity changes.
- Installation: Many engineered hardwoods also use click-lock floating systems, making installation difficulty comparable to laminate. Some are glued or nailed.
- Cost: Engineered hardwood is generally more expensive than laminate but less expensive than solid hardwood.
Laminate vs. Luxury Vinyl Plank (LVP)/Luxury Vinyl Tile (LVT):
- Appearance: Both offer realistic wood and stone looks. High-end LVP can be very convincing. Laminate sometimes offers slightly sharper image clarity. LVP often has more texture options.
- Durability: Both are very durable. LVP is generally considered more dent-resistant. Scratch resistance is comparable, depending on the quality and wear layer thickness of each.
- Water Resistance: This is a key difference. Most LVP/LVT products are waterproof or highly water-resistant due to their vinyl core, making them suitable for kitchens, bathrooms, and basements where standard laminate is not recommended. Laminate is improving, but typically only offers water resistance for topical spills for a limited time.
- Installation: Both primarily use click-lock floating systems, making DIY installation similar.
- Cost: Prices overlap significantly. Basic laminate might be cheaper than basic LVP, but mid-to-high range products are often similarly priced.
- Comfort/Sound: LVP can feel slightly softer and quieter underfoot than laminate, though quality underlayment helps laminate.
Laminate vs. Ceramic/Porcelain Tile:
- Appearance: Tile offers authentic stone or ceramic looks, or unique patterns. Laminate mimics these but isn’t the real thing.
- Durability: Tile is extremely durable, scratch-resistant, and fully waterproof. However, it can chip or crack if heavy objects are dropped on it. Grout lines require sealing and cleaning.
- Water Resistance: Tile is waterproof, making it ideal for bathrooms and kitchens.
- Installation: Tile installation is much more labor-intensive, messy (mortar, grout), and difficult for DIYers than laminate.
- Cost: Material costs for tile vary widely but can be comparable to mid-range laminate. Installation costs for tile are significantly higher.
- Comfort/Sound: Tile is hard and cold underfoot and can be noisy without rugs. Laminate with underlayment is generally warmer and quieter.
Laminate vs. Carpet:
- Appearance: Offers vastly different aesthetics. Carpet provides softness and warmth. Laminate offers wood/stone looks.
- Durability: Laminate is generally more durable and resistant to wear and stains than carpet. Carpet can snag, stain, and crush over time.
- Water Resistance: Laminate handles spills better than carpet (if cleaned quickly). Carpet absorbs spills and can harbor mold/mildew if not dried properly.
- Installation: Both can be DIY projects, but stretching carpet requires specialized tools. Laminate installation is often considered easier for beginners.
- Cost: Costs overlap. Inexpensive carpet and laminate are comparable; high-end versions of both exist.
- Maintenance/Health: Laminate is easier to clean and better for allergies. Carpet requires frequent vacuuming and periodic deep cleaning and traps allergens.
- Comfort/Sound: Carpet is much softer, warmer, and quieter underfoot.
This comparison highlights that laminate flooring offers a strong balance of aesthetics, durability, DIY-friendliness, and cost, making it a versatile choice, though its primary weakness compared to LVP or tile is its sensitivity to moisture in standard forms.
What Should I Know Before I Install Laminate?
Before purchasing and proceeding with install laminate flooring, consider these important factors about the product itself:
- AC Rating (Abrasion Class): This rating indicates the laminate’s durability and resistance to abrasion, impacts, stains, and burns. It’s a crucial indicator of quality and suitability for different traffic levels.
- AC1 (Moderate Residential): Suitable for low-traffic areas like bedrooms or closets. (Less common now).
- AC2 (General Residential): Suitable for moderate-traffic areas like living rooms or dining rooms. (Less common now).
- AC3 (Heavy Residential / Moderate Commercial): A good standard for all residential areas, including high-traffic zones like hallways and kitchens. Also suitable for light commercial use. (Most common residential choice).
- AC4 (General Commercial): Suitable for heavier residential use and general commercial applications like offices, cafes, or boutiques. Offers increased durability.
- AC5 (Heavy Commercial): Designed for heavy commercial traffic like department stores or public buildings. Very durable.
- Recommendation: For most homes, choose AC3 or AC4 for the best balance of durability and cost. Avoid AC1/AC2 for main living areas.
- Thickness: Laminate plank thickness is measured in millimeters (mm), typically ranging from 6mm to 12mm or even 14mm. This measurement usually includes the core and top layers but may or may not include pre-attached padding (check specs).
- Thicker is Generally Better: Thicker planks (10mm-12mm) tend to feel more substantial and solid underfoot, offer better sound absorption, are more forgiving of minor subfloor imperfections, and often have more robust locking mechanisms.
- Minimum Recommendation: Aim for at least 8mm thickness for main living areas. 6mm or 7mm might be acceptable for very low-traffic areas or tight budgets, but may feel less durable.
- Core Material: The core provides structural integrity and moisture resistance. Most laminates use High-Density Fiberboard (HDF). Look for HDF cores, as Medium-Density Fiberboard (MDF) is less durable and less resistant to moisture. Some premium products might advertise special water-resistant HDF cores.
- Locking System Quality: While most use click-lock, the precision and robustness of the system can vary. Reputable brands often have well-engineered locking systems that are easier to install and provide tighter, more durable joints. Reading reviews can sometimes offer insight into the ease of installation related to the locking mechanism.
- Water Resistance Features: If you need flooring for areas prone to occasional spills (kitchens, entryways, half-baths), look for laminate specifically marketed as “water-resistant” or “waterproof.” These products often feature:
- Tighter locking systems.
- Waxed or sealed edges/joints.
- More moisture-resistant HDF cores.
- Specific installation requirements (like perimeter sealing).
- Important: Understand the warranty limitations. “Water-resistant” usually covers topical spills for a specified time (e.g., 24-72 hours), not flooding or leaks from underneath. True “waterproof” laminate (less common, often overlaps with vinyl core products) offers more protection. Standard laminate should not be used in full bathrooms or areas with frequent water exposure.
- Pre-Attached Underlayment: Check if the product includes attached padding. This can save time and money, but ensure the attached pad is suitable for your needs (e.g., thickness, sound dampening). Remember, you might still need a separate vapor barrier over concrete even with attached padding. Don’t double up underlayment.
- Warranty: Review the manufacturer’s warranty. Look at the duration (e.g., 15 years, 25 years, lifetime residential) and what it covers (e.g., staining, fading, wear-through, joint integrity). Note that warranties are contingent on proper installation according to guidelines and don’t cover damage from improper maintenance, excessive moisture, or scratches.
- Style, Color, and Texture: Consider the aesthetics. Get samples to see how they look in your room’s lighting. Consider plank width (wider planks can make small rooms feel larger) and edge details (beveled edges define individual planks more, square edges give a seamless look). Textures range from smooth to embossed-in-register (EIR), where the texture aligns with the printed wood grain image for enhanced realism.
- Calculate Quantity: Measure your room(s) accurately (length x width = square footage). Add 5-10% extra for cutting waste (more for complex layouts or diagonal installations). It’s crucial to buy enough from the same dye lot initially, as colors can vary slightly between batches. Saving extra planks is vital for future repairs.
Considering these factors before buying your flooring laminate ensures you select a product that meets your practical needs and aesthetic desires, setting the stage for a successful laminate installation.
Laminate Grades
As mentioned previously, the AC rating (Abrasion Class) is the standard measure used to grade laminate flooring durability. Understanding these laminate grades is crucial for selecting a floor that will withstand the traffic levels in the intended area. The ratings are determined through standardized tests (European Standard EN 13329) that assess resistance to abrasion, impact, staining, burns, and furniture leg indentation.
Here’s a more detailed look at the AC ratings:
- AC1 (Moderate Residential): Designed for light foot traffic areas within a home.
- Examples: Bedrooms, walk-in closets.
- Characteristics: Lowest durability, often thinner, less expensive. Not commonly recommended or found for general use.
- AC2 (General Residential): Suitable for moderate foot traffic areas.
- Examples: Dining rooms, living rooms (with average use).
- Characteristics: Better durability than AC1, but still considered light-duty. Also less common now as AC3 has become the standard residential baseline.
- AC3 (Heavy Residential / Moderate Commercial): The most common grade for residential use, suitable for all traffic levels within a home. Also durable enough for light commercial settings.
- Examples: All residential areas including hallways, kitchens, family rooms, home offices. Light commercial like hotel rooms, small offices.
- Characteristics: Good balance of durability and cost. Widely available in various styles. The recommended minimum for most homes.
- AC4 (General Commercial): Designed for residential use in all areas and for moderately busy commercial applications.
- Examples: Busy homes, offices, cafes, boutiques, salons.
- Characteristics: Higher resistance to wear and impact than AC3. A good choice for active households or if seeking extra durability.
- AC5 (Heavy Commercial): Built to withstand heavy foot traffic in commercial environments.
- Examples: Department stores, public buildings, busy restaurants, schools.
- Characteristics: Highest level of durability commonly available. Often thicker with very tough wear layers. Can be used residentially for maximum durability, but might be overkill and more expensive.
- AC6 (Intensive Commercial): An even higher grade for extremely high-traffic industrial or commercial settings. Less common in standard retail.
Why AC Rating Matters: Choosing an appropriate AC rating ensures your floor won’t wear out prematurely under its expected usage. Installing an AC1 or AC2 floor in a busy hallway or kitchen will likely lead to visible wear much faster than an AC3 or AC4 product. Conversely, while AC5 offers maximum durability, it might be an unnecessary expense for a quiet bedroom. Matching the laminate grade to the application is key for long-term satisfaction and value. When evaluating laminate flooring, the AC rating is one of the most important technical specifications to check.
Laminate Styles
Beyond technical specifications like AC rating and thickness, laminate styles play a huge role in the selection process. Laminate flooring offers incredible versatility in mimicking various natural materials and providing diverse aesthetic options. Here are some key style elements to consider:
- Visuals (Wood, Stone, Tile Looks):
- Wood Look: This is the most popular category. Laminate can replicate countless wood species (oak, maple, hickory, pine, exotic woods), colors (from light whitewashed to dark espresso), and grain patterns (subtle, rustic, wire-brushed). High-definition printing technology allows for very realistic visuals.
- Stone Look: Laminate can mimic the appearance of natural stone like slate, travertine, marble, or granite. This offers the look of stone without the coldness, hardness, or difficult installation of real stone tile.
- Tile Look: Options replicating ceramic or porcelain tile are available, often in square or rectangular formats. Some even mimic grout lines. This provides a tile aesthetic with a warmer feel underfoot and easier installation.
- Texture: The surface texture significantly impacts the realism and feel of the laminate.
- Smooth/Satin: A simple, clean finish with minimal texture.
- Matte: A low-gloss finish that helps hide minor scratches and footprints.
- Embossed: A general texture is applied to the surface, adding some dimension but not necessarily matching the underlying visual pattern.
- Embossed-in-Register (EIR): This premium texture aligns precisely with the printed visual pattern (e.g., the texture follows the wood grain lines or knot contours). EIR provides the most realistic look and feel, closely mimicking natural wood or stone.
- Hand-Scraped/Distressed: Mimics the rustic look of older, hand-worked wood, often featuring deliberate markings, indentations, and variations.
- Wire-Brushed: Replicates the texture achieved by brushing wood with wire, subtly exposing the grain pattern.
- Plank Width and Length:
- Standard Widths: Typically range from 5 to 7 inches.
- Wide Planks: Planks wider than 7 inches (e.g., 8-10 inches) are increasingly popular, especially for larger rooms, creating a more open and contemporary feel.
- Narrow Planks: Less common now, but can create a more traditional look.
- Mixed Widths: Some styles come with planks of varying widths in the same box for a more randomized, reclaimed look.
- Length: Standard lengths are often around 48 inches, but longer planks (e.g., 60-72 inches or more) are available and can enhance the sense of flow and reduce the number of end joints.
- Edge Detail: The way the edges of the planks are finished affects the overall look.
- Square Edge: Planks fit flush against each other, creating a smooth, seamless appearance.
- Beveled Edge (or Micro-Bevel): Each plank has a slight angle or groove along its edges (V-groove). This defines individual planks more clearly, adding depth and realism, especially for wood looks. Micro-bevels are shallower than full bevels.
- Color and Shade: Laminate comes in virtually every color imaginable, from light, airy whites and grays to warm honeys and browns, rich reds, and deep blacks. Consider the room’s size, lighting, wall color, and furniture when selecting a color. Lighter colors can make a room feel larger and brighter; darker colors can add warmth and sophistication but may show dust more easily.
The vast array of laminate styles ensures that there’s a laminate flooring option to suit almost any interior design preference and functional need. Taking the time to explore samples and consider these stylistic elements will help you choose a floor you love.
Final Thoughts on Laminate
Laminate flooring stands out as a highly practical, attractive, and often budget-friendly flooring solution for modern homes. Its ability to convincingly mimic more expensive materials like hardwood and stone, combined with its impressive durability (when choosing the right AC rating) and relative ease of installation, makes it a compelling choice for homeowners undertaking home improvement projects.
As this guide has detailed, a successful laminate flooring installation hinges on careful preparation, adherence to manufacturer guidelines (especially regarding acclimation, subfloor prep, and expansion gaps), and methodical work during the laying process. While challenges like cutting around obstacles or ensuring perfect staggering exist, the click-lock systems make the core installation process accessible for many DIYers. Learning how to install laminate flooring empowers homeowners to transform their spaces significantly without necessarily incurring professional labor costs.
Post-installation, the low-maintenance nature of laminate floors is another key benefit. Simple routines involving regular sweeping and occasional damp mopping are usually sufficient to keep the floor looking great. Understanding how to handle minor repairs and taking preventative measures like using furniture pads further ensures longevity.
When choosing flooring laminate, considering factors like AC rating, thickness, water resistance features, and style allows you to select a product perfectly tailored to your needs and aesthetic vision. While newer options like LVP offer advantages in terms of water resistance, high-quality laminate remains a strong contender, particularly for its scratch resistance and often sharper visual clarity in wood looks.
Ultimately, whether you opt for a DIY laminate flooring project or hire professionals, laminate offers a pathway to achieving beautiful, durable floors that enhance your home’s value and your daily living experience. With the knowledge provided in this guide, you should feel well-equipped to approach your laminate flooring project with confidence, from selection through installation and maintenance.