How to Install a Shower Head
Upgrading your shower experience often starts with a simple yet impactful change: installing a new shower head. Whether you’re replacing an old, clogged fixture, aiming for better water pressure, seeking water-saving features, or simply want a more luxurious feel, learning how to install a shower head is a valuable DIY skill. This comprehensive guide will walk you through every step, from gathering the necessary tools and materials to performing the final leak check. We’ll cover the best way to install a shower head, troubleshoot common issues, and even touch upon how to replace a shower head if you’re upgrading an existing setup. This guide to installing a shower head aims to make the process straightforward, even for beginners undertaking their first bathroom fixture installation. Understanding the nuances of shower head installation ensures a secure, leak-free fit and years of enjoyable showers. This task is often considered one of the simpler plumbing projects, making it an excellent starting point for homeowners looking to tackle basic home maintenance. Follow this detailed how to install a shower head tutorial, and you’ll be enjoying your new shower fixture in no time. We’ll cover everything from the initial how to steps to specific shower head tips for a perfect installation of a shower head.
Tools and Materials Needed for Shower Head Installation
Before you begin the process of installing a shower head, gathering the right tools and materials is paramount. Having everything on hand prevents interruptions and ensures the job is done correctly and efficiently. Proper preparation is key to a successful shower head fitting and avoids potential damage to your new fixture or existing plumbing. This preparation phase is crucial for any shower gear installation, whether it’s a simple head replacement or part of a larger shower installation.
What Tools Do I Need to Install a Shower Head?
The specific tools required for installing shower heads can sometimes vary slightly depending on the type of shower head and the condition of your existing plumbing, but a standard set will cover most situations. You don’t typically need a vast array of specialized plumbing equipment for this common task. Here’s a breakdown of the essential tools:
- Adjustable Wrench or Pliers: This is arguably the most crucial tool. An adjustable wrench (often called a Crescent wrench) is ideal because you can adjust its jaws to fit the base of the old shower head and the new one precisely. Channel-lock pliers can also work, but be cautious as their teeth can easily scratch the finish of your fixtures. Look for wrenches with smooth jaws if possible, or be prepared to protect the fixture finish. The size needed is typically around 10-12 inches to provide adequate leverage without being overly cumbersome. You might need two wrenches – one to hold the shower arm steady while you loosen or tighten the shower head, preventing strain on the plumbing inside the wall. This is a critical part of learning how to install a shower head without causing damage.
- Soft Cloth or Rag: This serves multiple purposes. Primarily, you’ll use it to wrap around the base of the shower head or the shower arm when using a wrench or pliers. This protects the chrome, brushed nickel, bronze, or other finishes from scratches or gouges caused by the tool’s jaws. Trying to install a shower head without protecting the finish can lead to unsightly marks on your brand-new fixture. The cloth can also be used for cleaning the shower arm threads and wiping away any old sealant or debris. Keep a few clean rags handy.
- Stiff-Bristled Brush (Non-Metallic): An old toothbrush or a small nylon brush is perfect for cleaning the threads on the shower arm after removing the old head. Old plumber’s tape, mineral deposits (like limescale), and general grime can accumulate here, preventing the new shower head from sealing properly. Avoid using wire brushes, as they can damage the soft brass threads of the shower arm. Thorough cleaning is essential for a leak-free installation of shower head.
- Utility Knife or Scissors: This is needed for cutting the plumber’s tape cleanly. While you can sometimes tear the tape, a clean cut makes for a neater application.
- Safety Glasses (Optional but Recommended): While installing a shower head is generally safe, there’s always a small chance of dislodged debris or a sudden spray of residual water. Protecting your eyes is always a good practice when doing any home repair work.
- Step Stool or Ladder (If Necessary): Depending on the height of your shower arm, you might need a stable step stool or ladder to comfortably reach the connection point without overextending. Ensure it’s placed securely on the shower floor or tub bottom.
Having these tools ready before you start the shower head setup will streamline the entire process, making the installation of a shower head much smoother.
Essential Materials for Shower Head Fitting
Alongside the tools, a few key materials are necessary for ensuring a watertight seal and a successful shower head installation. These are inexpensive but vital components.
- New Shower Head: This is the main component, of course. Ensure you have the correct shower head you intend to install. Check that it includes all necessary parts, such as rubber washers or O-rings, as specified in its instructions. Sometimes, manufacturers include a small roll of plumber’s tape, but it’s often low quality, so having your own is recommended. Consider the type of head – fixed, handheld, rain, etc. – as this guide primarily covers standard fixed showerheads, though the basic principles apply broadly.
- Plumber’s Tape (Teflon Tape or Thread Seal Tape): This is non-negotiable for almost all shower head installations. This thin, white (usually) tape wraps around the male threads of the shower arm. It acts as both a lubricant, allowing the new shower head to thread on smoothly, and a sealant, filling the tiny gaps between the threads to prevent leaks. Using plumber’s tape is fundamental to knowing how to install a shower head correctly. We’ll discuss its application in detail later. Ensure you get tape specifically designed for plumbing applications; it’s readily available at any hardware store. PTFE (polytetrafluoroethylene) tape is the standard.
- Pipe Sealant (Optional Alternative/Supplement to Tape): Some plumbers prefer or supplement plumber’s tape with a liquid or paste pipe sealant (often called pipe dope). While plumber’s tape is sufficient for most shower head fittings, sealant can provide an extra layer of protection against leaks, especially on older or slightly damaged threads. However, it can be messier to apply and clean up. For a standard shower head installation, high-quality plumber’s tape applied correctly is usually perfectly adequate. If you opt for sealant, ensure it’s rated for potable (drinking) water systems. For the average DIYer learning how to install shower head, sticking with tape is simpler.
- Replacement Rubber Washer/O-Ring (If Needed): Most new shower heads come with a rubber washer or O-ring pre-installed inside the connector nut. This creates the primary seal against the end of the shower arm. Inspect your new shower head to ensure this washer is present and seated correctly. If it’s missing or damaged, or if your old shower head leaked due to a faulty washer, you might need to purchase a replacement. These are standard sizes and available at hardware stores. Never double up washers, and ensure the old one is completely removed.
Gathering these tools and materials is the first concrete step in your guide to installing a shower head. Proper preparation minimizes frustration and is the foundation of a successful install.
Preparing for the Installation: Removing the Old Head
Before you can install the new shower head, the old one must be removed. This part of the bathroom fixture installation process is usually straightforward but requires care to avoid damaging the shower arm – the pipe extending from the wall. This preparatory step is crucial whether you are doing a complete shower installation or just a simple shower head replacement.
Safely Removing Your Old Shower Fixture
Safety and preventing damage are key when removing the existing shower head. Follow these steps for a smooth removal:
- Turn Off the Water (Optional but Recommended): While you don’t strictly need to turn off the main water supply to the house just to change a shower head (the shower valve/faucet handles control the flow), doing so eliminates any risk of accidental water spray if the valve isn’t perfectly off or if there’s residual pressure. If you choose not to turn off the main supply, ensure the shower faucet handles (hot and cold) are firmly in the ‘off’ position. It’s also wise to briefly turn the faucet on and then off again to release any trapped water pressure in the system before you start loosening the old head.
- Protect the Tub/Shower Floor: Lay down an old towel or drop cloth in the bottom of your tub or shower stall. This protects the surface from scratches if you accidentally drop the old shower head or a tool. This is a simple but effective tip for any installing bathroom fixtures project.
- Position Your Wrench/Pliers: Place your adjustable wrench or channel-lock pliers around the base of the old shower head, where it connects to the shower arm. If the shower head has flat spots designed for a wrench, use those. If not, grip the round connector nut carefully.
- Protect the Finish (If Reusing/Careful): Even if you’re discarding the old head, it’s good practice to protect finishes. Wrap your soft cloth or rag around the connector nut before applying the wrench. This prevents scratching the old head and, more importantly, gets you in the habit for when you install the new one.
- Consider Using Two Wrenches: If the shower arm feels loose or if the old head is very tight, use a second wrench or pair of pliers to hold the shower arm steady. Place the second wrench (also potentially wrapped in a cloth) on the shower arm itself, close to the wall but *before* the threads. This counter-holds the arm, preventing the twisting force from being transferred to the pipe connections inside the wall, which could cause a serious leak. This is a crucial technique for safely fixing a shower head connection or performing a shower head replacement.
- Loosen the Old Shower Head: Turn the wrench on the shower head connector counter-clockwise (remember: “lefty-loosey, righty-tighty”). Apply steady, firm pressure. It might require some initial force to break the seal, especially if it’s been installed for a long time or has mineral buildup. Avoid sudden, jerky movements. If it’s extremely stubborn, double-check you’re turning it the correct way. You could also try applying a penetrating oil (like WD-40, used sparingly and wiped off thoroughly afterwards) around the connection and letting it sit for a few minutes, but this is usually unnecessary.
- Unscrew by Hand: Once loosened, you should be able to unscrew the old shower head the rest of the way by hand. Be prepared for a small amount of residual water to drip out.
- Inspect the Old Head: Take a quick look inside the connector of the old head. Is the old rubber washer still inside? Sometimes it stays stuck to the end of the shower arm. Make sure it’s completely removed. You don’t want two washers when you install the new head.
Successfully removing the old fixture without damaging the shower arm is a critical part of the how to replace a shower head process and prepares the way for the new installation.
Cleaning the Shower Arm Threads
With the old shower head removed, you’ll see the exposed male threads on the end of the shower arm. These threads are vital for creating a watertight seal with the new fixture. Over time, they accumulate old plumber’s tape, pipe dope residue, mineral deposits (limescale or calcium buildup), and sometimes even rust or corrosion. Thoroughly cleaning these threads is essential before you install the new shower head. Skipping this step is a common cause of leaks after a shower head installation.
- Initial Wipe-Down: Use a damp cloth to wipe away any loose debris, old tape fragments, or residual water from the threads and the end of the shower arm.
- Remove Old Plumber’s Tape: Carefully pick and peel off any remaining pieces of old plumber’s tape. It often gets stuck in the thread grooves. Use your fingernail or the edge of a plastic putty knife if needed, but avoid scratching the threads.
- Scrub the Threads: Take your stiff-bristled nylon brush (like an old toothbrush) and scrub the threads thoroughly. Focus on the grooves where buildup tends to collect. You can do this dry or slightly damp. For stubborn mineral deposits, you can dip the brush in white vinegar (acetic acid helps dissolve limescale) and scrub. Let the vinegar sit for a few minutes, then scrub again.
- Rinse (Optional but Recommended): If you used vinegar or if there’s a lot of dislodged debris, briefly turn the shower water on for a second or two (direct the flow into the tub/shower drain, perhaps using a bucket or covering with a rag) to flush the arm clean. Turn the water off again immediately. Be cautious doing this to avoid getting soaked.
- Final Wipe and Dry: Use a clean, dry cloth to wipe the threads one last time, ensuring they are clean and completely dry. The plumber’s tape needs a clean, dry surface to adhere properly.
- Inspect the Threads: Carefully examine the threads for any signs of damage, such as cross-threading, deep gouges, or significant corrosion. If the threads look severely damaged, the shower arm itself may need replacement (covered later). Minor imperfections are usually okay, as the plumber’s tape will compensate.
A clean, dry, and undamaged threaded end on the shower arm is the perfect surface for the next stage: applying new sealant tape and attaching the new shower head. This cleaning step is fundamental to the best way to install a shower head and prevent frustrating leaks down the line. It’s a detail often overlooked in quick how to install showerhead guides but critical for success.
How to Install a Shower Head: Step-by-Step Guide
Now that the old head is removed and the shower arm is prepped, you’re ready for the core task: the actual installation of a shower head. Following these steps carefully will ensure a secure, leak-free connection for your new fixture. This is the heart of the how to install a shower head guide.
Step 1: Prepare the Shower Arm
Preparation is key. Although we just cleaned the threads, this step involves ensuring everything is ready for the tape application.
- Confirm Cleanliness and Dryness: Give the threads one final visual inspection and touch. They must be clean and completely dry. Any moisture or residue will interfere with the plumber’s tape adhesion and sealing properties.
- Check the End of the Arm: Ensure the very end surface of the shower arm (the flat part the washer will seal against) is also clean and free of burrs or nicks that could compromise the washer seal. Gently file down any significant burrs if necessary, but usually, a simple wipe-down suffices.
- Have Tape Ready: Unroll a few inches of your plumber’s tape so it’s ready to apply. Make sure you know which direction to wrap it (we’ll cover this next).
This quick final check ensures the foundation for the shower head fitting is perfect.
Step 2: Apply Sealant Tape Correctly
Applying plumber’s tape (thread seal tape) correctly is arguably the most critical step in preventing leaks when you install a shower head. It seems simple, but there’s a right way and a wrong way.
- Direction Matters: This is crucial. You must wrap the tape around the threads in the *same direction* that the shower head will be screwed on. Since you screw the shower head on clockwise (“righty-tighty”), you need to wrap the tape clockwise as you look at the end of the shower arm. Hold the tape roll in one hand and the end of the tape against the thread with your other thumb. Start wrapping *over* the top of the arm, moving clockwise. If you wrap it counter-clockwise, the action of screwing on the shower head will tend to unwrap or bunch up the tape, defeating its purpose. This is a fundamental point in any how to install a shower head tutorial.
- Start Point: Begin wrapping on the second or third thread from the end of the arm. Don’t cover the very end opening of the pipe, as small pieces of tape could potentially break off and enter the shower head, causing clogs.
- Overlap and Tension: Wrap the tape tightly around the threads, pulling it taut so it conforms snugly into the thread grooves. Overlap each layer by about half the width of the tape. This ensures complete coverage.
- Number of Wraps: The common recommendation is 3 to 6 full wraps around the threads. The exact number depends on the thickness of the tape and the fit of the threads. Standard white PTFE tape usually requires 4-5 wraps. Too little tape won’t seal effectively; too much tape can make it difficult or impossible to thread the shower head on and might even risk cracking the female connector on the shower head. You want enough tape to fill the thread gaps but not so much that it prevents engagement. Experience helps here, but 4 wraps is a good starting point for a typical shower head installation.
- Coverage Area: Ensure you cover all the threads that the shower head will engage with. Stop wrapping just before the threads end near the base of the arm.
- Finish the Wrap: Once you have the desired number of wraps, pull the tape tight and snap it off, or cut it cleanly with a utility knife or scissors. Press the loose end down firmly against the wrapped tape so it doesn’t unravel.
- Smooth the Tape: Gently run your finger over the wrapped tape (in the clockwise direction) to ensure it’s pressed firmly into the threads and smooth.
Properly applied plumber’s tape is essential for a leak-proof install shower head job. Take your time with this step.
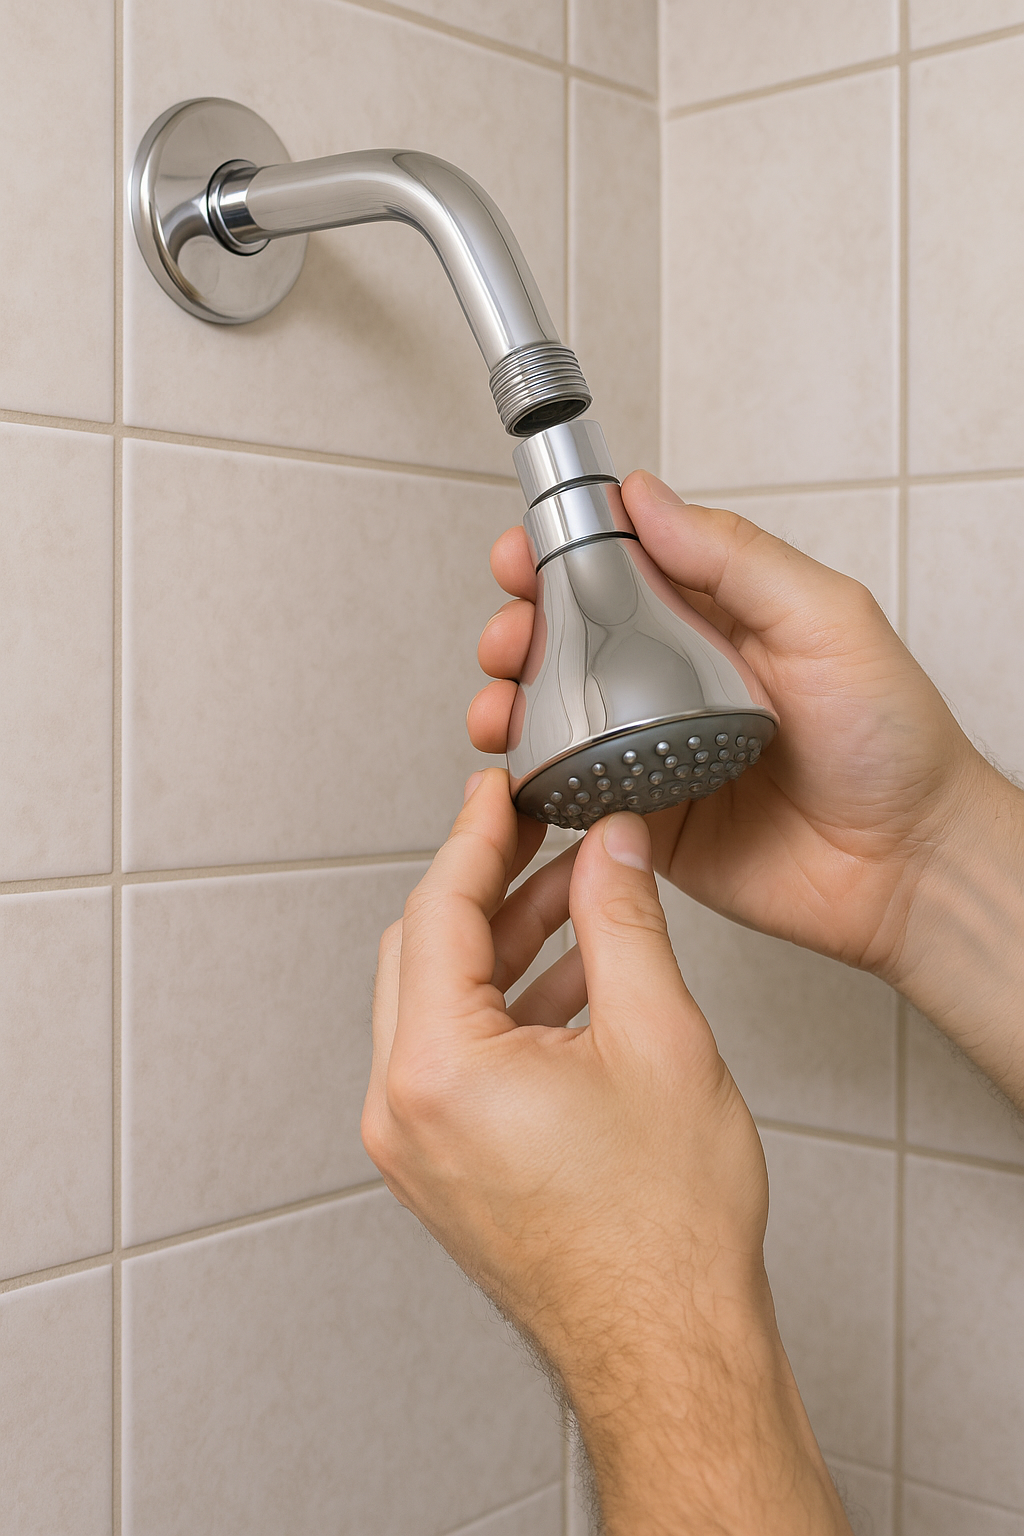
Step 3: How to Attach a Shower Head Securely
With the tape applied, it’s time to actually attach the new shower head.
- Check the Washer: Before screwing it on, look inside the threaded connector of your new shower head. Confirm that the rubber washer or O-ring is present and properly seated flat inside. This washer creates the primary seal against the end of the shower arm; the tape seals the threads. Both are necessary.
- Align Carefully: Position the new shower head straight onto the end of the taped shower arm threads. Ensure it’s not tilted or crooked.
- Start Threading by Hand: Carefully begin screwing the shower head onto the arm clockwise by hand. It should thread on smoothly for the first few turns. If you feel significant resistance immediately, stop! You might be cross-threading, which can damage both the shower head and the arm. Unscrew it completely, realign, and try again. Patience here prevents costly mistakes. Knowing how to attach a shower head without cross-threading is vital.
- Hand-Tighten: Continue tightening the shower head by hand until it feels snug. For many modern shower heads, especially those with good quality washers and plastic threads, hand-tightening might be sufficient to create a seal. Over-tightening, especially with plastic fittings, can cause cracks.
This initial attachment sets the stage for the final tightening, ensuring the shower head mounting is straight and properly engaged.
Step 4: Tightening the Connection
While hand-tightening is often enough, a final gentle tightening with a tool is usually recommended to ensure a secure, long-lasting seal, especially for metal fittings.
- Protect the Finish: *Before* applying any tool, wrap your soft cloth or rag around the connector nut of the new shower head. If the shower head base has flat spots for a wrench, wrap the cloth there. This prevents scratches on your new fixture – a key part of a professional-looking shower head installation.
- Position the Wrench: Place your adjustable wrench or pliers over the cloth-covered connector nut. Ensure a firm grip.
- Consider Counter-Holding: As when removing the old head, if the shower arm seems delicate or if you need to apply more than minimal force, use a second wrench (also with a cloth) to hold the shower arm steady near the wall. This prevents stress on the in-wall plumbing.
- Gentle Tightening: Slowly turn the wrench clockwise (righty-tighty). You typically only need an additional quarter-turn to half-turn *after* hand-tightness. The goal is to compress the rubber washer slightly and ensure the tape-sealed threads are snug. Do *not* overtighten! Overtightening is a common mistake. It can crack the shower head connector (especially if plastic), damage the washer, strip the threads, or even break the shower arm. The connection should feel firm, not excessively torqued. This is a crucial judgement call in the how to install a shower head process.
- Final Positioning: Adjust the shower head to its desired angle or position.
Following these four steps meticulously constitutes the core guide to installing a shower head. From preparing the arm and applying tape to attaching and carefully tightening the head, each stage builds towards a successful outcome.
Applying Plumber’s Tape: A Crucial Step
We’ve covered how to apply plumber’s tape within the step-by-step guide, but its importance warrants a dedicated discussion. Understanding why it’s used and how much to use is fundamental to mastering how to install a shower head and crucial for any installing shower fixtures task involving threaded connections. Many DIY installation problems stem from improper tape usage.
Why is Plumber’s Tape Necessary for Installation?
Plumber’s tape, technically known as thread seal tape or PTFE tape, serves two primary functions in a shower head installation:
- Sealing: Pipe threads, even when perfectly machined, have tiny gaps between the male threads (on the shower arm) and the female threads (inside the shower head connector). Water under pressure can easily force its way through these microscopic gaps, resulting in drips or leaks at the connection. The soft, pliable PTFE tape molds itself into these gaps when the connection is tightened, creating a waterproof barrier. It effectively fills the voids that the metal-on-metal (or metal-on-plastic) connection cannot seal on its own. While the rubber washer seals against the end of the arm, the tape seals the *threads* themselves, providing redundancy and sealing potential imperfections along the thread path.
- Lubrication: The PTFE material is naturally very slippery. Applying it to the threads reduces friction as you screw the shower head onto the arm. This makes it easier to tighten the connection smoothly and helps prevent galling or seizing, especially with metal threads (like brass on brass or brass on chrome-plated brass). Easier tightening also means you’re less likely to damage the threads or overtighten the connection while trying to achieve a seal. It allows for a snug fit without excessive force.
Essentially, plumber’s tape ensures that the mechanical connection made by threading the parts together also becomes a watertight seal. It compensates for minor imperfections in the threads and makes the entire install shower process more reliable. Skipping tape is a common reason for needing to learn how to fix a shower head leak immediately after installation. It’s a cornerstone of the best way to install a shower head.
How Much Tape Should I Use When Installing a Shower Head?
Finding the right amount of tape is key. As mentioned earlier, the general guideline for standard white PTFE tape (the most common type for household plumbing) is 3 to 6 wraps. However, several factors influence the optimal amount:
- Tape Thickness: Plumber’s tape comes in different densities or thicknesses. Standard single-density white tape is thin and usually requires more wraps (4-6). Pink tape is often heavier duty (double density) and designed for gas lines but also works well for water, typically requiring fewer wraps (maybe 2-4). Yellow tape is usually extra-heavy-duty for gas. Stick with standard white or pink tape specifically rated for potable water for your shower head fitting. Read the tape packaging if unsure.
- Thread Condition and Fit: Older or slightly worn threads might have larger gaps and benefit from an extra wrap or two. Conversely, very precisely machined new threads might seal well with fewer wraps. If the shower head feels very loose when initially threaded on by hand (before significant tape application), you might need more tape. If it feels tight immediately, you might need less.
- Material Type: Plastic threads (often found on less expensive shower heads or handheld shower brackets) are more susceptible to cracking if too much tape makes the connection overly tight. Be slightly more conservative with tape quantity (perhaps 3-4 wraps) when dealing with plastic female threads.
General Recommendations:
- Start with 4-5 wraps of standard white PTFE tape, applied tightly and clockwise.
- Ensure the tape is pulled taut into the thread grooves.
- Cover all the threads that will be engaged by the shower head connector.
- Don’t let the tape extend beyond the end of the threads where it could impede water flow or break off.
- If, after tightening, you have a small leak at the threads, you can try tightening slightly more (no more than a quarter turn). If it still leaks, it’s better to remove the shower head, remove the old tape completely, and reapply tape, perhaps adding one extra wrap compared to the first attempt. Don’t just wrap more tape over the old tape.
Learning the feel for the right amount of tape comes with experience, but following these guidelines provides a solid foundation for your how to install a shower head project. It’s better to start slightly conservatively and add more if needed than to overtighten and risk damage. Proper tape application is a core element of successful shower head mounting.
Attaching the New Shower Head
This section focuses specifically on the nuances of physically connecting the new fixture after the prep work is done. While covered in the step-by-step guide, highlighting these points reinforces best practices for installing a shower head. Proper attachment technique prevents damage and ensures a good seal.
Hand-Tightening vs. Using a Wrench
A common question when learning how to install a shower head is whether hand-tightening is sufficient or if a wrench is always necessary. The answer depends on the specific shower head and the connection type.
- Hand-Tightening: Many modern shower heads, particularly those made largely of plastic or designed with high-quality rubber washers, are intended to be primarily hand-tightened. The manufacturers design the washer and connector to seal effectively with just firm hand pressure. The instructions included with your new shower head might explicitly state “hand-tighten only.” In these cases, follow the manufacturer’s instructions. Over-tightening with a wrench can easily crack plastic components or deform the washer, leading to leaks. Hand-tightening is often sufficient if:
- The manufacturer recommends it.
- The connection involves plastic threads.
- The washer is thick and pliable.
- The threads on the arm and head are clean and well-formed.
- Using a Wrench: For shower heads with metal connectors (brass, stainless steel), especially when connecting to a metal shower arm, a final snugging with a wrench is usually recommended after hand-tightening. This provides extra assurance of a tight seal and prevents the head from loosening over time due to vibrations or temperature changes. The key is gentle tightening – typically only a quarter to half turn past hand-tight. The wrench provides mechanical advantage that hands alone cannot, ensuring the washer is properly compressed and the taped threads are fully engaged. A wrench is generally needed if:
- The connection is metal-on-metal.
- The manufacturer’s instructions imply or don’t forbid using a tool.
- Hand-tightening alone results in a leak during the leak check.
- You want maximum security against loosening.
Best Practice: Always start by hand-tightening until snug. Then, if appropriate for your fixture type (metal connection, not prohibited by instructions), use a wrench wrapped in a cloth for that final quarter/half turn. Prioritize the manufacturer’s instructions if they specify a method. This balanced approach is often the best way to install a shower head.
Protecting the Finish During Shower Head Mounting
Your new shower head likely has an attractive finish – chrome, brushed nickel, matte black, bronze, etc. Scratching it during installation is frustrating and detracts from the upgrade. Protecting the finish is a crucial part of a professional-looking shower head installation.
- Use a Soft Cloth: This is the simplest and most effective method. Always wrap a soft, clean cloth (like microfiber or an old t-shirt scrap) around the connector nut or wrench flats *before* applying pliers or an adjustable wrench. The cloth provides a protective barrier between the tool’s jaws and the fixture’s surface. Double up the cloth if needed for extra padding.
- Choose the Right Tool: An adjustable wrench with smooth jaws is preferable to pliers with serrated teeth, which are more likely to bite through the cloth and mar the finish. Strap wrenches, which use a rubber or fabric strap to grip, are excellent for protecting finishes but less common in a typical DIY toolkit.
- Correct Wrench Size: Use a wrench that fits the connector nut snugly. A wrench that’s too large can slip easily, increasing the risk of scratching the finish or rounding off the nut.
- Apply Force Carefully: Apply steady, controlled pressure when tightening. Avoid jerky movements that could cause the wrench to slip.
- Handle with Care: Be mindful when handling the shower head throughout the install process. Avoid dropping it or banging it against the shower wall or fixtures. Keep it in its protective packaging until you’re ready to attach it.
Taking these simple precautions ensures your shower head mounting results in a fixture that looks as good as it performs. It reflects care and attention to detail in your bathroom fixture installation.
Checking for Leaks After You Install the Shower Head
You’ve successfully removed the old fixture, prepped the arm, applied tape, and attached the new shower head. The final, crucial step in the how to install a shower head process is to check thoroughly for leaks. Skipping this step can lead to water waste, potential water damage behind the wall over time, or simply an annoying drip.
Performing a Leak Check After Installation
A systematic leak check ensures all connections are watertight.
- Clear the Area: Remove your tools, cloths, and the old shower head from the tub or shower area. Make sure the drain is clear.
- Turn On the Water Slowly: Go to the shower faucet handles. Slowly turn on the cold water first, only partially. Let the water start flowing through the new shower head. Then, gradually increase the flow and introduce hot water until the shower is running at a normal temperature and pressure. Turning it on slowly reduces the shock of pressure to the new connection.
- Inspect the Connection Point: Carefully watch the joint where the new shower head connects to the shower arm. Look for any signs of dripping, spraying, or even just seepage around the threads or the base of the connector nut. Check all around the connection.
- Check the Shower Arm Base: Also inspect where the shower arm enters the wall flange (escutcheon). While the installation process shouldn’t affect this joint if done carefully (especially if you counter-held the arm), it’s good practice to check here too, just in case any stress was inadvertently applied.
- Run for a Few Minutes: Let the shower run for at least 2-3 minutes at full operating pressure and temperature. Some slow leaks only become apparent after a short time. Observe the connection continuously during this period.
- Feel for Moisture: Turn off the water. Use a dry finger or a dry tissue/paper towel to wipe around the connection joint. Sometimes a very slow seep isn’t easily visible but will leave moisture that you can feel or see on the tissue.
- Check Different Settings (If Applicable): If your new shower head has multiple spray settings, cycle through them while the water is running and re-inspect the connection. Changing settings can sometimes alter pressure dynamics slightly.
If you see absolutely no drips, sprays, or moisture around the connection point after these checks, congratulations! Your shower head installation is successful. You have correctly learned how to install a shower head.
What if My New Shower Head Leaks?
Discovering a leak after you install shower head can be disheartening, but it’s usually easy to fix. Don’t panic. Here’s how to troubleshoot:
- Identify the Leak Source: Determine precisely where the water is coming from.
- Leak at the Threads (between shower head connector and shower arm): This is the most common leak location and usually indicates an issue with the plumber’s tape.
- Leak Between the Swivel Ball and Head (if applicable): Some shower heads have a swivel ball joint. If the leak is here, the unit might be defective, or an internal O-ring might be damaged or dislodged. Check the manufacturer’s instructions or contact them. This isn’t typically related to the installation onto the arm.
- Leak From the Shower Head Face: If water is dripping from the nozzles *after* the water is turned off, this is usually just residual water draining and not a true leak at the connection. However, if it sprays abnormally from the face *while running*, a nozzle might be blocked or the unit defective.
- Leak at the Shower Arm/Wall Connection: If the leak is where the arm enters the wall, this suggests the arm itself might have been loosened or damaged during the installation. This requires more involved repair, potentially involving removing the arm (covered later).
- Addressing Thread Leaks (Most Common):
- Try Gentle Tightening: Turn off the water. Using your cloth-wrapped wrench, try tightening the shower head *slightly* more – perhaps another eighth or quarter turn. Be very careful not to overtighten. Turn the water back on and check again.
- Re-Tape: If slight tightening doesn’t work, or if you suspect the tape wasn’t applied correctly, you’ll need to re-tape. Turn off the water. Unscrew the shower head. Completely remove all the old plumber’s tape from the shower arm threads. Clean and dry the threads again. Reapply new plumber’s tape (maybe add one extra wrap this time, e.g., 5-6 wraps instead of 4-5), ensuring it’s wrapped tightly and in the correct (clockwise) direction. Reattach the shower head, tighten appropriately (hand-tight then gentle wrench turn if needed), and perform the leak check again. This process of fixing a shower head leak often solves the problem.
- Check the Washer: When you have the shower head off to re-tape, double-check that the rubber washer inside the connector is present, seated flat, and not damaged (cut, cracked, or deformed). If it looks damaged, replace it. Ensure you removed the old washer from the previous installation.
- Addressing Other Leaks:
- Swivel Ball Leak: Consult manufacturer instructions; may require tightening a collar nut (if accessible) or warranty replacement.
- Shower Arm/Wall Leak: This is more serious. Turn off the water. You may need to unscrew the shower arm itself, clean the threads on both the arm and the fitting inside the wall, reapply sealant/tape to the wall-end threads, and reinstall the arm securely. If unsure, call a plumber.
Performing a thorough leak check and knowing how to address minor drips are essential final parts of the installation of shower head process. It ensures your shower head setup is reliable and worry-free.
How to Replace a Shower Head: Key Differences
Often, the task isn’t installing a shower head on a new construction shower arm, but rather replacing an existing one. The term how to replace a shower head is frequently searched and is functionally very similar to a first-time install, but with a couple of nuances primarily focused on removal and dealing with potentially older plumbing. This section highlights the key aspects specific to shower head replacement.
Key Steps for How to Replace a Shower Head
The core process for replacing a shower head mirrors the installation guide already detailed, but emphasizes these stages:
- Removal of the Old Head: This is the starting point unique to replacement. As detailed previously (under “Preparing for the Installation: Removing the Old Head”), this involves:
- Turning off the water (or ensuring faucets are off).
- Protecting the tub/shower floor.
- Using an appropriate wrench (often with a cloth) to grip the old shower head connector.
- Potentially using a second wrench to counter-hold the shower arm, especially important with older plumbing that might be less secure in the wall.
- Turning the old head counter-clockwise to loosen and remove it.
- Being prepared for stubborn connections due to age, mineral buildup, or previous overtightening. Penetrating oil might be considered in extreme cases, used sparingly.
- Ensuring the old rubber washer is removed along with the old head.
- Thorough Cleaning of Shower Arm Threads: This step is often *more* critical when replacing an old head compared to a new install. Years of use mean more potential buildup of old tape, sealant residue, limescale, and corrosion on the shower arm threads. Use a stiff nylon brush (and potentially vinegar for mineral deposits) to clean the threads meticulously until they are bare, clean, and dry. A poor cleaning job here is a prime suspect if the new head leaks after a shower head replacement.
- Inspection of the Shower Arm: Since the arm has been in use, inspect it carefully after cleaning. Check for excessive corrosion, deep scratches, or any signs of cracking or damage, especially at the threads. If the arm itself looks compromised, consider replacing it as part of the project (how to install a shower arm is covered later).
- Installation of the New Head: Follow the exact same steps outlined previously for how to install a shower head:
- Apply new plumber’s tape correctly (clockwise, 3-6 wraps, tight).
- Check the washer in the new head.
- Thread the new head on carefully by hand first.
- Tighten appropriately (hand-tight or hand-tight plus gentle wrench turn, protecting the finish).
- Leak Check: Perform the thorough leak check as described before.
Essentially, the how to replace a shower head process adds the crucial “removal” and potentially more intensive “cleaning/inspection” steps to the standard installation procedure.
Is Replacing a Shower Head Different from a First-Time Install?
While the fundamental steps of attaching the new head (applying tape, screwing on, tightening) are identical, there are subtle but important differences when replacing a shower head versus a first-time install:
- Dealing with the Old: Replacement inherently involves removal, which can sometimes be challenging if the old head is stuck fast. First-time installs usually start with a clean, new shower arm.
- Condition of the Arm: A shower arm that has had a head installed for years is more likely to have buildup or wear on the threads than a brand-new arm. Cleaning and inspection are therefore more critical in a replacement scenario.
- Potential for Hidden Issues: Removing an old fixture can sometimes reveal underlying problems, like a loose shower arm or corroded threads, that weren’t apparent before. A first-time install on new plumbing is less likely to encounter these legacy issues.
- Matching Finishes (Sometimes): If you’re only replacing the head and not the arm or flange, you might be concerned about matching the finish of the new head to the existing arm/flange.
In summary, replacing a shower head requires all the skills of a first-time installation, plus the ability to safely remove the old fixture and diligently clean and inspect the existing shower arm. The core shower head installation techniques remain the same, but the preparation phase is more involved. Many guides use “how to install a shower head” and “how to replace a shower head” interchangeably because the attachment process is identical, but recognizing these nuances helps ensure success when upgrading an existing shower.
Tips for Installing Shower Heads Successfully
Beyond the basic steps, several tips and best practices can elevate your shower head installation from functional to flawless. These shower head tips help ensure a smooth process, a durable connection, and optimal performance from your new fixture. Adhering to these suggestions represents the best way to install a shower head.
Shower Head Tips for a Smooth Setup
These practical hints can make the shower head setup easier and prevent common frustrations:
- Read the Manufacturer’s Instructions: Always check the instructions that came with your specific shower head. They may contain model-specific advice, torque recommendations (though rare for shower heads), or details about included washers or required procedures that differ slightly from generic guides. They might specify “hand-tighten only.”
- Gather Everything First: As mentioned under Tools & Materials, having everything ready – tools, tape, rags, new head, instructions, step stool – before you start prevents interruptions and searching mid-job.
- Protect Your Work Area: Laying down a towel isn’t just about preventing scratches; it also catches dropped screws, old washers, or chunks of old tape, making cleanup easier.
- Use the Right Tape: Stick to PTFE plumber’s tape designed for potable water. Avoid using electrical tape or duct tape!
- Clockwise is Key: Remember the clockwise rule for wrapping plumber’s tape. Getting this wrong is a frequent cause of leaks and frustration.
- Start Threads Carefully: Avoid cross-threading at all costs. If it doesn’t screw on easily by hand for the first few turns, back it off and try again. Forcing it will cause damage.
- Don’t Overtighten: This is perhaps the most common DIY mistake. Overtightening can crack fittings (especially plastic), damage washers, or even break the shower arm inside the wall. Snug is good; excessively tight is bad. Hand-tight plus a small nudge with a wrench (if appropriate) is usually sufficient.
- Use a Cloth Barrier: Always protect the finish when using tools. Scratches on a new fixture are easily avoided.
- Counter-Hold the Arm: Especially with older plumbing or stubborn fittings, use a second wrench to hold the shower arm steady. Preventing the arm from twisting in the wall is crucial to avoid hidden leaks.
- Check the Washer: Ensure the rubber washer is present, correctly seated, and undamaged in the new shower head *before* installation. Make sure the old washer was fully removed.
- Perform a Thorough Leak Check: Don’t assume it’s fine. Run the water, check carefully, use a dry tissue. It’s much easier to fix a small drip immediately than deal with water damage later.
- Keep Old Parts (Temporarily): Hang onto the old shower head for a day or two, just in case something is critically wrong with the new one and you need to temporarily reinstall the old one while sorting out a replacement/return.
Following these shower head tips makes the installation of shower head process more efficient and greatly increases the likelihood of a perfect, leak-free result on the first try. This advice is applicable to nearly all installing shower fixtures projects.
Best Way to Install a Shower Head for Longevity
Beyond just getting it installed without leaks, certain practices contribute to the long-term durability and performance of your shower head installation:
- Thorough Thread Cleaning: Investing time in meticulously cleaning the shower arm threads removes potential points of corrosion or buildup that could cause issues down the line. A clean start promotes a lasting seal.
- Quality Plumber’s Tape: Using good quality PTFE tape ensures a reliable thread seal that won’t break down quickly. Applying it correctly (sufficient wraps, correct direction, tight) is paramount.
- Proper Tightening (Not Overtightening): Achieving the right level of tightness is crucial. Overtightening stresses the materials and can lead to premature failure (cracks). Under-tightening can allow leaks or loosening over time. Finding the ‘just right’ point ensures a secure seal without undue stress.
- Using the Correct Washer: Ensure the washer provided with the shower head is used and is appropriate for the connection. Don’t substitute with a random O-ring unless it’s an exact match. The washer provides the primary compression seal.
- Supporting the Shower Arm: If the shower arm feels even slightly loose in the wall fitting, address it. This might involve carefully tightening the arm itself (after removing it) or ensuring the flange/escutcheon provides some support. A stable arm puts less stress on the shower head connection.
- Periodic Checks: Occasionally (e.g., during routine bathroom cleaning), glance at the shower head connection to ensure there are no new drips or signs of corrosion. Early detection of any issues prevents bigger problems.
- Consider Water Quality: If you have very hard water, mineral buildup can eventually affect the shower head’s performance and potentially compromise seals. Regular cleaning (as per maintenance section below) helps longevity. Using a shower head with easy-to-clean nozzles or even an inline shower filter can also contribute to a longer functional life, indirectly protecting the installation.
Focusing on these aspects represents the best way to install a shower head not just for immediate success, but for ensuring the connection remains sound and the fixture performs well for years to come. It’s about quality workmanship during the shower head fitting.
Troubleshooting Common Shower Head Installation Issues
Even with careful preparation and following instructions, you might encounter issues during or after installing a shower head. Knowing how to troubleshoot common problems can save time and frustration. This section addresses frequent challenges related to fixing a shower head connection.
Fixing a Shower Head Connection Problem
Here are common problems and their solutions:
- Problem: Leak at the Threads (Connection between Head and Arm)
- Cause: Insufficient plumber’s tape; tape wrapped incorrectly (counter-clockwise); tape not pulled tight; damaged threads; damaged/missing washer; insufficient tightening.
- Solution:
- First, try gently tightening the connection slightly more (max quarter turn) with a cloth-wrapped wrench. Check for leaks again.
- If still leaking, turn off water, remove head, remove *all* old tape.
- Inspect washer inside head (present? damaged? seated correctly?).
- Inspect shower arm threads for damage.
- Clean threads thoroughly.
- Reapply new plumber’s tape, ensuring correct clockwise direction, 4-6 tight wraps.
- Reinstall head, tighten appropriately.
- Perform leak check. This usually resolves thread leaks.
- Problem: Leak From the Swivel Joint (If Applicable)
- Cause: Defective joint; damaged internal O-ring; loose locking collar (if present).
- Solution: Check manufacturer’s instructions. Some swivel joints have a collar nut that can be gently tightened (use cloth to protect finish). If it seems defective or leaks internally, contact the manufacturer for warranty support or replacement. This is less about the installation onto the arm and more about the fixture itself.
- Problem: Low Water Pressure After Installation
- Cause: Debris flushed into the new head during installation; water-saving flow restrictor installed (and perhaps more restrictive than the old head); kinked hose (for handheld showers); partially closed shut-off valve (if you used one).
- Solution:
- Check if the main shower valve is fully open.
- Remove the shower head. Check the inlet screen/washer for debris (bits of old tape, sediment). Clean it out.
- Check if a flow restrictor is installed (often looks like a small plastic disc or O-ring with small holes, just inside the inlet). Many can be removed (check local regulations regarding water conservation), but this might void the warranty. Consult manufacturer instructions. Sometimes just removing and reseating the restrictor helps if it was dislodged.
- For handhelds, ensure the hose isn’t kinked.
- Briefly flush the shower arm with water (direct flow into drain) before reinstalling the head to clear any loose debris in the pipe.
- Problem: Shower Head Sprays Unevenly or Clogged Nozzles
- Cause: Mineral buildup (limescale); debris trapped in nozzles. More common over time, but possible if debris entered during install.
- Solution: Many modern shower heads have flexible rubber nozzles (e.g., Rubit™ or similar). Try rubbing the nozzles vigorously with your thumb or a cloth while water is running (or off) to dislodge buildup. For more stubborn clogs, refer to the maintenance section (often involves soaking the head in vinegar).
- Problem: Cannot Tighten Shower Head Enough / Keeps Spinning
- Cause: Stripped threads (on head or arm); too much plumber’s tape preventing threads from engaging properly; wrong thread type/size (unlikely with standard fixtures).
- Solution:
- Remove head and tape. Inspect threads on both arm and head carefully. If stripped, the arm or head (or both) may need replacement.
- Try again with less plumber’s tape (e.g., 3 wraps). Ensure tape isn’t bunching up.
- Verify the shower head is the correct standard size (usually 1/2-inch NPT in North America).
- Problem: Shower Arm is Loose in the Wall
- Cause: Arm was not sufficiently tightened into the wall fitting (drop-ear elbow); connection loosened over time or during removal/installation of the head.
- Solution: This requires careful attention. You may need to remove the shower head, then attempt to tighten the shower arm itself by turning it clockwise (use a cloth or strap wrench on the arm pipe). If it spins freely or doesn’t tighten, you may need to remove the arm entirely, reapply sealant/tape to the *wall end* threads, and screw it back into the fitting securely. If the fitting inside the wall is loose, this becomes a more involved plumbing repair, potentially requiring access behind the wall. Consider calling a plumber if unsure. This goes beyond a simple shower head installation.
Addressing these common issues systematically will help you overcome most challenges encountered during a shower head replacement or install.
How to Install a Shower Arm (If Necessary)
Sometimes, during a shower head replacement, you might find that the existing shower arm is damaged (corroded, stripped threads, cracked) or you simply want to change its length, shape (e.g., S-shape for height), or finish to match your new shower head. Learning how to install a shower arm is a slightly more involved task than just the head, as it involves the connection inside the wall, but it’s still often manageable for a DIYer.
Guide to Installing a Shower Arm if Needed
Here’s a general guide. Note: Always turn off the water supply to the shower or the main house supply before removing the shower arm.
- Turn Off Water Supply: Locate the shut-off valve for the shower or the main water supply valve for the house and turn it off completely. Open the shower faucet to drain residual water.
- Remove the Old Shower Head: Follow the steps outlined earlier.
- Remove the Flange/Escutcheon: The decorative trim piece covering the hole where the arm enters the wall (the flange or escutcheon) usually slides off or is held by caulk. If caulked, carefully cut the caulk bead with a utility knife and slide the flange off the arm.
- Protect the Wall: Place a cloth around the arm where it enters the wall to prevent scratching the tile or surround when using a wrench.
- Unscrew the Old Shower Arm: Grip the shower arm pipe itself with an adjustable wrench or pipe wrench (use a cloth to protect the finish if you plan to reuse it, though unlikely if replacing). Turn the arm counter-clockwise. It screws into a fitting (usually a drop-ear elbow) inside the wall. It might be quite tight. Apply steady pressure. Be careful not to damage the wall surface.
- Clean the Fitting Threads: Once the old arm is removed, look inside the wall opening at the female threads of the drop-ear elbow. Clean these threads using a nylon brush. Remove old tape, sealant, and debris.
- Prepare the New Shower Arm: Take your new shower arm. Note that it has threads on both ends. The shorter threaded end typically goes into the wall fitting; the longer threaded end is for the shower head.
- Apply Sealant/Tape to Wall End: Apply plumber’s tape (4-6 wraps clockwise) or pipe sealant to the *shorter* threaded end of the new shower arm (the end going into the wall).
- Screw in the New Arm: Carefully insert the taped/sealed end into the wall fitting and start threading it clockwise by hand. Ensure it’s straight and not cross-threaded.
- Tighten the Arm: Once hand-tight, use your wrench (with cloth protection) on the *pipe* of the new arm to tighten it securely into the wall fitting. How tight? It should feel very snug. The final position is also important – you want the arm angled correctly downwards for the shower head. Typically, you tighten until it’s firm, then adjust slightly to the correct angle. Don’t overtighten, but it needs to be secure. Standard advice is usually 3-4 full turns past hand tight, but this varies. It must be tight enough not to leak or wobble.
- Reinstall Flange/Escutcheon: Slide the flange back onto the new arm and press it against the wall. If there’s a gap, or for a cleaner look and to prevent water splashing behind it, apply a bead of bathroom-grade silicone caulk around the edge where the flange meets the wall.
- Install the New Shower Head: Now, proceed with installing the new shower head onto the newly installed arm, following all the steps detailed earlier (apply tape to arm threads, attach head, tighten, etc.).
- Turn Water Back On and Leak Check: Slowly turn the main water supply back on. Check *both* connections for leaks: where the shower head attaches to the arm, and where the arm enters the wall (behind the flange, if possible, or watch for drips down the wall). Also check the operation of the shower head.
Installing a shower arm requires more care with the wall connection, but follows similar principles of cleaning threads, using sealant/tape, and proper tightening. This skill complements your ability to install a shower head and handle more comprehensive installing bathroom fixtures tasks.
Understanding Different Shower Head Types
The term “shower head” encompasses a wide variety of designs, each offering different experiences and potentially having minor installation variations. Understanding these types helps you choose the right one and anticipate any specific install needs.
- Fixed Shower Heads (Wall-Mount): This is the most common type, directly attached to the shower arm. They come in various styles (standard, rain, high-pressure) and sizes. Installation typically follows the standard procedure outlined in this guide. The installation of a shower head of this type is usually the most straightforward.
- Rain Shower Heads: These are typically larger, flatter fixed heads designed to mimic rainfall. Due to their size and weight, ensure your shower arm is securely mounted. Installation is standard, but tightening requires care not to damage the larger fixture. Some larger rain heads benefit from a longer or higher shower arm for optimal effect, potentially requiring a shower arm installation upgrade.
- Handheld Shower Heads: These feature a head connected to a flexible hose, which attaches either to the shower arm directly or to a separate wall outlet elbow. The base often includes a bracket to hold the head. Installation involves attaching the bracket/hose connector to the shower arm (using tape and tightening as usual), then connecting the hose to the bracket and the head to the hose (these connections usually use washers and are hand-tightened). Ensure the hose connections are snug but don’t overtighten, as they often have plastic threads. This shower gear installation involves a few extra connections.
- Dual Shower Heads (Combo): These combine a fixed head and a handheld head, often running off a diverter valve mounted on the shower arm. Installation involves attaching the main diverter unit to the shower arm (standard tape/tightening), then connecting the fixed head, hose, and handheld head to the diverter unit according to manufacturer instructions. There are more potential leak points, so careful assembly and checking are needed.
- Filtered Shower Heads: These incorporate a filter cartridge (usually carbon or KDF) to remove chlorine, sediment, and other impurities. The filter housing is typically part of the shower head base or an inline unit attached to the arm before the head. Installation is standard, but you’ll need to follow instructions for filter installation and replacement schedules. The filter adds some length and weight.
- Low-Flow (Water-Saving) Shower Heads: Designed to meet WaterSense or similar standards, these use less water while often employing aeration or pulse technology to maintain pressure sensation. Installation is standard, but be aware they contain non-removable flow restrictors. Learning how to install showerheads of this type is the same mechanically, but the performance outcome is different.
- High-Pressure Shower Heads: Designed to maximize force, often through specialized nozzle design or flow channel optimization. Installation is standard. Note that actual pressure is determined by your home’s plumbing, but these heads aim to make the most of available pressure.
- Sliding Bar Shower Heads: These feature a handheld shower head whose holder mounts onto a vertical bar attached to the shower wall. This allows for height adjustment. Installation is more complex, involving mounting the bar securely to the wall (often requiring drilling into tile) and connecting the water supply via a hose to a wall outlet elbow, rather than directly to the standard shower arm. This is a more involved shower installation project.
While the core principle of attaching the fixture to the threaded shower arm (using tape and proper tightening) remains consistent for most types, always refer to the specific shower head instructions provided by the manufacturer, especially for combo units, handhelds, or filtered models.
Maintaining Your New Shower Head
Once you’ve successfully completed the shower head installation, proper maintenance will keep it performing well and looking great for years. Regular cleaning prevents clogs, preserves the finish, and ensures optimal water flow.
- Regular Cleaning of Nozzles: Mineral deposits (limescale, calcium) from hard water are the most common cause of clogged or unevenly spraying nozzles.
- Manual Cleaning: For flexible rubber nozzles, simply rub them firmly with your finger or a soft cloth periodically (e.g., weekly or bi-weekly) while the water is off or running gently. This dislodges minor buildup.
- Vinegar Soak (for stubborn clogs): If manual cleaning isn’t enough, you’ll need to descale. Turn off the water. If possible, unscrew the shower head (remember how you installed it!). Submerge the head face-down in a bowl or plastic bag filled with white vinegar, ensuring all nozzles are covered. Let it soak for several hours or overnight (for heavy buildup). For fixed heads you can’t easily remove, fill a sturdy plastic bag with vinegar and secure it around the head with a rubber band or string, ensuring the face is submerged. After soaking, remove the head/bag, scrub the nozzles gently with an old toothbrush, and run water through it at high pressure for a minute to flush out dissolved deposits and vinegar. This is a key part of fixing a shower head performance issue.
- Cleaning the Finish: Wipe down the exterior of the shower head regularly with a soft, damp cloth during routine bathroom cleaning. Avoid abrasive cleaners, scouring pads, or harsh chemicals (like bleach or ammonia-based cleaners), as these can permanently damage chrome, nickel, bronze, and other finishes. Mild soap and water are usually sufficient. Dry with a soft cloth to prevent water spots. Protecting the finish preserves the aesthetic appeal of your shower head upgrade.
- Checking the Inlet Screen: Periodically (e.g., annually or if you notice reduced flow), you might want to remove the shower head and check the small screen washer just inside the inlet connector. Sediment or debris can accumulate here, restricting flow. Gently remove the screen (it often sits inside the rubber washer), rinse it clean under running water, and carefully replace it before reinstalling the head.
- Filter Replacement (for Filtered Heads): If you installed a filtered shower head, adhere strictly to the manufacturer’s recommended schedule for replacing the filter cartridge. Old filters become ineffective and can even restrict water flow significantly.
- Inspect Connections: Occasionally glance at the connection point to the shower arm to ensure no leaks have developed over time.
Regular maintenance is simple but essential for getting the most out of your investment and ensuring the longevity of your shower head installation. It keeps your shower experience enjoyable and prevents minor issues from becoming bigger problems. Following this comprehensive guide to installing a shower head, along with understanding maintenance and troubleshooting, empowers you to confidently tackle this common home improvement task, enhancing your bathroom with minimal fuss. Whether it’s a first-time install, a shower head replacement, or renovating a shower head experience, you now have the knowledge to do it right.