How to Fix a Leaky Faucet
An annoying dripping sound from a faucet is more than just a nuisance; it’s a sign of water and money waste. A leaky faucet might seem like a small problem, but over time, even a slow drip can lead to hundreds, if not thousands, of liters of wasted water per year. This affects not only your water bill but also the environment. Fortunately, how to fix a leaky faucet is often a project that most homeowners can handle themselves with the right tools and a little guidance. Performing a diy leaky faucet repair not only saves money on a plumber but also provides a sense of satisfaction.
This comprehensive guide is designed to help you understand why your faucet is leaking, what tools you need for the job, and most importantly, how you can perform a step-by-step faucet repair. We will cover different types of faucets, common problems and solutions, and provide faucet repair tips to make the process as smooth as possible. Whether you need to fix a leaky faucet in the kitchen, bathroom, or laundry room, this guide will give you the knowledge to stop a leaky faucet and restore peace to your home. Learning how to repair a leaky faucet is a valuable skill for any homeowner. From identifying the cause to replacing worn parts, we cover everything you need to know to successfully fix leaky faucet problems. Let’s start by understanding why your faucet is dripping.
Why is My Leaky Faucet Dripping?
Before you dive into fixing a leaky faucet, it’s important to understand why it happens. A faucet is a relatively simple mechanical device, but it contains several moving parts and seals that can wear out or get damaged over time. When these components no longer function as they should, water can seep through and cause that constant dripping. Understanding the basic causes behind a leaky tap can help you diagnose the problem more accurately and perform an effective faucet leak fix. It’s not just about stopping the drip; it’s about addressing the root cause to prevent future problems. Ignoring a leaky faucet can lead to more significant problems down the line, including water damage and mold growth. Therefore, it’s wise to address the problem as soon as it’s discovered. Understanding the mechanism behind your specific faucet is the first step towards a successful repair a leaky faucet operation.
Understanding Common Causes of a Leaky Tap
Several factors can lead to a leaky faucet. Identifying the specific cause is key to a successful faucet repair. Here are some of the most common culprits behind a dripping faucet:
- Worn O-Ring: The O-ring is a small rubber ring located around the base of the faucet spout or around the valve stem (depending on the faucet type). It acts as a seal to prevent water from leaking out around the handle or the base of the spout. Over time, this rubber ring can dry out, crack, or wear down due to constant friction and water exposure. A leak around the faucet handle is often a sign of a worn O-ring. This is a common cause requiring a fix leaky faucet action.
- Corroded Valve Seat: The valve seat is the connection point between the faucet and the spout in compression faucets. Water deposits, especially in areas with hard water, can cause corrosion on the valve seat. When the seat corrodes, it creates an uneven surface that prevents the washer (seat washer) from sealing properly, leading to drips from the spout. Cleaning or replacing the valve seat is a necessary part of how to repair a leaky faucet in these cases.
- Worn Cartridge: Many modern faucets, especially single-handle mixers, use a cartridge instead of traditional washers and seats. This cartridge controls the water flow. Over time, the cartridge can wear out or crack, resulting in a leaky faucet. If your single-handle mixer is dripping, a worn cartridge is the most likely cause. Replacing the cartridge is a common faucet leak fix.
- Worn Seals (Inlet and Outlet Seals): In ceramic disc faucets, there are neoprene seals at the inlet and outlet that can wear out over time due to sediment and friction. When these seals become worn, water can leak through, usually from the spout. This is another common reason for needing to repair a faucet.
- Damaged or Improperly Installed Washer (Compression Faucets): In compression faucets (often those with separate hot and cold handles), a rubber washer is pressed against the valve seat to stop water flow when the faucet is turned off. This washer is the most common cause of drips in this type of faucet. It can wear out, become stiff, tear, or be installed incorrectly. Even tightening the faucet too hard can damage the washer or the seat. Replacing the washer is often a simple fix a leaky faucet solution.
- Loose Parts: Sometimes the problem can be as simple as parts inside the faucet, like the adjusting ring or packing nut in a compression faucet, having loosened over time. Tightening these parts can sometimes be a quick home remedy for leaky faucet.
- High Water Pressure: Although less common, excessive water pressure in your home can cause faucets to drip because the pressure forces water past the seals, even when the faucet is closed. If multiple faucets in the house start leaking around the same time, it might be worth checking the water pressure. This is a more complex plumbing issue.
Understanding these common causes helps you troubleshoot and determine the best method for how to fix a leaky faucet.
The Importance of Faucet Maintenance
Regular faucet maintenance is crucial for preventing small problems from developing into costly repairs or replacements. Just like other mechanical systems in your home, your faucets benefit from periodic attention. Ignoring early signs of trouble, like a small drip or a stiff handle, can lead to bigger problems. A leaky faucet is not only a waste of water and money, but the constant dripping can also cause unsightly stains in your sink or basin and contribute to a damp environment that encourages mold and mildew growth.
Here’s why faucet maintenance is so important:
- Prevent Major Leaks: A small drip can be an early warning sign that an internal component is failing. By addressing the problem early, such as replacing a worn O-ring or washer, you can prevent a more catastrophic failure that could lead to a major leak or even flooding if it occurs when you’re not home. Performing a diy leaky faucet repair early is wise.
- Save Water and Money: Even one drip per second can waste over 11,000 liters (about 3,000 gallons) of water per year. That’s a lot of water going straight down the drain and adding to your water bill. Quickly fixing a leaky faucet is an easy way to reduce your water consumption and save money.
- Extend Faucet Lifespan: Regularly cleaning faucet parts, especially the aerator and internal components during repair, can remove mineral deposits (limescale) that can cause wear and corrosion. Lubricating moving parts like O-rings with silicone-based plumber’s grease during maintenance or repair can also reduce friction and extend their lifespan. This is an important part of how to repair a faucet correctly.
- Maintain Water Pressure and Flow: A clogged aerator or problems inside the faucet can reduce water pressure and disrupt flow. Regular cleaning and maintenance ensure your faucet operates optimally.
- Avoid Damage to Sink/Basin: Constant dripping can etch the surface of your sink or basin over time, especially if you have hard water. Stopping a faucet leak prevents these permanent stains.
- Early Detection of Problems: By regularly inspecting your faucets – checking for drips, leaks around the base or handle, and noting if handles feel stiff or loose – you can catch problems before they become serious. This proactive approach is the core of good faucet maintenance.
Incorporating simple faucet maintenance into your routine, like cleaning the aerator a few times a year and paying attention to any drips, can save you time, money, and hassle in the long run. And when a drip does appear, you know it’s time to act and use your knowledge of how to fix a leaky faucet.
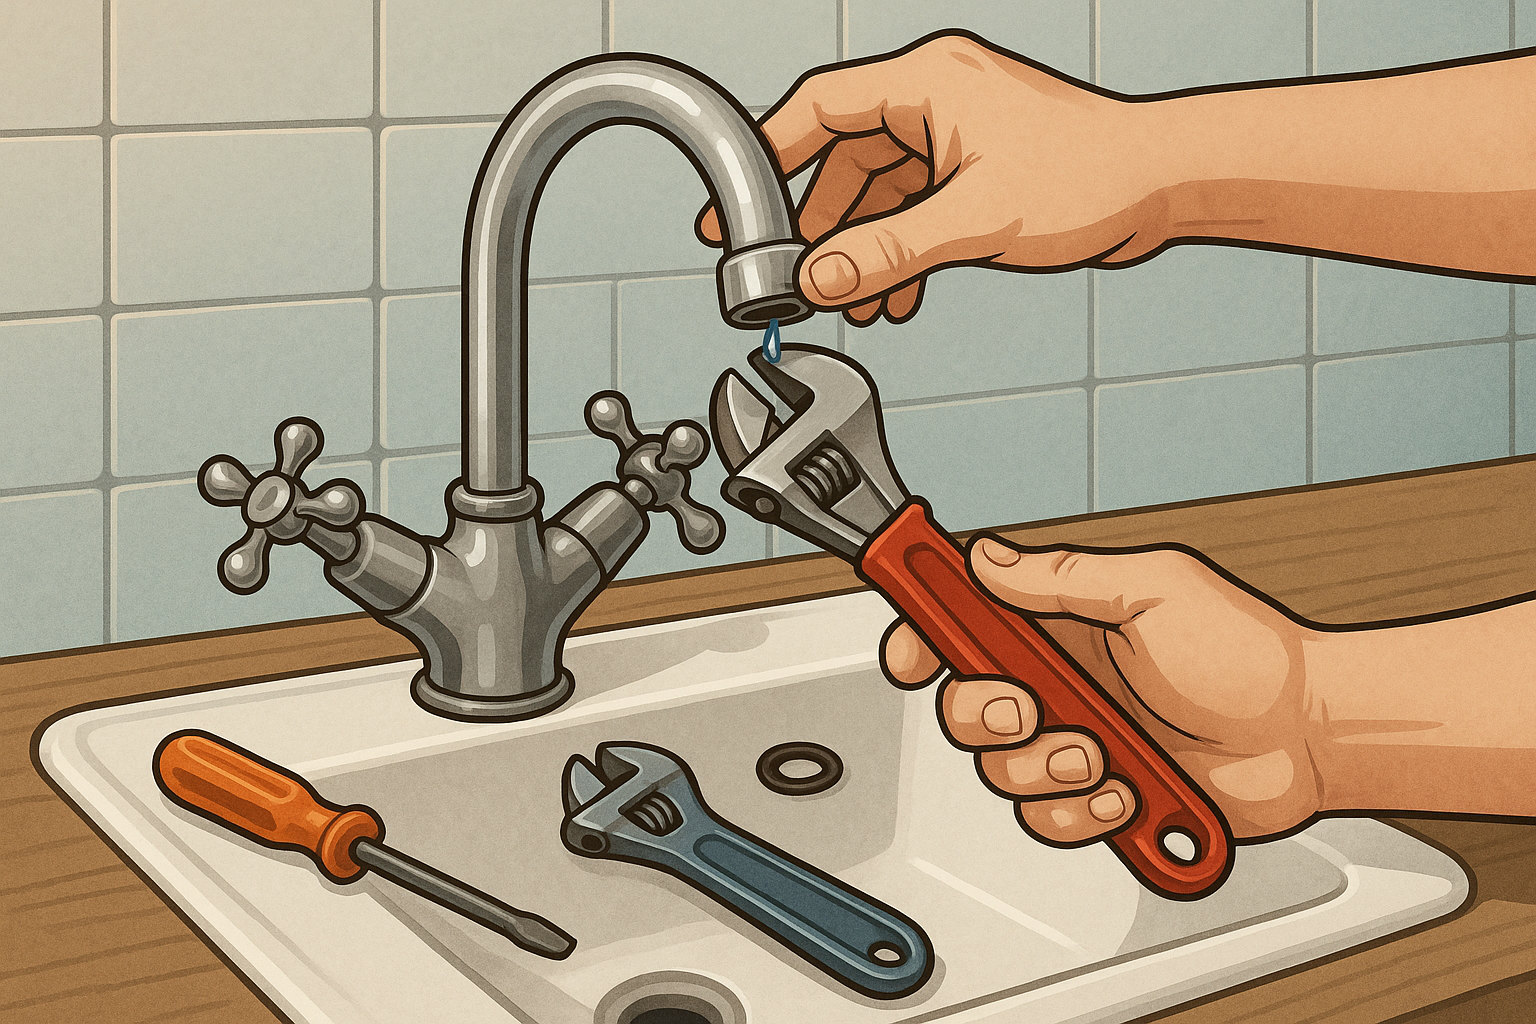
Tools You Need to Fix a Leaky Faucet
Before starting your diy leaky faucet repair, it’s important to gather all the necessary tools. Having the right equipment on hand makes the job much easier, faster, and reduces the risk of damaging the faucet or surrounding surfaces. Although the exact tools might vary slightly depending on your specific faucet type, there is a basic set that covers most faucet repair situations. Investing in some basic plumbing repair tools is a good idea for any homeowner, as they will be useful for more than just fixing a leaky faucet. Being well-prepared is half the battle when it comes to fixing a leaky faucet. Make sure you have everything in place before you turn off the water and start dismantling the faucet.
Essential Plumbing Repair Tools List
Here is a list of the most essential tools and materials you will likely need to successfully repair a leaky faucet:
- Adjustable Wrench: A must-have for loosening and tightening nuts of various sizes, like those holding the faucet in place or attaching the supply lines. One with smooth jaws is preferable to avoid scratching chrome surfaces.
- Pliers: A pair of standard pliers (combination pliers) and possibly channel lock pliers can be useful for gripping and turning parts. Use caution on visible surfaces.
- Screwdrivers: Both Phillips head and flathead screwdrivers in various sizes are often needed to remove handle screws and other fasteners.
- Allen Wrenches/Hex Keys: Many modern faucet handles are attached with a small set screw hidden under a decorative cap. A complete set ensures you have the right size.
- Plumber’s Tape/Teflon Tape: Used to seal threaded connections, like those on water supply lines, to prevent leaks. Wrap the tape clockwise around the male threads.
- Plumber’s Putty: Sometimes used to create a watertight seal between the faucet base and the sink/basin. Do not use on porous materials like granite or marble; use silicone-based sealant instead.
- Replacement Parts: The most important! This includes O-rings, washers, cartridges, valve seats, or other specific parts for your exact faucet model. Try to identify your faucet and buy the parts in advance, or take the old parts to the hardware store to find exact matches. This is the core of leaky faucet repair.
- Rags or Towels: To wipe up any spilled water and keep the work area dry.
- Small Bucket or Bowl: To catch water that might drain out when you disassemble the faucet.
- Penetrating Oil (WD-40 or similar): Can help loosen rusted or corroded screws and nuts. Use sparingly.
- Flashlight or Headlamp: It’s often dark under the sink where shut-off valves and faucet mountings are located.
- Utility Knife or Small Putty Knife: Can be useful for gently prying off decorative caps or scraping away old putty.
- Old Toothbrush or Small Brush: For cleaning faucet parts from dirt and mineral deposits.
- White Vinegar: Excellent for dissolving limescale deposits on faucet parts.
Having this essential plumbing repair tools list ready will significantly streamline your how to fix a leaky faucet process.
Wrenches, Pliers, and Screwdrivers for Faucet Repair
Wrenches, pliers, and screwdrivers are the workhorses of almost every faucet repair job. Understanding their specific roles and how to use them correctly is crucial to avoid damaging your faucet.
- Adjustable Wrench: This is your primary tool for handling nuts. Its adjustable jaws make it versatile for different sizes.
- Use: Used for loosening and tightening the large nuts that hold the faucet to the sink (mounting nuts) and the nuts connecting the water supply lines to the shut-off valves and faucet inlets.
- Tip: Adjust the jaws to fit snugly around the nut to avoid slipping and damaging the nut’s corners. For chrome or finished parts, wrap a rag around the part or use a wrench with soft jaws (or put electrical tape on the jaws) to prevent scratching. This is an important faucet repair tip.
- Channel Lock Pliers: These pliers have adjustable, angled jaws that provide a strong grip on round or irregular shapes.
- Use: Can be used for larger nuts or parts where a wrench won’t fit or grip. They are especially useful for gripping the faucet body itself or the spout if it needs to be twisted off (protect the finish!).
- Tip: Use with caution on visible surfaces as the serrated jaws can easily scratch. Use a rag for protection. Often, an adjustable wrench is a better choice for nuts.
- Standard Pliers (Combination Pliers): Good for gripping small parts, pulling out cotter pins, or cutting wire (though rarely needed for faucet repair).
- Use: Can be used to hold one part steady while loosening another, or to gently grip and pull out a worn O-ring.
- Tip: Avoid using them to turn nuts if you have a wrench, as they are more likely to damage the nut.
- Screwdrivers (Phillips and Flathead): Indispensable for removing the screws that hold faucet handles in place.
- Use: Loosen the screw (often hidden under a decorative cap) that secures the handle to the faucet’s internal mechanism (stem or cartridge). May also be needed to loosen the screw holding the washer in a compression faucet.
- Tip: Use the correct size and type of screwdriver to avoid stripping the screw head. Press the screwdriver firmly into the screw slot before turning. If a screw is stuck, try a little penetrating oil.
- Allen Wrenches/Hex Keys: Many modern faucets use small hex screws (set screws) to secure handles.
- Use: To loosen and tighten these specific screws.
- Tip: Make sure the Allen wrench is fully seated in the screw head before turning to avoid stripping it. A complete set is necessary as sizes vary.
Using the right tool in the right way is fundamental for a successful fix a faucet operation and for ensuring your faucet looks as good after the repair as it did before.
Plumber’s Tape and Putty: Sealing the Fix
When performing a faucet repair, especially when reconnecting water lines or mounting the faucet, it’s important to create watertight seals to prevent new leaks. Two common products used for this are plumber’s tape and plumber’s putty. Knowing when and how to use them is an important part of how to fix a leaky faucet.
- Plumber’s Tape (Teflon Tape): This is a thin, white (usually) tape made of PTFE (polytetrafluoroethylene) used to seal the threads of pipe connections.
- Purpose: When you screw two threaded parts together (like a water supply line to a shut-off valve or faucet inlet), the tape fills the tiny gaps between the threads and acts as a lubricant, making it easier to tighten the connection properly and creating a watertight seal.
- How to Use: Wrap the tape around the male threads (the threaded part that screws into another part) in the same direction the nut will be tightened (usually clockwise when looking at the end of the thread). Apply 3-5 wraps, ensuring the tape lies flat in the threads. Start one or two threads from the end to prevent pieces of tape from getting into the water line. Do not overtighten, as this can crack the female fitting.
- When to Use: Used on most threaded plumbing connections that don’t have a built-in rubber gasket or ferrule (like compression fittings often do). Use it on the connections for the water supply lines to the shut-off valves and to the faucet inlets.
- Plumber’s Putty: This is a soft, pliable sealing compound used to create a watertight barrier between two rigid surfaces.
- Purpose: Its main purpose in faucet installation or repair is to seal the gap between the base of the faucet (or sink strainer flange) and the surface of the sink or basin. This prevents water splashed onto the counter from seeping under the faucet base and into the cabinet below. It is not an adhesive or a thread sealant.
- How to Use: Take a lump of putty and roll it between your palms into a rope-like shape. Place the “rope” around the underside of the faucet’s base flange (or sink strainer flange). Place the faucet onto the sink and tighten the mounting nuts from below. Excess putty will squeeze out around the edges. Wipe away the excess with a rag or your finger. The putty remains soft and flexible.
- When to Use: Used under the base of most kitchen and bathroom faucets when mounting them to the sink/basin.
- Warning: Do not use plumber’s putty on porous surfaces like granite, marble, quartz, or some plastics, as the oils in the putty can leach in and cause permanent stains. Use 100% silicone caulk or a non-staining putty specifically designed for these materials instead. Always read the manufacturer’s instructions for both the faucet and the sealant.
Using these sealing materials correctly is an important detail in how to mend a leaky faucet and ensuring your repair is durable and leak-free. It’s part of doing the job properly from start to finish.
Finding Replacement Faucet Parts (Cartridges, O-Rings)
One of the most critical aspects of how to fix a leaky faucet is getting the correct replacement parts. Using the wrong part, even if it looks similar, will likely not solve the problem and might even make it worse. Whether you need a new cartridge, O-rings, washers, or a valve seat, precision is key.
1. Identify Your Faucet:
- Brand and Model: The first step is to try to identify the faucet’s brand and, if possible, model number. Look for a brand name or logo on the faucet body, handle, or base. Common brands include Moen, Delta, Kohler, Price Pfister, American Standard, Grohe, etc. The model number might sometimes be on a tag on the supply lines under the sink or in the original documentation (if you have it).
- Take Photos: If you can’t find the brand, take clear photos of the faucet from different angles. This can help hardware store staff or yourself when searching online.
2. Bring the Old Parts:
- Best Method: The absolute surest way to get the right replacement parts is to take the old, worn-out parts with you to a well-stocked hardware store or plumbing supply store. Even if an O-ring looks like a standard size, there can be slight differences in thickness or diameter that are crucial. The same goes for cartridges – there are hundreds of different types, and they are rarely interchangeable between brands or even models within the same brand.
- Preparation: Once you’ve disassembled the faucet (after shutting off the water!), put the parts you think need replacing (cartridge, O-rings, washers, springs, seats) in a plastic bag and take them with you.
3. Where to Buy Parts:
- Local Hardware Stores: Major chains (like Home Depot, Lowe’s in the US, or local equivalents) often have a good selection of common repair parts, organized by brand.
- Specialized Plumbing Supply Stores: These stores often carry an even wider range and have more knowledgeable staff who can help identify and source even more obscure parts.
- Online: If you know the brand and model, or have a part number from the old part, you can often find replacement parts online through the manufacturer’s website or specialized plumbing retailers. This may be necessary for older or less common faucets.
4. Common Replacement Parts:
- Cartridges: For single-handle and some two-handle faucets. They come in various materials (plastic, brass, ceramic) and countless shapes and sizes. Match the old one exactly.
- O-Rings: Small rubber rings that seal various connection points, like around the spout base or on the valve stem. Often sold in assortment kits or individually. Bring the old one to match size and thickness.
- Washers and Springs: Common in older compression faucets and some cartridge faucets (like Delta and Moen). The washer seals against the valve seat. Springs help hold the washer in place. Often replace both at the same time.
- Valve Seats: In compression faucets, this is the surface the washer seals against. If corroded or damaged, it may need replacement (if replaceable) or resurfacing with a special tool (seat dresser).
- Ceramic Discs: In ceramic disc faucets. These are usually enclosed in a cartridge and rarely replaced separately; the entire cartridge is replaced.
Carefully identifying and obtaining the right parts is crucial for a successful leaky faucet repair. It might take a little detective work, but it’s well worth the effort to ensure a permanent fix.
How to Fix a Leaky Faucet: Step-by-Step Guide
Now that you understand why faucets leak, have gathered your tools, and know how to find the right replacement parts, it’s time to tackle the repair itself. This step-by-step guide provides a general overview of the process for how to fix a leaky faucet. Remember that the details might vary depending on your specific faucet type, but the basic steps are usually the same. Work methodically and take your time – a careful faucet repair is more likely to succeed. This is the core of learning how to fix a faucet effectively.
Step 1: Turn Off Water Supply (Crucial First Fix Step)
This is the absolute most important first step in any plumbing repair, including fixing a leaky faucet. Skipping this step will result in an unwanted indoor shower and potential water damage.
- Locate the Shut-off Valves: Look in the cabinet directly under the sink or basin where the faucet is installed. You should see two separate valves, one connected to the hot water line and one to the cold. They usually have small round or oval handles (sometimes called angle stops or stop valves).
- Close the Valves: Turn the handles on both valves clockwise (to the right) until they stop. Do not overtighten them, especially if they are old, as they can be damaged. If the valves are lever-type, turn the lever so it is perpendicular to the pipe.
- Check the Water Flow: Turn the faucet on fully (both hot and cold) to release any remaining water and pressure in the lines. The water should slow to a drip and then stop completely within a few seconds. If water continues to run, the shut-off valves aren’t working correctly.
- If the Valves Don’t Work: If the local shut-off valves don’t completely stop the water (they might be old or clogged), you need to shut off the main water valve for the entire house. This valve is typically located where the water pipe enters the house (often in the basement, crawl space, or a utility room) or sometimes outside near the water meter. Once the main valve is off, open the lowest faucet in the house (e.g., in the basement or outside) to help drain the system. Remember that no water will work in the house while the main valve is off.
- Protect the Work Area: Place a bucket or bowl under the faucet and shut-off valves to catch any residual water that might drip out during disassembly. Lay out old towels or rags around the work area.
Ensuring the water is completely shut off is a non-negotiable part of how to fix leaky faucet safely and without mess. This is the basic fix a leaky faucet preparation.
Step 2: Dismantle the Faucet Handle and Components
Once the water is off, you can begin dismantling the faucet to access the internal parts causing the leak. The process varies depending on the faucet type and design, but here are the general steps:
- Close the Drain: Cover or close the sink drain with a stopper or a rag. This prevents small screws or parts from accidentally falling down the drain – a common frustration during diy leaky faucet repair.
- Remove Decorative Cap (if present): Many faucet handles have a small plastic or metal cap (often marked with ‘H’ for hot, ‘C’ for cold, or the manufacturer’s logo) that conceals the handle screw. Use a small flathead screwdriver or a utility knife to gently pry this cap off. Be careful not to scratch the faucet’s surface.
- Loosen the Handle Screw: Under the cap, you’ll find the screw holding the handle to the faucet stem or cartridge. Use the appropriate screwdriver (usually Phillips head) or Allen wrench (for set screws) to loosen and remove the screw. Turn counter-clockwise (left) to loosen. Place the screw in a safe place.
- Remove the Handle: Pull the handle straight up or off the faucet body. If it’s stuck due to corrosion or limescale, wiggle it gently back and forth while pulling. Avoid using excessive force. In stubborn cases, a special handle puller may be needed, but first try gentle wiggling and possibly some penetrating oil around the base (let it sit for a while).
- Remove Other Parts (if necessary): Depending on the faucet type, there might be additional parts on top of the internal mechanism, such as a decorative sleeve, a retaining nut, or a dome-shaped cap. Note the order and orientation of these parts as you remove them. An adjustable wrench may be needed to loosen retaining nuts (protect the finish with a rag). Set all parts aside in the order you removed them – taking photos with your phone during the process can be very helpful for reassembly.
Carefully dismantling and keeping track of parts is crucial for a smooth repair a faucet process. Be methodical and don’t force anything.
Step 3: Identify Your Faucet Type (Ball, Cartridge, Disc, Compression)
Before you can proceed with the repair, you need to identify what type of faucet you have, as the repair method differs for each type. The four main types are:
- Compression Faucet:
- Identification: Usually has two separate handles for hot and cold that you turn multiple times to turn on and off. You feel increasing resistance as you tighten the handle to shut off the water completely. This is an older design but still common.
- Mechanism: Uses a rubber washer (seat washer) on the end of a threaded stem. As you turn the handle, the washer is compressed down onto a valve seat to stop the water flow.
- Most Common Leak: Drip from the spout (worn washer or damaged seat) or leakage around the handle (worn O-ring or loose packing nut). This is a common leaky tap to fix.
- Cartridge Faucet:
- Identification: Can have one or two handles. The handles often provide a smooth and easy feel when operated, without the “tightening” resistance of a compression faucet. Single-handle mixers that lift up and down as well as turn side to side are often cartridge faucets. Two-handle faucets where the handles only turn a quarter or half turn are also often cartridge type.
- Mechanism: Uses a movable stem or sleeve cartridge, usually made of plastic or brass, which controls water flow. Some brands (like Moen and Delta) have specific cartridge types.
- Most Common Leak: Drip from the spout or leakage around the handle, usually caused by a worn cartridge or worn O-rings on the cartridge. Replacing the cartridge is a common faucet leak fix.
- Ball Faucet:
- Identification: Almost always a single-handle mixer with a handle that moves over a rounded, ball-shaped cap at the faucet’s base. The handle controls a metal or plastic ball inside the faucet.
- Mechanism: A slotted metal or plastic ball rotates inside a socket with spring-loaded rubber seals and O-rings. The ball’s position controls the mix and flow of hot and cold water. Delta pioneered this design.
- Most Common Leak: Drip from the spout or leakage at the base of the handle. Often caused by worn spring-loaded seals, worn O-rings, or a damaged ball. Ball faucet repair kits usually contain all the necessary parts (ball, springs, seals, O-rings, and a small tool). This is a specific type of how to repair a leaky faucet scenario.
- Ceramic Disc Faucet:
- Identification: Often single-handle mixers, but also available as two-handle models. Characterized by a very smooth and effortless action (often only a quarter turn from off to full on) and a modern design with a cylindrical body. The handle often moves up/down for flow and side-to-side for temperature.
- Mechanism: Two highly durable ceramic discs rotate against each other to control water flow. One disc is fixed while the other rotates with the handle. When holes in the discs align, water flows; when they don’t, flow is shut off.
- Most Common Leak: These faucets are very durable and rarely leak. When they do, it’s usually due to worn neoprene seals at the inlets/outlets or, more rarely, a cracked ceramic disc (often due to debris). Repair usually involves replacing the entire ceramic cartridge assembly or at least the inlet/outlet seals. Fixing a faucet of this type usually involves replacing the entire unit.
Once you have identified your faucet type, you can focus on the specific repair steps for that mechanism. This is crucial for knowing how to fix a leaky faucet correctly.
Step 4: How to Repair a Leaky Faucet Cartridge or Stem
Now that you’ve identified the faucet type and removed the handle, it’s time to access and repair or replace the faulty component – usually a cartridge or a stem (for compression faucets).
For Cartridge Faucets:
- Locate the Cartridge: The cartridge sits directly under where the handle was attached.
- Remove the Locking Mechanism: There’s usually a mechanism holding the cartridge in place. It could be:
- A threaded retaining nut on top of the cartridge. Use an adjustable wrench or channel lock pliers (protect the finish!) to unscrew it counter-clockwise.
- A retaining clip, often U-shaped, that slides into slots on the side of the faucet body holding the cartridge down. Use pliers or a screwdriver to gently pull the clip straight out. Don’t lose it!
- Screws holding the cartridge down. Loosen them with the appropriate screwdriver.
- Pull Out the Old Cartridge: Grip the top of the cartridge (often a square or splined stem) with pliers. Pull the cartridge straight up and out of the faucet body. They can be quite snug due to O-rings and deposits. Wiggle it gently back and forth while pulling. Some brands (like Moen) may require a special cartridge puller tool if it’s really stuck. Note the cartridge’s orientation before removing it completely – there’s often a tab or slot that needs to align correctly upon reinstallation.
- Install the New Cartridge: Ensure the new cartridge is an exact match. Apply a thin layer of silicone-based plumber’s grease to the O-rings on the new cartridge to ease installation and protect the rubber. Slide the new cartridge into the faucet body, making sure it’s oriented correctly (align any tabs or slots). It should slide down fully.
- Secure the Cartridge: Replace the locking mechanism (nut, clip, or screws) and tighten it securely but not excessively.
For Compression Faucets:
- Locate the Stem: The stem is the part the handle was attached to.
- Remove the Packing Nut: Directly under where the handle sat is the packing nut. Use an adjustable wrench to loosen and unscrew this nut counter-clockwise.
- Unscrew the Stem: Once the packing nut is off, you can usually unscrew the entire stem assembly from the faucet body by turning it counter-clockwise with a wrench on the flat sides of the stem (or sometimes by turning the stem itself as the handle normally would).
- Inspect and Replace Washer and O-ring: At the bottom of the stem, you’ll find the rubber seat washer, usually held in place by a brass screw. Loosen the screw, remove the old washer, and replace it with a new one of the exact same size and type (flat or beveled). Retighten the brass screw. Also inspect the O-ring that sits around the stem under the packing nut threads. Replace it if it looks worn or damaged. Apply a little plumber’s grease to the new O-ring.
- Install the Stem: Screw the stem assembly back into the faucet body clockwise until snug. Then screw the packing nut back on and tighten it moderately with the wrench (enough to seal, but not so tight the stem becomes hard to turn).
For ball faucets and ceramic disc faucets, this step usually involves removing a cap or collar to access the ball or ceramic cartridge, then replacing parts according to a repair kit’s instructions or replacing the entire cartridge. The process is similar to cartridge replacement but with specific parts for these types. This covers the basic steps for how to repair a leaky faucet cartridge or stem.
Step 5: Replace Worn Seals and O-Rings
O-rings and seals are small but critical components in almost all faucet types. They are often the primary cause of leaks, especially those occurring around the handle or at the base of the spout. Replacing them is an essential part of most leaky faucet repair jobs.
Why They Fail:
- Wear and Tear: Constant movement and friction, especially in handle mechanisms, wear down the rubber over time.
- Drying and Cracking: Rubber can dry out and become brittle, especially with age and exposure to chlorinated water.
- Compression Set: Being constantly under pressure can cause them to lose their shape and sealing ability.
- Deposits: Mineral deposits (limescale) can build up on and around seals, preventing them from seating properly.
How to Replace Them:
- Identify the Location: O-rings and seals are found in several places:
- On the Cartridge/Stem: As mentioned in the previous step, there are often O-rings on the body of the cartridge or compression stem that seal against the inside of the faucet body. These prevent leaks up through the handle.
- At the Spout Base: If your faucet leaks at the base where the spout swivels, there are usually one or more O-rings inside the faucet body that seal around the lower part of the spout. Accessing these usually requires removing the spout. This might involve loosening a collar, pulling out a clip, or simply lifting and twisting the spout off after the handle and cartridge/stem are removed (varies greatly by model).
- On the Aerator: While not causing a drip, a worn gasket in the aerator (the small screen at the end of the spout) can cause leakage around the aerator when the water is running.
- Remove the Old Seals: Use a small flathead screwdriver, an O-ring pick, or even a paperclip to carefully pry or hook the old O-ring out of its groove. Be careful not to scratch the metal surfaces where the O-ring sits.
- Clean the Groove: Before inserting the new O-ring, clean the groove thoroughly with a rag or small brush to remove any dirt, corrosion, or old rubber fragments.
- Choose the Right Replacement: Match the old O-ring exactly in size (diameter) and thickness. Using the wrong size will not seal properly. It’s often best to buy an O-ring assortment kit or take the old one to the store.
- Lubricate the New O-ring: Apply a thin coat of silicone-based plumber’s grease to the new O-ring. This helps it slide into place easily, protects the rubber from pinching or damage during installation, and extends its life. Do not use petroleum-based grease (like Vaseline), as it can cause rubber to swell and degrade.
- Install the New O-ring: Gently roll or stretch the new O-ring over the part and into its groove. Ensure it is seated evenly and not twisted.
Carefully inspecting and replacing all suspect O-rings and seals while the faucet is apart is good practice for a thorough fix a leaky faucet and can prevent future problems. This is an often overlooked but important part of faucet maintenance.
Step 6: Clean Faucet Parts Thoroughly
While the faucet is disassembled, it’s a perfect opportunity to clean all components thoroughly. Mineral deposits (limescale and rust) from the water can build up inside the faucet over time. These deposits can cause parts to bind, wear out seals and cartridges, and may even be a contributing factor to the leak. A clean faucet works better and lasts longer.
Cleaning Process:
- Gather the Parts: Place all disassembled metal parts (stem, cartridge body if metal, retaining nuts, spout, etc.) and plastic parts in a bowl or container. Avoid soaking sensitive electronic components if you have a touchless faucet.
- Use White Vinegar: White vinegar is excellent for dissolving mineral deposits. Pour enough vinegar into the container to cover the parts. Let them soak for at least 30 minutes to an hour, or longer for heavy deposits (up to overnight for stubborn cases, but check periodically, especially on finished parts).
- Scrub Gently: After soaking, use an old toothbrush or a small soft brush to scrub away any remaining deposits. Pay special attention to threads, small openings, and grooves where O-rings sit. For stubborn spots, you can make a paste of baking soda and water and scrub with that.
- Clean the Faucet Body: While the parts are soaking, use a rag dipped in vinegar and a brush to clean the inside of the faucet body where the cartridge or stem sits. Try to remove all visible grime and deposits. Be careful not to scratch the interior surfaces. For compression faucets, inspect the valve seat inside the faucet body. If it’s rough or nicked, it may need to be resurfaced with a valve seat tool (seat dresser/grinder) or replaced if possible. A damaged seat will continue to cause drips even with a new washer.
- Rinse Thoroughly: Once everything is clean, rinse all parts thoroughly with clean water to remove all vinegar and loosened particles. Ensure all small holes and passageways are clear of debris.
- Clean the Aerator: Unscrew the aerator from the end of the spout (use a rag to protect the finish if you need pliers). Disassemble it (noting the order of screens and washers) and clean the parts the same way as above, soaking in vinegar and scrubbing, to remove sediment that can restrict flow.
- Dry the Parts: Dry all parts thoroughly with a clean cloth before reassembly.
This cleaning process is an important part of faucet maintenance and contributes to a more effective and long-lasting leaky faucet repair. It ensures the new parts operate in a clean environment.
Step 7: Reassemble the Faucet Components
Now that the faulty parts are replaced and everything is clean, it’s time to put the faucet back together. Work in the reverse order of how you disassembled it. Accuracy here is just as important as during disassembly.
- Install Internal Components: Insert the repaired or new stem/cartridge/ball/ceramic assembly back into the faucet body. Ensure it is oriented correctly and fully seated. Apply plumber’s grease to O-rings if you haven’t already.
- Secure the Internal Mechanism: Replace any retaining nuts, clips, or screws that hold the internal mechanism in place. Tighten nuts and screws securely, but avoid overtightening, which can damage threads or crack parts. Nuts should generally be “hand-tight plus a quarter turn” with a wrench, but follow manufacturer specs if available.
- Reinstall the Spout (if removed): If you removed the spout to replace base O-rings, ensure the new O-rings are lubricated and reinstall the spout. It often needs to be pushed down and possibly twisted to lock into place, or secured with a collar or clip.
- Reassemble Other Parts: Replace any sleeves, caps, or decorative rings that sat on top of the internal mechanism, in the correct order.
- Replace the Handle: Align the handle correctly onto the stem or cartridge top (there are often splines or a flat side that must match). Push the handle down firmly.
- Attach the Handle Screw: Reinsert the handle screw (Phillips, flathead, or hex) and tighten it securely so the handle is firm and doesn’t wobble. Don’t overtighten, especially if it’s a small screw in plastic.
- Replace the Decorative Cap: Press the small cap back into place to cover the handle screw.
- Screw Back the Aerator: Reassemble the aerator and screw it back onto the end of the spout. Tighten it hand-tight; if it leaks slightly at the side when the water is on, tighten it a little more with pliers (protect the finish with a rag).
Check that all parts are correctly assembled and the handle moves smoothly. Double-check that everything feels stable. This completes the mechanical part of how to fix a leaky faucet. The next step is to test your work.
Step 8: Test Your Leaky Faucet Repair
This is the moment you find out if your faucet repair was successful. Testing correctly is important to ensure there are no new leaks and the faucet operates as it should.
- Check That the Faucet is Closed: Make sure the faucet handle(s) are in the off position before turning the water back on.
- Turn On the Water Supply Slowly: Go back to the shut-off valves under the sink (or the main water valve if you turned it off). Turn both valves (hot and cold) on very slowly by turning them counter-clockwise (left). Turning them on slowly reduces the chance of “water hammer” (a jolt in the pipes) and gives you time to quickly shut them off again if you see an obvious leak. Open them fully once water is flowing.
- Check for Immediate Leaks: Look and feel carefully around all the connections and parts you worked on:
- Around the base of the faucet handle(s).
- Around the base of the spout (where it meets the faucet body or sink).
- At the connections to the shut-off valves and where the supply lines connect to the faucet under the sink.
- Under the faucet body itself inside the cabinet.
- Open the Faucet Gently: Slowly turn the faucet on and let the water run for a few seconds. Then turn it off.
- Check the Spout: Look closely at the spout opening. Are there any drips? Leave it off for several minutes and check again. Hopefully, the original dripping is gone – your fix leaky faucet operation was successful!
- Test Both Hot and Cold: Turn the faucet fully to cold and let it run for a bit. Check for leaks again. Turn it off. Then turn fully to hot and let it run. Check for leaks. Test mixed water as well. Check that the handle moves smoothly through its full range of motion.
- Check the Aerator: Make sure water flows smoothly from the aerator. If the stream is weak or erratic, the aerator might be clogged or improperly assembled. Unscrew it, check and clean if necessary, and reinstall it.
- Final Leak Check: Once you’re satisfied there are no obvious leaks, dry everything thoroughly under the sink and around the faucet base. Place a dry paper towel under the faucet and around the connections. Check it again after an hour, and then again after a few hours or the next day to be sure no slow seeping leaks have developed.
If everything is dry and the faucet operates correctly, congratulations! You’ve successfully learned how to fix a leaky faucet and completed the repair. If you still have a drip or a new leak, go back through the steps, check your work, and ensure you used the right parts and assembled everything correctly.
Repair a Faucet: Common Issues and Solutions
Even after carefully following the steps, you might sometimes encounter specific problems or find the leak persists or has moved. Understanding where the leak is coming from can help you zero in on the problem. Here we look at some common leaky faucet scenarios and their likely causes and solutions. Being able to troubleshoot a leaky faucet is an important part of the repair process.
How to Troubleshoot a Dripping Faucet Spout
A constant drip from the spout opening itself, even when the faucet is fully turned off, is the most common leaky faucet problem. This almost always indicates an issue with the faucet’s internal sealing mechanism.
Possible Causes and Solutions:
- Worn Seat Washer – Compression Faucet: This is the most common cause by far in compression faucets. The rubber washer at the bottom of the stem no longer seals properly against the valve seat.
- Solution: Follow the steps to dismantle the handle, remove the packing nut, and unscrew the stem. Replace the rubber washer with a new one of the exact same size and type. Remember to also check the brass screw holding it. This is a basic fix leaky faucet measure.
- Damaged Valve Seat – Compression Faucet: If the washer is new but the faucet still drips, the valve seat (the metal surface the washer presses against inside the faucet body) might be corroded, scratched, or nicked.
- Solution: Inspect the seat with a flashlight. If it looks damaged, you can try smoothing it with a special tool called a valve seat dresser/grinder. Follow the tool’s instructions. If the seat is too damaged or if it’s a replaceable type, it needs to be replaced (often requires a special seat wrench). This is a more advanced faucet repair.
- Worn Cartridge – Cartridge, Ball, or Disc Faucet: In these faucet types, the internal cartridge or ball valve components control the water flow. If these parts are worn or damaged, water can seep through even when closed.
- Solution: Replace the entire cartridge or the repair kit for the ball/disc faucet. Ensure you have the exact replacement part for your faucet model. Follow the steps to remove the old cartridge/parts and install the new one. This is the most common how to repair a leaky faucet cartridge solution.
- Worn Springs and Seals – Some Cartridge and Ball Faucets: Certain designs (especially older Delta and similar ball valves) use small rubber seals pressed against the ball by springs. If these seals or springs are worn, it can cause dripping.
- Solution: Replace both the springs and the rubber seals. These are usually included in a ball valve repair kit. Make sure the small seals are oriented correctly in their recesses.
- Debris in the Faucet: Sometimes small pieces of debris, sediment, or a fragment of an old washer can get lodged in the mechanism, preventing it from closing completely.
- Solution: When you have the faucet apart, flush the faucet body by slightly opening the shut-off valves (have a bucket ready!). This can dislodge any loose debris. Clean all parts thoroughly before reassembly.
Troubleshooting a dripping faucet spout involves systematically checking the internal sealing components based on your faucet type.
Leaky Faucet Solutions for Base Leaks
If you see water seeping out or pooling around the base of the faucet spout (where it meets the faucet body, especially on faucets with swiveling spouts), this points to a problem with the seals designed to prevent water from leaking out at this joint.
Possible Causes and Solutions:
- Worn O-rings at the Spout Base: This is by far the most common cause of leaks at the spout base. The spout rotates on one or more O-rings seated in grooves inside the faucet body or on the spout base itself. As these O-rings wear out from movement and age, water can seep past them when the faucet is on.
- Solution: You need to remove the spout to access the O-rings. The process varies: some spouts simply lift off after the handle and cartridge/retaining nut are removed, others might be held by a threaded collar at the base, a small set screw, or a clip. Once the spout is off, locate the old O-rings (there might be one, two, or more). Remove them, clean the grooves, and install new, correctly sized and lubricated O-rings. Reinstall the spout. This is a specific leaky faucet solution.
- Loose Spout: Sometimes the mechanism holding the spout in place might have loosened, creating a gap where water can leak.
- Solution: Check if there’s a nut, collar, or screw holding the spout and tighten if necessary. If this doesn’t help, it’s likely the O-rings.
- Cracked Faucet Body or Spout: Although uncommon, the faucet body or spout itself could have developed a crack, especially if very old or subjected to freezing.
- Solution: Inspect carefully for cracks. If you find one, repair is usually not feasible or cost-effective. The entire faucet likely needs replacement.
Fixing a leak at the base usually involves focusing on the O-rings that seal the spout to the faucet body. This is an important part of how to stop faucet leak at the base.
How to Stop Faucet Leak from Under the Handle
If water leaks out from around the base of the faucet handle itself when you turn the water on, it indicates a problem with the seals meant to prevent water from traveling up the stem or cartridge.
Possible Causes and Solutions:
- Worn O-ring on Stem/Cartridge: Most cartridges and compression stems have one or more O-rings around their body that seal against the inside of the faucet body. If these O-rings are worn, water can be forced up the sides and leak out under the handle.
- Solution: Follow the steps to remove the handle and expose the stem or cartridge. Remove the stem/cartridge. Locate the O-rings on its body. Replace them with new, correctly sized, and lubricated O-rings. This is a very common fix a leaky faucet measure.
- Loose or Worn Packing Nut – Compression Faucet: On compression faucets, there’s a packing nut just under the handle that compresses packing material (often a rubber or graphite packing, or an O-ring) around the stem to prevent leaks. If this nut is loose, water can seep out. If the packing material inside is worn, it can also cause leakage.
- Solution: First, try gently tightening the packing nut slightly (clockwise) with an adjustable wrench. Do this with the water on (carefully!) to see if the leak stops. Don’t overtighten, or the handle will become hard to turn. If tightening doesn’t help, turn off the water, remove the handle, and unscrew the packing nut completely. Inspect the packing (or O-ring) inside. Replace it if it looks worn. Sometimes, wrapping a few turns of special graphite packing string around the stem under the nut can serve as a temporary home remedy for leaky faucet. Replacing the O-ring or packing is the best solution, though.
- Worn or Cracked Cartridge: If the body of the cartridge is cracked or the seals at the top of the cartridge are damaged, water can leak upwards.
- Solution: Replace the entire cartridge. Inspect the old cartridge carefully for signs of damage when you remove it.
- Incorrectly Installed Cartridge/Stem: If the cartridge or stem wasn’t seated correctly after a previous repair, it might not be sealing properly against the faucet body.
- Solution: Disassemble again and ensure the cartridge/stem is fully seated, correctly oriented, and any locking mechanisms are properly tightened.
Stopping a faucet leak from under the handle usually involves focusing on the O-rings or the packing nut/packing that seals around the moving stem or cartridge.
How to Repair a Faucet Cartridge In-Depth
Cartridge faucets are extremely common in modern homes, in both kitchens and bathrooms. Understanding how to specifically handle a leaky faucet caused by a faulty cartridge is therefore a very useful skill. While the basic principle – replace the cartridge – is simple, there can be nuances and potential difficulties. This section provides a more detailed look at how to repair a faucet cartridge.
Detailed Guide to Removing the Old Faucet Cartridge
Getting the old cartridge out is often the most challenging part of the job, especially if the faucet is old or if you have hard water that has caused deposits.
- Preparation: Ensure water is off (Step 1) and the handle and any covering sleeves or nuts are removed (Step 2). Identify the locking mechanism (nut, clip, screws).
- Remove the Locking Mechanism:
- Retaining Nut: Use an appropriate wrench or pliers. If stuck, spray some penetrating oil around the threads and let it sit. Tap the wrench handle gently to help break it loose. Protect the finish!
- Retaining Clip: Note exactly how it’s seated before pulling it out. Use needle-nose pliers or a screwdriver. Pull it straight out. Don’t lose it!
- Screws: Use the correct screwdriver and apply firm pressure to avoid stripping the head.
- Attempt to Pull Out the Cartridge: Grip the cartridge top (the stem) with pliers (preferably ones with parallel jaws for a better grip). Try pulling it straight up with steady, even force. Wiggling it slightly back and forth or side to side while pulling can help.
- If the Cartridge is Stuck (Common Problem): This often happens due to mineral deposits “gluing” the cartridge into the faucet body.
- More Twisting/Wiggling: Try twisting the cartridge more firmly back and forth with the pliers to break the deposits loose before pulling upwards.
- Penetrating Oil: Spray penetrating oil around the edge where the cartridge meets the faucet body. Let it work for 15-30 minutes (or longer) and try again.
- Vinegar: If oil doesn’t work, try dripping or spraying white vinegar around the cartridge edge to dissolve mineral deposits. Let it sit.
- Heat (Use with Extreme Caution): Gently warming the faucet body around the cartridge with a hairdryer (not a heat gun!) might cause the metal to expand slightly, helping to free the cartridge. Be very careful not to overheat or melt plastic parts.
- Cartridge Puller: This is often the most effective solution for truly stubborn cartridges, especially for certain brands like Moen (which has a specific tool). A cartridge puller is designed to grip the cartridge and use leverage or a screw mechanism to pull it straight out without damaging the faucet body. They are available at hardware stores and are often brand-specific. Read the instructions carefully. This tool can be a lifesaver for a difficult faucet repair.
- When the Cartridge is Out: Inspect the inside of the faucet body thoroughly. Clean it of all deposits, debris, or bits of the old cartridge’s seals using vinegar and a brush (as described in Step 6). This is crucial for the new cartridge to seal properly.
Having patience and the right tools (including a cartridge puller if necessary) is key to successfully removing an old, stuck cartridge.
Selecting the Correct Replacement Cartridge for Your Faucet
Choosing the wrong replacement cartridge is a common mistake that will guarantee your fix a leaky faucet effort fails. Cartridges are not universal; they are specific to the faucet brand and often even the model series.
Strategies for Finding the Right Cartridge:
- Bring the Old Cartridge: This is the absolute surest method. Once you’ve removed the old cartridge, take it to a well-stocked hardware or plumbing supply store. The staff there can visually match it or use measuring tools and reference guides to find an exact replacement. Note:
- Material (plastic, brass, ceramic)
- Size (length, diameter)
- Shape of the bottom (hole configuration, seals)
- Type of stem (square, splined, flat side)
- Any identifying numbers or markings on the cartridge itself.
- Identify Faucet Brand and Model: If you know the brand (Moen, Delta, Kohler, etc.) and ideally the model number (look under the sink or on original packaging/manual), you can:
- Visit Manufacturer’s Website: Most major manufacturers have support sections on their websites where you can identify your faucet (often with pictures) and find the correct part number for the replacement cartridge.
- Use Online Retailer Search Functions: Many online plumbing parts suppliers allow you to search by brand and model.
- Ask at the Store: Even without the old cartridge, knowledgeable staff can sometimes identify the right one if you know the brand and can describe the faucet or show a picture.
- Use Universal Repair Guides: Some hardware stores have binders or displays with pictures and dimensions of various cartridges, sorted by brand, to help with identification.
- Be Aware of Variations: Even within the same brand, there can be different cartridges for different models or generations of faucets. For example, Moen has several common cartridges (like 1200, 1222, 1225) that look similar but are not interchangeable. Delta also has different cartridges for its older ball valves versus its newer Diamond Seal Technology faucets.
- OEM vs. Aftermarket Parts: You can often choose between an original equipment manufacturer (OEM) cartridge from the faucet maker or a less expensive aftermarket version. OEM parts are generally preferred for the best fit and longevity, but high-quality aftermarket parts can also work well.
Invest time in ensuring you have the exact right cartridge before leaving the store or ordering online. It will save you a return trip and frustration. This is crucial for a successful how to fix a leaky faucet cartridge operation.
Tips for Fixing a Leaky Faucet Cartridge Without Hassle
Replacing a faucet cartridge is usually a straightforward process once you have the right part and the old one is out. Here are some extra tips to make the job smoother and ensure a good result:
- Lubricate the O-rings: Always apply a thin coat of silicone-based plumber’s grease to all O-rings on the new cartridge before installation. This is crucial for it to slide in easily, seal properly, and prevent damage to the rubber.
- Check the Orientation: Most cartridges have a specific orientation. There might be a small tab, a groove, or a specific shape on the bottom that needs to align with a corresponding recess in the faucet body. Look at the old cartridge as you remove it and note how it was seated. Forcing the cartridge in the wrong orientation can damage both the cartridge and the faucet and will definitely cause leaks or operational problems.
- Ensure It’s Fully Seated: The cartridge must be fully seated in the faucet body before you replace the locking mechanism. If it’s sticking up slightly, it’s either not oriented correctly or there’s debris in the bottom of the socket. Remove it, check, and try again.
- Tighten the Locking Mechanism Appropriately: Whether it’s a nut, clip, or screws, tighten them enough to secure the cartridge firmly, but avoid overtightening. Overtightening can crack plastic cartridges, damage threads, or make future removal difficult. Snug is the keyword.
- Flush the System (Optional but Recommended): Before replacing the handle, you can briefly turn the water on gently (with a towel or bucket ready) to flush out any debris from the repair before it reaches the new cartridge or aerator. Quickly turn the water off again.
- Test the Movement: Once the handle is back on, check that it moves smoothly through its full normal range of motion (up/down, side-to-side). If it feels stiff or restricted, the cartridge may be installed incorrectly.
- Slow Water Turn-On: When testing the repair, open the shut-off valves very slowly to let the system pressurize gradually.
- Keep the Old Cartridge Handy: Hold onto the old cartridge until you are completely sure the new one is working correctly and not leaking. If problems arise, you might need to compare them again or even temporarily reinstall the old one if the new one seems faulty.
By following these tips for fixing a leaky faucet cartridge, you increase the chances of a hassle-free repair and a faucet that works perfectly again.
Fix a Leaky Compression Faucet Guide
Compression faucets, with their traditional separate handles for hot and cold and the need to turn them multiple times, are a classic design. Although less common in new installations, they are still found in many homes, especially in older properties or in utility sinks and outdoor spigots. Fixing a leaky compression faucet is often one of the easiest faucet repairs, as the mechanism is relatively simple and problems usually stem from a worn washer or packing.
Specific Methods to Fix a Leaky Compression Faucet
The repair of a compression faucet almost always focuses on the stem assembly found under each handle. Leaks occur either from the spout (dripping) or around the base of the handle.
For Drips from the Spout:
This is almost invariably caused by the rubber seat washer at the bottom of the stem no longer sealing against the valve seat inside the faucet body.
- Disassemble: Turn off the water, remove the handle (cap, screw, lift off handle).
- Remove the Packing Nut: Use a wrench to unscrew the packing nut surrounding the stem.
- Unscrew the Stem: Use the wrench on the flat sides of the stem and turn it counter-clockwise to unscrew the entire assembly from the faucet body.
- Replace the Washer: At the bottom of the stem is the washer, usually held by a brass screw. Loosen the screw, remove the old washer. Note if it’s flat or beveled. Replace it with a new one of the exact same size and type. Retighten the brass screw (not too tight).
- Inspect/Clean the Seat: Look into the faucet body with a flashlight where the stem was. Check the valve seat (the raised brass ring the washer seals against). If it’s rough or nicked, the new washer won’t seal. Clean it with a rag or brush. If damaged, use a valve seat dresser to smooth the surface, or replace the seat if possible (requires special tool).
- Reassemble: Screw the stem back in (clockwise), tighten the packing nut (moderately), replace the handle.
For Leaks Around the Handle Base:
This is caused by the packing under the packing nut no longer sealing around the stem.
- Try Tightening the Packing Nut: With the water on (carefully!), use a wrench to very gently tighten the packing nut (clockwise) just a little (maybe 1/8 to 1/4 turn). See if the leak stops. If it does, and the handle still turns without excessive resistance, you’re done. Don’t overtighten!
- Replace Packing/O-ring: If tightening doesn’t help or makes the handle too stiff, the packing needs replacement. Turn off the water, remove the handle, unscrew the packing nut completely. Under the nut is the packing – it might be an O-ring, a graphite packing, or a special rubber packing. Pick out the old packing. Clean the area. Install new packing of the correct type and size (lubricate O-rings with plumber’s grease). Replace the packing nut and tighten moderately. Replace the handle.
These are the primary methods to fix a leaky compression faucet. It’s almost always about the washer for spout drips and the packing for handle leaks.
Replacing the Seat Washer: A Common Fix Leaky Faucet Task
Replacing the seat washer is the most common repair on a compression faucet and often all that’s needed to stop an annoying drip from the spout. It’s a core part of how to fix a leaky faucet of this type.
Detailed Steps for Replacing the Washer:
- Turn Off Water and Disassemble: Follow the steps above: shut off water, remove handle, loosen packing nut, and unscrew the entire stem assembly.
- Locate the Washer and Screw: Look at the bottom of the stem assembly. You’ll see a rubber washer (usually black) held in place by a central brass screw.
- Loosen the Brass Screw: Use an appropriate flathead screwdriver to loosen and remove the screw. Hold the stem steady so it doesn’t spin. The screw might be tight or corroded. Use the right size screwdriver and apply firm pressure. If very corroded, a little penetrating oil might help. Place the screw somewhere safe.
- Remove the Old Washer: Pry the old rubber washer off its seat in the stem. Note its size and whether it’s flat on both sides or has a beveled/tapered edge. Also note which side faced outwards.
- Choose the Right Replacement Washer: Take the old washer (and possibly the screw) to the hardware store. Find an exact replacement in both diameter and thickness. Also choose the correct type – flat or beveled. Flat washers are more common, but beveled washers are sometimes used to conform better to worn seats. If unsure, buy both types in the correct size. Washers are often sold in assortment packs.
- Install the New Washer: Place the new washer in the seat on the stem. If beveled, the tapered edge usually faces towards the valve seat (into the faucet), but double-check if you could tell how the old one sat. Reinsert the brass screw and tighten it firmly, but not so tight that you distort or damage the rubber washer. It just needs to hold the washer securely.
- Inspect/Clean the Valve Seat: Before reinstalling the stem, take the opportunity to inspect and clean the valve seat inside the faucet body as described in the previous section. A new washer won’t help if the seat is damaged.
- Reassemble the Faucet: Screw the stem back in, tighten the packing nut, replace the handle, and test the repair.
Replacing the washer is a simple, inexpensive, and often highly effective fix leaky faucet action for compression faucets. It’s a basic plumbing repair skill.
Home Remedy for Leaky Faucet: Tightening the Packing Nut
If your compression faucet leaks water around the base of the handle (not from the spout) when the water is on, there’s a very simple home remedy for leaky faucet you can try before replacing parts: tightening the packing nut.
What is the Packing Nut?
The packing nut is the nut visible on the faucet body just beneath the handle, surrounding the stem the handle attaches to. Its job is to compress a packing material (an O-ring, rubber, or graphite packing) around the stem to create a watertight seal, while still allowing the stem to rotate when you turn the handle.
How to Try Tightening It:
- Leave the Water On: For this specific adjustment, it’s best to leave the water supply on so you can see if the tightening stops the leak in real-time. Have a rag ready.
- Remove the Handle (Optional but Recommended): While you can sometimes access the nut with the handle on (using a thin wrench), it’s usually much easier to remove the handle first (cap, screw, lift off handle). This gives you clear access to the packing nut.
- Locate the Packing Nut: It’s the nut now exposed around the stem.
- Use the Right Tool: Use an adjustable wrench or an open-end wrench that fits the nut’s flat sides exactly.
- Tighten Very Gently: Place the wrench on the nut. Turn it clockwise (right) very slowly and gently. You usually only need to tighten it a tiny amount – perhaps 1/8 to 1/4 of a turn maximum.
- Observe the Leak: Watch the area around the stem where it was leaking. See if the leak slows or stops completely as you tighten the nut.
- Check Handle Movement: As you tighten, feel how stiff the stem becomes to turn (you might need to pop the handle back on temporarily to feel). The goal is to tighten just enough to stop the leak, but not so much that the handle becomes difficult or impossible to turn. It should still operate reasonably smoothly.
- Find the Balance: Adjust the tightness until the leak stops and the handle is still reasonably easy to turn. If you have to tighten so much that the handle becomes very stiff to stop the leak, the packing inside is likely too worn and needs replacement (see previous section).
- Reassemble the Handle: If tightening was successful, replace the handle, screw, and cap.
Tightening the packing nut is a quick and easy thing to try and can often solve the problem of leaks around the handle without needing further disassembly or parts. It’s a classic faucet repair tip for compression faucets.
Advanced Faucet Repair Tips and DIY Help
Sometimes a diy leaky faucet repair doesn’t go as planned. The leak might persist, you encounter unexpected problems, or you feel unsure about the next step. Here are some advanced tips and advice for handling tougher situations and knowing when it’s time to hand the job over to a pro. Knowing your limits is also part of being a smart DIYer.
DIY Leaky Faucet Repair: When to Call a Plumber
Although many leaky faucet problems can be solved with a DIY approach, there are situations where calling a professional plumber is wiser and safer. Attempting repairs beyond your comfort zone or skill level can lead to bigger damage and more expensive repairs in the long run.
Consider Calling a Plumber If:
- You Can’t Turn Off the Water: If the local shut-off valves under the sink don’t work (won’t shut off the water completely or are seized) and you can’t or don’t want to shut off the main water valve to the house (or if that’s also problematic), the valves need replacement. This is a job for a plumber.
- The Leak Persists After Several Repair Attempts: If you’ve carefully replaced the obvious parts (cartridge, washers, O-rings) with the correct replacements, but the faucet still leaks, there might be a more subtle problem, like a hairline crack in the faucet body or a damaged valve seat that can’t be resurfaced. A plumber has the experience and tools to diagnose these tougher cases.
- The Faucet is Very Old or Obscure: If the faucet is antique or an uncommon brand, finding the right replacement parts can be extremely difficult. An experienced plumber may have access to more suppliers or know which modern parts might be adaptable.
- You Suspect Problems with the Water Lines: If you see signs of corrosion, rust, or leaks on the actual water supply lines connecting to the faucet, or if you have trouble loosening or tightening the connections without damaging the pipes, it’s best to let a professional take over. Breaking an old pipe can cause a major water damage incident.
- The Valve Seat is Severely Damaged (Compression Faucet): If the valve seat is deeply scratched, pitted, or corroded beyond what simple resurfacing can fix, and it’s not a replaceable type, the entire faucet may need replacement.
- You Have Broken a Part: If you accidentally strip a screw head, break off part of the stem or cartridge, or crack the faucet body while trying to loosen a stuck part, the situation has become more complicated and likely requires professional help or replacement of the entire faucet.
- You Suspect High Water Pressure: If multiple faucets in the house are leaking, or if the leak returns quickly after repair, the problem might be excessive water pressure in the entire system. A plumber can measure the pressure and install or adjust a pressure reducing valve (PRV) if needed.
- You Feel Unsure or Uncomfortable: If you feel overwhelmed, unsure of the steps, lack the right tools, or are simply not comfortable working with plumbing, there’s no shame in calling a professional. It’s better than risking making the problem worse. A simple faucet repair is usually not an expensive service from a plumber and can provide peace of mind.
- The Leak is Coming From the Faucet Body Itself: If water seems to be seeping from a crack in the actual metal body of the faucet (not at a connection or moving part), the faucet is beyond repair and must be replaced.
Knowing when to throw in the towel and call a pro is just as important as knowing how to fix a leaky faucet yourself.
Ways to Fix a Leaky Faucet with Stubborn Leaks
You’ve replaced the cartridge, washers, and O-rings, but that stubborn dripping continues. What else can you try? Here are some additional ways to fix a leaky faucet that refuses to cooperate:
- Double-Check the Replacement Parts: Are you absolutely certain you got the exact correct cartridge, washer, or O-ring? Compare the old and new parts side-by-side again. Even a tiny difference in size or shape can prevent a proper seal. It’s surprisingly easy to get the wrong part, even from a knowledgeable salesperson.
- Inspect the Faucet Body More Thoroughly: Remove the new cartridge/stem again. Clean the inside of the faucet body extremely carefully. Use a flashlight and look for:
- Debris: Tiny bits of old O-ring, limescale flakes, or sediment that might be lodged where the cartridge/washer needs to seal.
- Scratches or Nicks: Fine scratches or tiny nicks on the sealing surfaces inside the body (especially the valve seat in compression faucets) can create a path for water to seep through. Try gently smoothing minor imperfections with very fine emery cloth (if accessible) or use a valve seat dresser if it’s a seat issue.
- Cracks: Look for hairline cracks in the metal. These are often hard to see but can cause an inexplicable leak. A crack usually means the faucet needs replacement.
- Check the Assembly Again: Ensure the cartridge/stem is fully seated and correctly oriented. Check that the locking mechanism (nut, clip) is properly tightened, but not so tight it’s distorting the cartridge.
- Try Another Replacement Part: Even new parts can occasionally be defective from the factory. If you’ve tried everything else, it might be worth buying another replacement cartridge (perhaps from a different brand or an OEM part if you used aftermarket) and see if that makes a difference.
- Check the Water Pressure: As mentioned before, if the pressure is too high, it can force water past even new seals. You can buy a simple water pressure gauge that screws onto an outdoor hose bib or washing machine connection to check the pressure. Ideal pressure is typically between 40-60 PSI. If it’s consistently over 80 PSI, you should consider having a pressure reducing valve (PRV) installed or adjusted, which is usually a job for a plumber.
- Flush the Lines More Thoroughly: Larger pieces of debris can sometimes break loose from upstream pipes, especially after the water has been shut off. Try removing the cartridge/stem again and opening the shut-off valves a bit more forcefully (with a bucket ready) to try and flush out any larger debris that might be caught in the valves or inside the faucet body.
- Consider the Faucet’s Age and Condition: If the faucet is very old and corroded, the metal might have become porous, or the tolerances between parts may have increased so much that achieving a perfect seal is difficult. In such cases, replacing the entire faucet might be more cost-effective and less frustrating.
Dealing with a stubborn leak requires patience and systematic troubleshooting. Go through these points carefully before giving up or calling for help. These leaky faucet solutions cover most of the less common causes.
How to Mend a Leaky Faucet: Final Checks
When you believe you have successfully repaired your leaky faucet, there are a few final checks and actions to ensure everything is in top shape and to prevent future problems. This is the last step in how to mend a leaky faucet properly.
- Check All Connections Again: Do one last visual and tactile check of all the points where you loosened and tightened nuts or fittings:
- Connections between supply lines and shut-off valves.
- Connections between supply lines and faucet inlets under the sink.
- The packing nut (if applicable).
- The retaining nut/clip holding the cartridge/stem.
- The aerator on the end of the spout.
- Verify Smooth Operation: Operate the faucet handle(s) through their full range of motion. They should feel smooth and consistent, without binding, stiffness, or excessive looseness. Check that you get both hot and cold water and that mixing works correctly. If you have a swivel spout, check that it moves easily but isn’t too loose.
- Check the Water Flow: Ensure the water flow from the spout is steady and strong. If the flow is weak or sputtering, the aerator is likely clogged with debris dislodged during the repair, or it’s not assembled correctly. Unscrew it, clean it thoroughly again, and reinstall it.
- Listen for Drips: Turn the faucet off completely. Listen carefully. It should be completely silent. No dripping sounds from the spout.
- Long-Term Monitoring (A Few Hours): Leave the area under the sink completely dry. Place a dry paper towel under the faucet base and around the connections under the sink. Come back after an hour or two and check the paper carefully for any signs of moisture. Repeat the check again later in the day or the next morning. Small, slow leaks can take time to show up.
- Clean the Faucet Exterior: Once you’re fully satisfied with the repair, clean the outside of the faucet from fingerprints, water spots, or any spilled cleaners or oils. A clean, shiny faucet is the reward for your work.
- Note the Repair: It can be helpful to make a note of the date of the repair and what parts were replaced (e.g., “Replaced kitchen faucet cartridge, Moen #1225, Oct 27, 2023”). This can aid future maintenance or troubleshooting. Save any information about the replacement part.
By performing these final checks, you ensure that your faucet repair is complete and that you can trust your faucet to be leak-free and function correctly. You’ve now mastered how to fix a leaky faucet and helped conserve water and save money.