How to Prep Walls for Painting: The Ultimate Guide
Embarking on a painting project can transform a room, breathing new life and personality into your space. However, the secret to a stunning, long-lasting finish doesn’t lie solely in the quality of the paint or the skill of the painter. It resides predominantly in the meticulous preparation undertaken before a single drop of color touches the surface. Understanding how to prep walls for painting is arguably the most critical aspect of the entire process. Many homeowners, eager to see results, rush this stage, only to find their efforts undermined by peeling paint, visible imperfections, and a generally unprofessional appearance. This comprehensive guide is designed to navigate you through every essential step of wall prep, ensuring that your surfaces are perfectly primed and ready for transformation. We will delve into the intricacies of cleaning, repairing, sanding, taping, and priming, providing you with the knowledge and techniques needed for preparing walls for painting like a seasoned professional. Proper paint preparation is not just about aesthetics; it’s about ensuring the durability and longevity of your paint job. By investing time and effort in prepping walls for painting, you are laying the foundation for a flawless finish that you can admire for years to come. This guide covers everything from initial assessment to the final checks, making the often-daunting task of wall prep for interior painting manageable and effective. Learn how to prep walls correctly and turn your painting vision into a stunning reality.
Painting Prep
Painting prep is the unsung hero of any successful paint job. It’s the meticulous, often tedious, groundwork that separates an amateur attempt from a professional-grade finish. While choosing the perfect color and applying it evenly are important, they are rendered almost insignificant if the underlying surface isn’t properly prepared. Effective paint prep for walls involves a series of crucial steps designed to create a clean, smooth, and stable surface that readily accepts and holds paint. Think of it as building a strong foundation for a house; without it, the structure is compromised. Similarly, without thorough painting prep, your paint is likely to fail prematurely, exhibiting problems like blistering, cracking, peeling, or revealing every minor flaw underneath. This section will guide you through the essential stages of paint preparation, emphasizing why each step, from cleaning away grime to applying the right primer, is indispensable. Mastering painting prep walls techniques is fundamental for anyone looking to achieve durable and aesthetically pleasing results. We’ll explore the tools, materials, and methods required for comprehensive prep for painting, ensuring you understand not just the ‘how’ but also the ‘why’ behind each action. Whether you’re tackling a small accent wall or repainting your entire home, dedicating adequate time to painting prep tips and procedures will pay dividends in the final outcome, saving you time, money, and frustration in the long run. This is your essential resource for understanding the full scope of painting prep.
How to Prep for a Flawless Finish
Achieving a truly flawless paint finish—one that’s smooth, uniform, and free of imperfections—is the ultimate goal of any painting project. But how to prep for painting to reach that level of perfection? It requires more than just opening a can of paint and grabbing a roller. The journey to a flawless finish begins long before the first coat is applied. It starts with diligent prep walls for painting. This preparatory phase addresses all the potential issues that could mar the final look: dirt and grease that prevent adhesion, cracks and holes that create visible blemishes, rough patches that result in an uneven texture, and gaps that disrupt clean lines. Prepping for paint is a systematic process of transforming an existing wall surface, regardless of its current condition, into an ideal canvas. This involves careful inspection, thorough cleaning, meticulous repairs, precise sanding, strategic taping, and appropriate priming. Each step builds upon the last, contributing to the overall quality and appearance of the finished job. Understanding how to prep surfaces for painting correctly means recognizing potential problems and knowing how to address them effectively. This guide will provide detailed instructions and expert insights on how to prep walls for paint, ensuring that you don’t overlook any critical details. From selecting the right paint prep tools to executing each technique with care, we’ll cover everything you need to know to achieve that coveted, immaculate finish. Learning how to prepare for painting walls properly is the key to unlocking professional-looking results in your own home.
Wall Preparation for Painting Like a Pro
Ever wonder how professional painters achieve those incredibly smooth, durable, and sharp-looking paint jobs? The secret isn’t necessarily some magical technique during the painting itself; it’s their unwavering commitment to meticulous wall preparation for painting. Professionals understand that the time invested in prep walls directly translates into the quality and longevity of the final product. They know that skipping steps or cutting corners during paint wall prep inevitably leads to subpar results that won’t stand the test of time. This section aims to equip you with the knowledge and techniques professionals use, demystifying the process of preparing walls for paint. We will break down the essential components of professional-grade wall prep, from assessing the surface condition to the final wipe-down before priming. You’ll learn how to prepare walls for painting thoroughly, addressing everything from invisible grease films to hairline cracks. We cover the nuances of surface preparation for painting walls, including choosing the right products for repairs and priming based on the specific wall material and condition. By following these guidelines on walls prep for painting, you can elevate your DIY painting projects from acceptable to exceptional. Mastering interior wall painting prep involves attention to detail and a methodical approach. This guide provides the roadmap, explaining the critical steps like cleaning, patching, sanding, caulking, taping, and priming – all essential elements of preparations for painting walls that ensure a finish worthy of a professional. Learn the secrets behind professional walls prep and transform your painting outcomes.
Gathering Your Paint Prep Supplies
Before you can even think about how to prep walls for painting, the very first step is assembling the necessary tools and materials. Proper painting prep relies heavily on having the right equipment at hand. Trying to make do without the correct supplies will not only make the job more difficult and time-consuming but can also compromise the quality of your wall prep. Imagine trying to scrape old paint without a scraper or smooth spackle without sandpaper – it’s inefficient and leads to poor results. Therefore, taking the time to gather everything you need before you start is crucial for a smooth workflow and effective paint preparation. This ensures that once you begin the process of preparing walls for painting, you won’t need to interrupt your work to run to the store for a forgotten item. A well-stocked paint prep toolkit allows you to tackle each stage, from cleaning to priming, efficiently and effectively. Having the right supplies makes tasks like patching holes, sanding rough spots, and applying painter’s tape much easier and leads to a better overall surface preparation for painting walls. Think of this stage as setting up your workstation; it’s fundamental to the success of the entire project. We’ll break down the essential tools and materials you’ll need to properly prep walls for painting, ensuring you’re fully equipped for the task ahead. This initial step is foundational for anyone serious about learning how to prep walls in house correctly.
Essential Tools Checklist
Having the right tools is paramount when tackling wall preparation for painting. These implements are designed to make specific tasks within the paint prep process easier, faster, and more effective. Without them, achieving a professional-level finish when you prep walls becomes significantly harder. Here’s a checklist of essential tools you’ll likely need for thorough painting prep walls:
- Putty Knives (Multiple Sizes): A flexible 1.5-inch knife is great for applying spackle to small holes, while a wider 4-inch or 6-inch knife helps smooth larger patches and feather edges. A stiff putty knife or a 5-in-1 tool is useful for scraping loose paint or stubborn debris. These are indispensable for the repair stage of preparing walls for painting.
- Sanding Tools:
- Sanding Sponge (Medium/Fine Grit): Versatile for smoothing patches, feathering edges, and light overall sanding. Conforms well to curves and corners.
- Pole Sander: Essential for sanding large wall areas or ceilings efficiently without excessive strain. Uses sanding sheets or screens.
- Detail Sander (Optional): A small power sander can speed up sanding, especially around trim or in tight spots, but requires careful handling to avoid gouging. Proper sanding is key when learning how to prep walls for paint.
- Scrapers: A paint scraper or a 5-in-1 tool is necessary for removing loose or peeling paint, a common task in paint wall prep for older surfaces.
- Caulk Gun: Needed to apply caulk smoothly and evenly into gaps along trim, baseboards, and corners. Choose a dripless model if possible for cleaner application during walls prep.
- Utility Knife: Essential for opening spackle containers, cutting painter’s tape cleanly, trimming patches, and scoring paint lines before tape removal.
- Screwdrivers: For removing outlet covers, switch plates, and any wall-mounted fixtures. Keep track of screws! This is a basic but crucial step in how to prepare for painting walls.
- Buckets: At least two – one for your cleaning solution and one for rinse water.
- Sponges/Rags: Large sponges for washing walls and clean, lint-free rags for rinsing, drying, and wiping up spills. Microfiber cloths are excellent for final dust removal.
- Step Ladder/Stool: To safely reach higher sections of the wall and the ceiling line during cleaning, repairs, taping, and priming.
- Shop Vacuum with Brush Attachment: Highly recommended for cleaning up sanding dust effectively from walls, floors, and trim before proceeding to the next painting prep step.
- Safety Gear:
- Safety Glasses/Goggles: Protect your eyes from dust, debris, cleaning solutions, and paint splatters.
- Dust Mask/Respirator: Crucial during sanding to avoid inhaling fine dust particles. A respirator is recommended if using strong cleaners or oil-based primers.
- Gloves: Protect your hands from cleaners, spackle, caulk, and primer. Nitrile or rubber gloves work well.
Having these tools ready will streamline your prep for painting walls process significantly.
Material Considerations: Drop Cloths and More
Alongside the tools, specific materials are consumed during the wall prep process. Choosing the right materials is just as important as having the correct tools for effective preparing walls for painting. These materials protect your home, facilitate repairs, and prepare the surface for paint adhesion. Here’s a breakdown of essential materials:
- Drop Cloths: Protecting your floors and furniture is non-negotiable during painting prep.
- Canvas Drop Cloths: The preferred choice for professionals. They are absorbent, durable, reusable, and less slippery than plastic. Ideal for floors.
- Plastic Sheeting: Less expensive and good for covering furniture or large areas quickly. However, paint spills can puddle and track, and they can be very slippery. Use painter’s tape to secure edges.
- Rosin Paper/Builder’s Paper: Good for protecting floors along baseboards where you’ll be working closely. Tape it down securely. Effective prep for painting includes thorough protection.
- Cleaning Solution:
- TSP (Trisodium Phosphate) or TSP Substitute: Powerful degreasers effective for heavily soiled walls, especially kitchens or bathrooms. TSP requires thorough rinsing and safety precautions (gloves, goggles). TSP substitutes are generally safer and require less rinsing.
- Mild Detergent: For walls that are not heavily soiled, a simple solution of dish soap or all-purpose cleaner and warm water often suffices.
- Degreaser: Specifically formulated to cut through kitchen grease. Essential when prepping walls for painting in cooking areas.
- Spackling Paste/Putty:
- Lightweight Spackle: Dries quickly, shrinks minimally, and is easy to sand. Best for small nail holes and minor dents.
- All-Purpose Putty/Vinyl Spackle: Stronger, more durable, suitable for slightly larger repairs. May require more sanding.
- Setting-Type Joint Compound (Powdered): For large holes or damaged drywall. Dries chemically, very hard and fast, minimal shrinkage, but harder to sand. Requires mixing. This is part of advanced wall preparation for painting.
- Sandpaper/Sanding Screens:
- Grit Selection: Use medium grit (100-150) for smoothing spackle patches and rough spots. Use fine grit (180-220) for final smoothing and feathering edges, and for light sanding between primer/paint coats if needed. Essential for how to prep walls with sanding techniques.
- Painter’s Tape:
- Blue Tape (Multi-Surface): The standard choice for most surfaces like trim, baseboards, and cured paint. Usually offers a 14-day clean removal.
- Green Tape (Sharp Lines): Often marketed for delivering extra sharp paint lines, sometimes with edge-locking technology.
- Yellow/Purple Tape (Delicate Surfaces): Lower adhesion, designed for use on freshly painted surfaces (after proper curing time, usually 24-72 hours), wallpaper, or faux finishes without causing damage. Crucial for preparing walls for painting: the importance of taping.
- Caulk:
- Paintable Latex Caulk: The standard for interior painting prep. Fills gaps along trim, baseboards, and corners. Cleans up with water. Look for “paintable” specifically.
- Siliconized Latex Caulk: Offers better flexibility and moisture resistance, good for bathrooms or areas with potential movement, but ensure it’s paintable.
- Primer: A critical material for ensuring adhesion and a uniform finish. The type depends on the surface condition (discussed later). Options include latex (water-based), oil-based, and shellac-based primers. Choosing the right primer is key to how to prep walls for painting.
- Tack Cloth: A sticky cheesecloth used for picking up the finest dust particles after sanding, just before priming or painting. Essential for the final checks before you paint walls.
- Wall Repair Patches (Optional): Self-adhesive mesh or metal patches for repairing holes larger than what spackle alone can handle easily.
Gathering these specific materials ensures your paint prep for walls is comprehensive and sets the stage for a successful painting project.
Step 1: Cleaning the Surface – The Foundation of Wall Prep
Often overlooked or rushed, cleaning the walls is arguably the most fundamental step in the entire how to prep walls for painting process. Paint, whether primer or topcoat, needs a clean, sound surface to adhere to properly. Dust, dirt, grease, grime, cobwebs, fingerprints, smoke residue, and even airborne pollutants can create a barrier between the wall and the new paint, leading to adhesion problems down the line. These issues might manifest as peeling, blistering, cracking, or uneven sheen levels. Therefore, thorough wall prep must begin with washing the surfaces. Think of it like washing your hands before eating; it removes contaminants that could cause problems. This initial cleaning is crucial for ensuring the subsequent steps of preparing walls for painting, such as patching and priming, are effective. Even walls that appear clean to the naked eye can harbor invisible films of grease (especially in kitchens) or dust that will interfere with paint adhesion. Taking the time for proper surface preparation for painting walls by cleaning ensures your primer and paint bond securely, resulting in a durable and long-lasting finish. This step sets the standard for the quality of your entire paint preparation effort. Don’t underestimate the power of a clean slate when prepping walls for painting; it’s the bedrock upon which a beautiful paint job is built. This is a non-negotiable part of how to get walls ready for painting.
Choosing the Right Cleaning Solution (TSP Alternative?)
Selecting the appropriate cleaning solution is vital for effective wall prep. The best choice depends on the level and type of soil on your walls.
- For Lightly Soiled Walls: In most living rooms, bedrooms, or hallways where walls aren’t exposed to heavy grease or grime, a simple cleaning solution is often sufficient for preparing walls for painting. You can mix a teaspoon of mild dish soap (like Dawn, which has good grease-cutting properties) or a few drops of a gentle all-purpose cleaner into a gallon of warm water. This is usually enough to remove general dust, light scuffs, and fingerprints. The advantage is that these solutions are mild, readily available, and require less rigorous rinsing than stronger chemicals. This is a common approach for basic painting prep walls.
- For Moderately Soiled Walls (Bathrooms, Kid’s Rooms): Walls in these areas might have soap scum, more fingerprints, or general grime. A slightly stronger mix of all-purpose cleaner might be needed, or you could consider a dedicated bathroom cleaner (ensure it’s safe for painted surfaces and rinse well). Always test in an inconspicuous area first.
- For Heavily Soiled Walls (Kitchens, Smoker’s Homes): Kitchen walls often accumulate a sticky film of cooking grease, while walls in homes with smokers can be coated in nicotine residue. These contaminants are notorious for preventing paint adhesion and causing stains to bleed through new paint. In these cases, a heavy-duty cleaner is required for proper paint wall prep.
- TSP (Trisodium Phosphate): Traditionally, TSP was the go-to cleaner for tough jobs in painting prep. It’s a powerful alkaline cleaner highly effective at cutting grease and removing heavy grime. However, TSP is caustic, can irritate skin and eyes, requires thorough rinsing (any residue will interfere with paint adhesion), and is banned or restricted in some areas due to environmental concerns (phosphates can contribute to algae blooms in waterways). If using TSP, wear heavy-duty gloves, eye protection, and ensure good ventilation. Follow mixing instructions carefully and rinse the walls meticulously with clean water afterwards, changing the rinse water frequently.
- TSP Substitutes: Due to the drawbacks of TSP, many phosphate-free “TSP substitutes” are now available. These are generally safer to use, less harsh on the skin, and often require less rinsing, though thorough rinsing is still recommended. They are formulated to be effective degreasers and are a good alternative for tackling tough grime during wall preparation for painting. Always check the product label for specific instructions and safety precautions.
- Dedicated Degreasers: Commercial degreasing products, often found in spray bottles, can also be effective, particularly for spot-treating greasy areas around stoves or backsplashes.
Important Considerations:
- Test First: Regardless of the cleaner chosen, always test it on a small, hidden area of the wall first to ensure it doesn’t damage the existing paint or the wall surface itself.
- Rinsing: Thorough rinsing with clean water is critical, especially when using stronger cleaners like TSP or its substitutes. Residue left behind can cause paint adhesion failure. Change your rinse water often. This step is essential for how to prep walls for painting correctly.
Choosing the right cleaner ensures that the foundation of your paint prep is solid, removing the contaminants that could sabotage your final finish.
Washing Technique for Grease and Grime
Once you’ve selected your cleaning solution, the washing technique itself is important for effectively removing dirt, grease, and grime as part of your wall prep. Simply wiping haphazardly won’t do the job thoroughly. Follow these steps for effective preparing walls for painting:
- Preparation: Lay down drop cloths to protect your flooring. Have two buckets ready: one with your chosen cleaning solution and one with clean rinse water. Gather your sponges or soft cloths. Wear gloves and eye protection, especially if using stronger cleaners. Remove outlet covers and switch plates (turn off power at the breaker first!).
- Start at the Bottom: When washing vertical surfaces like walls, always start washing from the bottom and work your way up. This prevents dirty streaks, known as “clean streaks” or “runs,” from forming as the cleaning solution drips down onto the soiled area below. If you start at the top, drips running down the dirty wall can create hard-to-remove streaks. This is a key technique in how to prep walls.
- Apply Solution: Dip your sponge or cloth into the cleaning solution, wring it out so it’s damp but not dripping excessively, and wash the wall in manageable sections (e.g., 3×3 foot areas). Use gentle, overlapping strokes. Apply light to moderate pressure; avoid aggressive scrubbing that could damage the existing paint finish unless you intend to remove it.
- Address Stubborn Spots: For areas with heavy grease (like behind a stove) or stubborn grime, you may need to let the cleaning solution sit for a minute or two to break down the soil before wiping. A slightly more abrasive but non-scratching sponge might be helpful, but again, be cautious not to damage the wall surface. Reapply cleaner if necessary. Effective paint prep for walls means tackling these problem areas diligently.
- Rinse Thoroughly: This is a critical step, especially if using TSP or TSP substitutes. Immediately after washing a section, use a clean sponge or cloth dipped in the clean rinse water bucket to rinse the area thoroughly. Again, start from the bottom up within your rinsed section if possible, or ensure you rinse away all cleaning solution residue. Change the rinse water frequently, as soon as it becomes cloudy or dirty. Inadequate rinsing is a common mistake in painting prep that leads to adhesion issues.
- Dry the Walls: After rinsing, wipe the walls down with clean, dry rags or allow them to air dry completely. Microfiber cloths are excellent for this final wipe-down. Ensure the walls are bone dry before proceeding to any subsequent wall prep steps like patching or sanding. Trapped moisture can cause paint failure. This might take several hours or even overnight, depending on humidity levels. Good ventilation can speed up the drying process.
Following this systematic washing technique ensures that your surface preparation for painting walls effectively removes the contaminants that could compromise your paint job, providing a truly clean foundation for the steps ahead in prepping walls for painting.
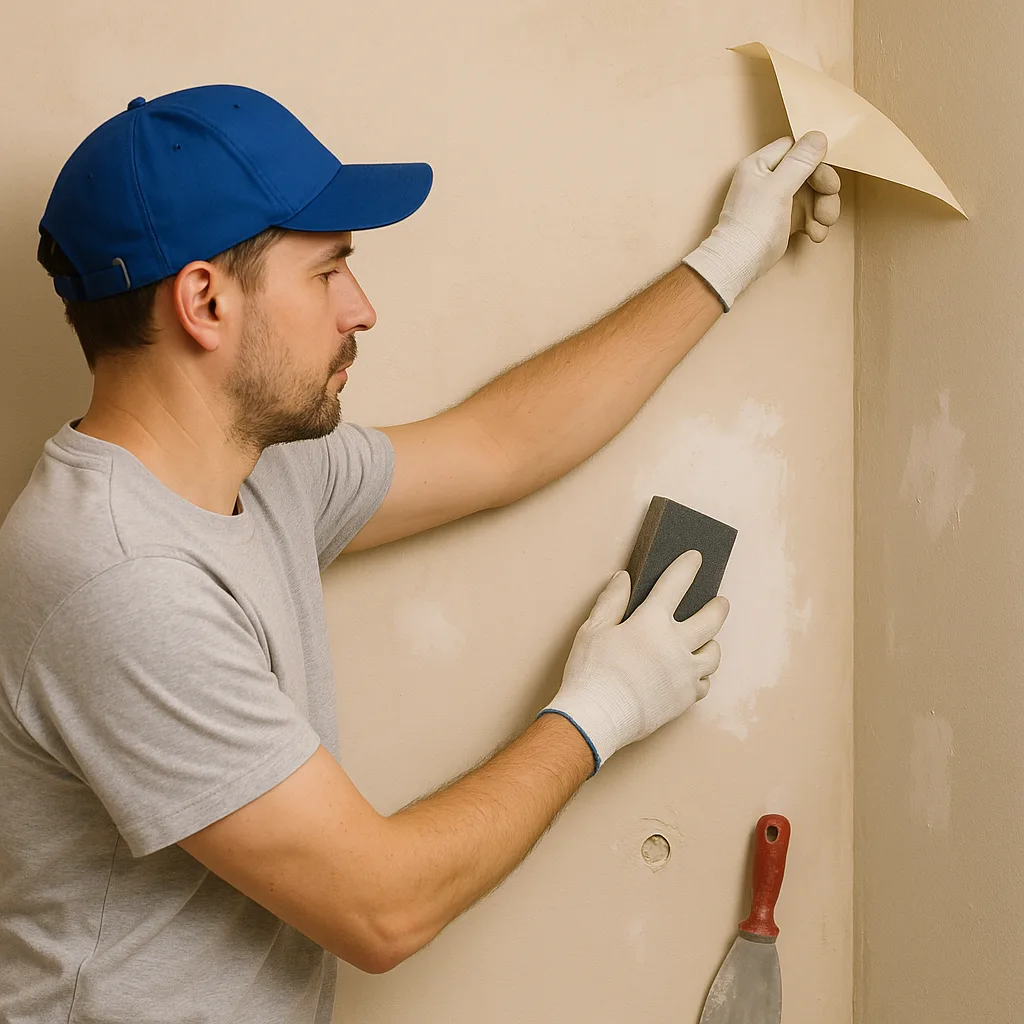
Step 2: Repairing Imperfections with Spackling Paste
With the walls clean and dry, the next crucial stage in how to prep walls for painting is addressing any surface imperfections. Few walls are perfectly smooth, especially in older homes. Nail holes, screw holes, dents, dings, cracks, and other blemishes will be highlighted, not hidden, by a fresh coat of paint, particularly if you’re using a paint with any sheen (like eggshell, satin, or semi-gloss). Meticulous repair work is therefore essential for achieving that flawless, professional finish that defines excellent paint prep. This step involves filling holes and cracks with spackling paste or putty and ensuring these repairs blend seamlessly with the surrounding wall surface. Taking the time to carefully patch imperfections during wall preparation for painting makes a significant difference in the final appearance. Even minor flaws can detract from an otherwise well-executed paint job. Proper paint wall prep requires patience during this stage to ensure all repairs are smooth and level before moving on to sanding. This is where attention to detail in preparing walls for painting truly pays off, creating the smooth canvas necessary for beautiful results. Learning how to prep walls includes mastering basic repair techniques.
Applying Putty with a Putty Knife
Applying spackling paste (often referred to simply as “spackle” or “putty”) is a fundamental skill in painting prep for walls. It’s used primarily for filling small imperfections like nail holes, screw holes, small dents, and minor cracks. Here’s how to do it effectively as part of your wall prep:
- Choose Your Spackle: For most small repairs, a lightweight spackling compound is ideal. It’s easy to work with, dries quickly, sands easily, and typically doesn’t require priming before painting (though checking the product instructions is always wise). For slightly deeper holes or areas needing more durability, a vinyl or all-purpose spackle might be better, though it may require more sanding effort.
- Prepare the Area: Ensure the area around the hole or crack is clean, dry, and free of loose debris. If dealing with a nail pop (where the nail head pushes drywall paper out), gently dimple the area slightly below the surface using a hammer or the end of a screwdriver handle. This creates a slight indentation for the spackle to fill, preventing a bump. For cracks, you might need to gently widen the hairline crack slightly with the corner of a putty knife or utility knife to allow the spackle to penetrate effectively.
- Load the Putty Knife: Scoop a small amount of spackle onto the edge of a flexible putty knife (a 1.5-inch or 2-inch knife is usually good for small holes). Don’t overload the knife.
- Apply the Spackle: Hold the putty knife at a low angle (around 30 degrees) to the wall. Starting slightly above the hole, draw the knife down firmly over the imperfection, pressing the spackle into the void. Use a single, smooth stroke if possible. The goal is to completely fill the hole or crack.
- Smooth the Surface: Immediately after filling, make a second pass with the putty knife held at a slightly higher angle (around 45-60 degrees), using light pressure to smooth the spackle and remove most of the excess from the surrounding wall surface. Try to get it as flush with the wall as possible, but it’s generally better to leave it slightly raised (mounded) rather than indented. Lightweight spackle shrinks very little, but leaving it slightly proud ensures you can sand it perfectly flush later. This technique is key for effective prepping walls for paint.
- Feather the Edges: For slightly larger patches, use a wider putty knife (4-inch or 6-inch) for the smoothing pass. Apply pressure to the outer edge of the knife while lifting the inner edge slightly. This helps “feather” the edges of the spackle patch, creating a gradual transition to the wall surface, which makes sanding and blending much easier during the painting prep process.
- Drying Time: Allow the spackle to dry completely according to the manufacturer’s instructions. Drying time varies depending on the type of spackle, the depth of the repair, temperature, and humidity. Lightweight spackle often dries within 30 minutes to an hour for small fills, while deeper fills or all-purpose spackle may take several hours or require multiple applications. Do not sand until it is fully cured (hard and typically changed color, e.g., from pink to white). Rushing this step compromises your prepare walls for painting efforts.
- Multiple Coats (If Needed): For deeper holes (more than 1/4 inch), apply the spackle in layers, allowing each layer to dry before applying the next. This prevents excessive shrinkage and cracking.
Mastering this basic application technique is essential for anyone learning how to prep walls for painting.
Handling Larger Holes and Damage
While spackle is perfect for minor imperfections, larger holes (bigger than a golf ball), significant cracks, or areas of damaged drywall require more robust repair methods during wall preparation for painting. Simply filling large voids with spackle will lead to cracking and instability. Here’s how to handle more substantial damage as part of your paint prep:
- Assess the Damage: Determine the size and nature of the damage. Is it just a hole, or is the surrounding drywall weak or crumbling?
- Clean and Prepare the Area: Remove any loose debris, torn drywall paper, or crumbling plaster from around the hole or damaged section. Ensure the edges are relatively clean and stable. If the paper facing is torn, carefully trim it back with a utility knife.
- Choose a Repair Method:
- Self-Adhesive Mesh Patch: For holes up to a few inches in diameter, a self-adhesive fiberglass mesh patch is often the easiest solution. Select a patch slightly larger than the hole. Peel off the backing and apply it firmly over the hole, ensuring good adhesion to the surrounding wall.
- Drywall Patch (California Patch or Backing): For larger holes (e.g., 4-8 inches), you might need a more structural repair. One method involves cutting a new piece of drywall slightly larger than the hole, then tracing its outline onto the wall around the hole. Cut out the traced section of damaged drywall. Install wooden backing strips behind the hole (screwing them into the existing drywall), then screw the new drywall patch onto the backing strips. Alternatively, the “California patch” method involves cutting a larger patch, scoring the back, snapping off the gypsum core around the edges to leave paper flaps, and embedding these flaps in joint compound around the hole.
- Metal Patch: Similar to mesh patches but made of thin galvanized metal with mesh or paper edges. They offer a very rigid surface, good for areas prone to impact.
- Apply Joint Compound (Not Spackle): For patching over mesh, metal, or drywall patches, you need to use joint compound (also known as “mud”), not lightweight spackle. All-purpose pre-mixed joint compound is suitable for DIYers, though setting-type compound (powdered, requires mixing) is stronger and shrinks less, making it better for initial coats over patches.
- First Coat (Embedding Coat): Using a wider putty knife or drywall knife (6-inch), apply a thin, even layer of joint compound over the patch, extending a few inches beyond its edges onto the surrounding wall. Press firmly to embed the mesh tape (if using a mesh patch) or to cover the patch smoothly. Focus on filling the mesh or covering the patch edges completely.
- Feather the Edges: Smooth the compound as much as possible, feathering the edges outward to create a gradual transition. Don’t worry about perfection on the first coat; the goal is coverage and embedding.
- Dry and Apply Subsequent Coats: Allow the first coat to dry completely (this can take 12-24 hours for all-purpose compound). Once dry, lightly sand off any major ridges or bumps (use 120-150 grit sandpaper). Apply a second coat of joint compound, extending it further beyond the edges of the first coat (use an 8-inch or 10-inch knife if possible). Focus on smoothing and filling any low spots or imperfections. Feather the edges carefully.
- Third Coat (Skim Coat – Optional but Recommended): For the smoothest, most invisible repair, a third, thinner coat applied with an even wider knife (10 or 12 inches) is often necessary. This coat should be very thin (a skim coat) and extend even further out, blending the patch seamlessly into the wall. This level of detail is crucial for professional-level preparing walls for paint.
- Final Sanding: Once the final coat is completely dry, perform the final sanding (covered in the next section).
Handling larger repairs takes more time and patience than filling nail holes, but it’s a critical part of how to prep walls for painting if you want a truly uniform and durable finish. Skipping these steps when dealing with significant damage will result in visible flaws in your paint prep.
How to Prep Walls with Sanding Techniques
Sanding is a non-negotiable step in how to prep walls for painting, particularly after making repairs with spackle or joint compound. Its primary purpose is to smooth out those repaired areas, ensuring they are perfectly flush with the surrounding wall surface and undetectable after painting. Sanding also plays a role in preparing the overall wall surface: it can dull existing glossy paint finishes to improve adhesion for the new paint, smooth out minor imperfections or rough spots on the wall itself, and knock down any small bumps or “nibs” left from previous paint jobs. Proper sanding techniques are crucial for achieving that ultra-smooth canvas necessary for a professional look. However, sanding also creates fine dust, which requires careful management. Understanding how to prep walls with sanding techniques involves choosing the right tools and grits, applying the correct pressure, and knowing how to clean up effectively afterward. This stage of paint preparation bridges the gap between repair and priming, ensuring a seamless transition and optimal surface quality for paint adhesion. Neglecting or improperly executing the sanding step during wall prep can leave visible patch marks, rough textures, or lead to poor paint bonding.
Selecting the Correct Sandpaper Grit
Choosing the right sandpaper grit is essential for effective and efficient sanding during wall prep. Sandpaper is graded by number; lower numbers indicate coarser grits (more abrasive, remove material faster), while higher numbers indicate finer grits (less abrasive, used for smoothing). Using the wrong grit can either fail to smooth the surface adequately or damage the wall or repair. Here’s a guide for preparing walls for painting:
- Coarse Grit (60-80 Grit): Generally too coarse for typical interior wall sanding, especially on drywall. Coarse grits can easily scratch or gouge the wall surface and spackle/joint compound repairs. They might only be considered for very rough tasks like removing thick paint drips or leveling very uneven plaster, but extreme caution is needed. Avoid using on standard drywall repairs.
- Medium Grit (100-150 Grit): This is the workhorse range for sanding spackle and joint compound patches in paint prep.
- 100-120 Grit: Good for the initial sanding of dried joint compound (especially setting-type) or larger spackle patches to level them relatively quickly. Also useful for knocking down significant texture or bumps on the wall surface itself, or for dulling harder, glossier existing paint finishes.
- 150 Grit: An excellent all-around choice for sanding most standard spackle repairs (both lightweight and vinyl). It smooths effectively without being overly aggressive. It’s also good for feathering the edges of patches. Many sanding sponges come with a medium side in this range. This is often the primary grit used when learning how to prep walls.
- Fine Grit (180-220 Grit): Used for final smoothing and achieving a seamless blend between repaired areas and the surrounding wall.
- 180 Grit: Good for a final pass over spackled areas after initial sanding with medium grit, ensuring a very smooth finish. Also suitable for light scuff-sanding of the entire wall surface if needed to provide “tooth” for the primer or paint, especially over existing semi-gloss or satin finishes.
- 220 Grit: Provides the smoothest finish. Ideal for the final sanding of patches, especially if you’re aiming for a high-gloss topcoat where imperfections are highly visible. Also used for very light sanding between coats of primer or paint if required by the paint manufacturer or to remove minor imperfections like dust nibs. This fine grit is key for meticulous painting prep walls.
- Extra Fine Grit (320+ Grit): Generally not necessary for standard wall preparation, more commonly used in fine woodworking or automotive finishing.
Choosing the Form:
- Sandpaper Sheets: Versatile, can be cut to size and used by hand, with a sanding block, or on a pole sander.
- Sanding Sponges: Comfortable to hold, flexible for contours and corners, and often dual-sided with different grits. Reusable after rinsing (for wet/dry types). Excellent for feathering edges during wall prep for interior painting.
- Sanding Screens: Used primarily with pole sanders for drywall work. Less prone to clogging than sandpaper but can be more aggressive.
Recommendation: For most DIY preparing walls for painting tasks involving patching nail holes and minor imperfections, starting with 150-grit sandpaper or a medium-grit sanding sponge, followed by a quick pass with 180 or 220-grit for final smoothing, is usually sufficient. Always start with a finer grit if unsure, and only move to a coarser grit if necessary.
Smoothing Patched Areas Effectively
The goal when sanding patched areas during paint prep is to make the repair completely invisible after painting. This requires careful technique to blend the patch seamlessly with the surrounding wall surface. Here’s how to smooth patched areas effectively:
- Ensure Compound is Fully Dry: Never attempt to sand spackle or joint compound that isn’t completely dry and cured. Sanding damp material will just tear it and make a mess, ruining your paint wall prep efforts.
- Use the Right Tools: For small patches (nail holes), a sanding sponge or a small piece of sandpaper wrapped around a block works well. For larger patches, a wider hand sander or even a pole sander (used carefully) can help maintain flatness.
- Start with Medium Grit (If Needed): If the patch is significantly raised or has noticeable ridges, start with 120 or 150-grit sandpaper. Use light, overlapping strokes.
- Focus on Feathering Edges: The key to an invisible patch is perfectly feathered edges. Concentrate your sanding effort more on the outer perimeter of the patch than the center. Use light pressure and a circular or back-and-forth motion, gradually blending the edge of the spackle/compound into the existing wall surface. Feel the transition with your fingertips – it should be smooth and undetectable. Using a sanding sponge allows its flexibility to help feather these edges naturally. This is a critical skill in how to prep walls for painting.
- Avoid Over-Sanding: Drywall paper and joint compound are relatively soft. It’s easy to sand too aggressively and create a depression or scuff the surrounding drywall paper. Use light pressure and let the sandpaper do the work. Check your progress frequently by running your hand over the area.
- Use Finer Grit for Final Smoothing: Once the patch is level and the edges are feathered with the medium grit, switch to a fine grit (180 or 220). Go over the entire patched area lightly one more time. This removes any minor scratches left by the medium grit and ensures the smoothest possible finish, essential for high-quality painting prep.
- Check Your Work: After sanding, wipe away the dust with a soft brush or cloth. Close your eyes and run your hand over the repaired area. You shouldn’t be able to feel where the patch begins or ends. Also, shine a light across the wall at a low angle (raking light). This will highlight any remaining high spots, low spots, or unfeathered edges that need further attention before you prepare walls for painting further. Re-apply spackle/compound and re-sand if necessary. Patience here pays off.
- Sand Other Imperfections: While sanding patches, also lightly sand any other rough spots, bumps, or previous paint drips on the wall surface to ensure overall smoothness.
Effective sanding transforms rough repairs into an integral, invisible part of the wall, a hallmark of thorough prep walls for painting.
How to Prep for Dust Removal Post-Sanding
Sanding, while necessary for preparing walls for painting, creates a significant amount of fine dust. This dust is not just messy; it’s detrimental to your paint job. If left on the walls, it will mix with your primer and paint, resulting in a gritty texture, poor adhesion, and an unprofessional finish. Therefore, thorough dust removal after sanding is a critical step in wall prep. Here’s how to manage and remove sanding dust effectively:
- Containment (Before Sanding): Prevention is better than cure. Before you even start sanding:
- Seal off the room from the rest of the house using plastic sheeting and painter’s tape over doorways.
- Cover vents and cold air returns.
- Ensure all furniture is removed or completely covered with plastic.
- Wear your dust mask/respirator and eye protection.
- Initial Dust Removal (Vacuuming): The best way to remove the bulk of the sanding dust is with a vacuum cleaner equipped with a HEPA filter (to trap fine particles) and a soft brush attachment.
- Vacuum the Walls: Starting from the top of the wall and working down, vacuum the entire surface, paying close attention to the sanded areas. The brush attachment helps dislodge dust without scratching the wall.
- Vacuum Trim and Baseboards: Dust settles heavily on horizontal surfaces like window sills, door frames, and baseboards. Vacuum these thoroughly.
- Vacuum the Floor: Even with drop cloths, dust will escape. Vacuum the drop cloths and surrounding floor area carefully.
- This vacuuming step is essential for painting prep tips regarding cleanliness.
- Wiping Down (Microfiber or Damp Cloth): Vacuuming removes most, but not all, of the fine dust. The next step is to wipe the walls down.
- Microfiber Cloths (Dry): Dry microfiber cloths are excellent at trapping fine dust particles electrostatically. Wipe the walls down again, top to bottom. Shake out or change cloths frequently.
- Damp Rag/Sponge: Alternatively, use a slightly damp (well wrung-out) sponge or lint-free rag. Use clean water only – no soap needed at this stage. Wipe the walls gently, rinsing the sponge/rag frequently in clean water. Be careful not to over-wet the walls or freshly sanded compound/spackle, as excessive moisture can damage them. Allow the walls to dry completely after damp wiping. This ensures a truly clean surface for the next stage of prep for painting walls.
- Tack Cloth (Final Step Before Priming/Painting): Just before you apply primer or paint, do a final wipe-down with a tack cloth. A tack cloth is a sticky cheesecloth designed specifically to pick up the very finest remaining dust particles that other methods might miss. Wipe gently over the surface; don’t press hard. This provides the ultimate clean surface, crucial for meticulous prepping walls for painting.
- Clean the Room: After the walls are dust-free, carefully fold up drop cloths (dusty side inward) and remove them. Give the entire room a final vacuuming, including window sills, light fixtures, and anywhere else dust might have settled. Let the airborne dust settle for a while (maybe an hour) and vacuum again if necessary.
Thorough dust removal is a hallmark of professional paint preparation. Skipping this step guarantees a subpar finish, undermining all the effort put into cleaning and repairs during how to prep walls for painting.
Step 3: Caulking Gaps for a Seamless Look
After cleaning, repairing, and sanding, the next refinement in how to prep walls for painting is caulking. Caulk is a flexible sealant used to fill small gaps and cracks where different building materials meet, such as between walls and trim (baseboards, window frames, door casings), in corners where walls meet, or where ceilings meet walls (though this is sometimes left uncaulked or handled differently depending on desired look and potential movement). Applying caulk as part of your paint prep serves several important purposes: it seals drafts, prevents moisture intrusion (in certain areas), and, most importantly for painting, it creates a smooth, seamless transition between surfaces. These gaps, even if small, become glaringly obvious after painting, creating distracting dark lines that detract from the finished appearance. Proper caulking during wall preparation for painting eliminates these lines, giving your paint job crisp edges and a much more professional, finished look. It’s a relatively quick step in the overall preparing walls for painting process, but one that adds significant visual polish. Mastering the art of applying and smoothing caulk is essential for anyone aiming for high-quality interior wall painting prep. This step truly elevates the finish from DIY to pro.
Using a Caulk Gun Correctly
Applying caulk neatly requires proper use of a caulk gun. Many people struggle with getting a consistent bead, often applying too much or too little. Here’s how to use a caulk gun effectively during your painting prep walls routine:
- Choose the Right Caulk: For interior painting prep, select a high-quality PAINTABLE latex or acrylic latex caulk. Do NOT use pure silicone caulk for areas you intend to paint, as paint will not adhere to it. Siliconized acrylic latex offers a good balance of paintability and flexibility/mildew resistance, suitable for most interior trim work.
- Prepare the Caulk Tube:
- Cut the Tip: Most caulk tubes have a plastic nozzle that needs to be cut open. Use a sharp utility knife to cut the tip at a 45-degree angle. The crucial part is where you cut it. Start small – make the opening only about 1/16 to 1/8 inch wide. A smaller opening gives you more control and produces a finer bead suitable for most interior trim gaps. You can always make the hole bigger if needed, but you can’t make it smaller. Cutting too large an opening is a common mistake leading to excessive caulk application.
- Puncture the Inner Seal: After cutting the tip, insert a long nail or the built-in poker found on many caulk guns down through the nozzle to puncture the inner foil or plastic seal inside the tube base. If you forget this step, the caulk won’t come out.
- Load the Caulk Gun: Pull back the plunger rod of the caulk gun (you may need to press a release lever or button, often near the handle). Insert the caulk tube into the gun, nozzle end first. Gently push the plunger rod forward until it makes contact with the bottom of the tube. A light squeeze of the trigger should show caulk starting to emerge.
- Applying the Caulk:
- Positioning: Place the cut tip of the nozzle firmly into the beginning of the gap you want to fill. Maintain the 45-degree angle, ensuring the angled opening bridges the gap effectively.
- Consistent Pressure and Speed: Apply steady, even pressure to the caulk gun trigger while simultaneously moving the gun smoothly along the gap. The goal is to apply a uniform bead of caulk that just fills the gap. The speed at which you move the gun relative to the pressure on the trigger determines the bead size. Practice on a piece of cardboard first if you’re unsure. Consistent movement is key for good wall prep.
- Push or Pull?: Some people prefer to push the gun away from them, forcing caulk into the gap, while others prefer to pull it towards them. Both can work; find what feels more comfortable and gives you better control. Pushing can sometimes provide a cleaner application.
- Release Pressure: When you reach the end of the gap or need to stop, release the pressure on the trigger *and* engage the pressure release lever on the caulk gun (if it has one, or pull back the rod slightly) to stop the flow of caulk immediately. Dripless caulk guns automatically release pressure, which is a helpful feature. This prevents excess caulk from oozing out.
- Work in Sections: Don’t try to caulk excessively long runs at once, especially when you’re learning. Caulk starts to skin over relatively quickly, making it harder to smooth. Work in sections of a few feet at a time, applying and then immediately smoothing the caulk.
Mastering the caulk gun takes a little practice, but it’s a vital skill for seamless prepare walls for painting results.
Smoothing Caulk Lines for a Professional Finish
Applying the caulk is only half the battle; smoothing the bead properly is what creates that invisible, professional look that’s the goal of wall preparation for painting. A lumpy, uneven, or smeared caulk line will look just as bad as an unfilled gap after painting. Here are techniques for smoothing caulk effectively:
- Timing is Key: Smooth the caulk bead immediately after applying it, while it’s still wet and pliable. Most latex caulks start to skin over within 5-15 minutes, after which smoothing becomes difficult and messy. Work in manageable sections as mentioned before.
- Choose Your Smoothing Tool: Several methods work well:
- Finger (Wet): The most common method. Dip your index finger in a cup of clean water (or have a damp rag handy). Gently run your wet fingertip along the caulk bead with light, consistent pressure. The water prevents the caulk from sticking excessively to your finger and helps create a smooth, concave profile. Wipe the excess caulk that collects on your finger onto a paper towel or rag immediately. Re-wet your finger as needed. This is a go-to technique in painting prep.
- Caulk Finishing Tool: Specialized tools made of plastic or rubber come in various profiles designed to create perfectly shaped caulk lines. They can provide very consistent results once you get the hang of them. Follow the tool’s instructions.
- Spoon (Back): The curved back of a small spoon (like a teaspoon) can be used similarly to a finger or finishing tool. Wet it slightly first.
- Damp Sponge/Rag: Some people use a damp sponge corner or a tightly folded damp rag. This can work but requires care to avoid removing too much caulk or smearing it onto adjacent surfaces. Best reserved for cleanup rather than primary smoothing.
- Apply Light, Consistent Pressure: Whether using a finger or a tool, the goal is to press the caulk firmly into the gap while simultaneously smoothing the surface and removing just the excess. Don’t press so hard that you pull most of the caulk out of the joint. The smoothed bead should transition neatly onto both adjoining surfaces (e.g., the wall and the trim).
- Wipe Away Excess Immediately: As you smooth, excess caulk will squeeze out. Use paper towels or a damp rag to wipe this excess away cleanly from your finger/tool and from the surfaces adjacent to the caulk line *before* it dries. Cleanliness is crucial for sharp paint prep for walls. Dried smears of caulk will show under paint.
- Address Corners: Where two caulk lines meet in a corner, smooth one line first, then smooth the second line into the corner, ensuring a neat transition. You may need to use the very tip of your finger or a specialized tool for sharp inside corners.
- Drying/Curing Time: Allow the caulk to cure fully according to the manufacturer’s instructions before priming or painting over it. While some fast-drying caulks claim to be paintable in as little as 30-60 minutes, allowing several hours or overnight is often safer, especially in cooler or more humid conditions, to prevent the paint from cracking over uncured caulk. Check the product label for specific drying times – this is vital for proper prepping walls for painting.
Taking the time to caulk and smooth properly adds a level of finish that significantly enhances the final paint job, marking the difference in quality walls prep.
Preparing Walls for Painting: The Importance of Taping
Applying painter’s tape is a meticulous step in how to prep walls for painting that pays off immensely by creating sharp, clean paint lines between different surfaces or colors. While some highly skilled professionals can “cut in” edges freehand with a brush, for most DIYers and even many pros, painter’s tape is the key to achieving perfectly crisp lines along trim, ceilings, baseboards, and where different wall colors meet. This aspect of paint prep prevents messy edges, paint bleeding onto adjacent surfaces, and the frustration of trying to correct mistakes later. Proper taping technique ensures that when the tape is removed, you’re left with a professional-looking separation, enhancing the overall neatness and quality of your paint job. It’s an essential part of preparing walls for painting if you want results that look sharp and deliberate. While it can seem time-consuming, the effort invested in careful taping during wall prep for interior painting saves time and effort in cleanup and touch-ups later. Understanding how to prep for painting includes mastering the art of the tape.
Applying Painter’s Tape for Crisp Lines
Achieving those coveted crisp lines isn’t just about slapping on some tape; it requires careful application technique during your painting prep. Here’s how to apply painter’s tape effectively:
- Choose the Right Tape: As discussed in the materials section, select the tape appropriate for your surface. Use standard blue or green tape for cured paint, wood trim, and glass. Use delicate surface tape (yellow/purple) if taping over freshly painted surfaces (allow proper cure time first – typically 24-72 hours), wallpaper, or faux finishes. Using tape with too much adhesion can pull off the underlying surface when removed. The width of the tape (e.g., 1 inch, 1.5 inches, 2 inches) depends on personal preference and the amount of protection needed. Wider tape offers more buffer against accidental brush strokes.
- Ensure Surface is Clean and Dry: Apply tape only to surfaces that are clean, dry, and dust-free. Any dirt or dust trapped under the tape edge will compromise the seal and can lead to paint bleeding underneath. This reinforces the importance of earlier wall prep steps.
- Apply in Sections: Apply the tape in manageable lengths (e.g., 12-24 inches at a time) rather than trying to run one continuous strip along an entire wall or piece of trim. This gives you better control.
- Positioning: Carefully align the edge of the tape precisely along the line you want to protect. For example, if taping off trim, place the tape edge right where the trim meets the wall. Overlap the ends of tape sections slightly (by about half an inch) to ensure continuous protection.
- Adhere the Edge Firmly (Crucial Step): This is the most critical part of preventing paint bleed and achieving sharp lines. Once the tape is positioned, run a flexible putty knife, a credit card, or even just your fingernail firmly along the edge of the tape that will meet the new paint. Apply moderate pressure to create a tight seal between the tape and the surface. This presses out any tiny gaps where paint could seep under. Don’t just stick the tape on lightly; seal the edge. This sealing action is fundamental to successful prep for painting walls.
- Check for Gaps: Visually inspect the sealed edge to ensure it’s making continuous contact with the surface, especially in corners or over slightly textured surfaces.
- Taping Corners: For inside corners (e.g., where trim meets wall in a corner), run the first piece of tape slightly past the corner. Apply the second piece of tape overlapping the first, ensuring the edges meet tightly in the corner. Use the putty knife or your finger to press the tape firmly into the corner crease. For outside corners, you can wrap the tape around the corner or cut it precisely at the corner edge.
Proper application is key to making painter’s tape work effectively as part of your preparing walls for paint strategy.
Techniques for Taping Trim and Ceilings
Taping off trim (baseboards, window frames, door casings) and ceilings requires specific attention during painting prep walls to ensure clean lines without damaging these adjacent surfaces.
Taping Trim:
- Surface Condition: Ensure the trim itself is clean and dry. If the trim has a glossy finish, lightly scuff-sanding it where the tape will adhere can sometimes improve the seal, but be cautious not to damage the finish if the trim isn’t being painted.
- Placement: Apply the tape directly onto the trim, positioning the edge precisely where the trim meets the wall you intend to paint. Ensure the tape lies flat against the trim surface.
- Sealing the Edge: Firmly press down the edge of the tape that touches the wall using a putty knife or fingernail. This is the critical seal that prevents wall paint from bleeding onto the trim. Pay extra attention to any curves or details in the trim profile.
- Covering Width (Optional): If you’re concerned about paint splattering further onto the trim, you can use wider tape (1.5″ or 2″) or apply a second row of tape next to the first, or even tape rosin paper along the baseboards for extra protection. This is part of thorough paint prep.
Taping Ceilings:
- Challenge: Taping a straight line on a ceiling, especially if it has texture, can be challenging. Gravity works against you, and ceiling textures can make getting a good seal difficult.
- Placement: Carefully apply the tape onto the ceiling surface, aligning the bottom edge precisely where the ceiling meets the wall you’ll be painting. Work in manageable sections.
- Sealing on Texture: If the ceiling is textured, sealing the tape edge is crucial but tricky. After applying the tape, press the edge firmly into the texture using a putty knife or your finger. Try to mold the tape edge to the texture as much as possible.
- Caulking Trick (Optional but Effective): For textured ceilings or walls where achieving a perfect seal is difficult, a pro trick can help guarantee sharp lines. After applying and sealing the tape as best as possible, apply a very thin bead of clear or paintable caulk along the edge of the tape that will meet the new paint. Immediately wipe away almost all the caulk with a damp cloth, leaving just enough to fill any tiny voids under the tape edge. Let this caulk dry completely. This seals the edge perfectly. Alternatively, some painters brush a thin coat of the ceiling paint (or the color under the tape) along the tape edge to seal it, letting it dry before painting the wall color. This ensures any bleed-under is the same color as the surface being protected. This advanced technique elevates your preparing walls for painting skills.
- Using Laser Levels (Optional): For ensuring a perfectly straight line high on a wall or near the ceiling, especially if the ceiling line itself isn’t perfectly straight, a laser level can help guide your tape application.
These specific techniques for trim and ceilings are important nuances in mastering how to prep walls.
Removing Tape Without Damaging Paint
Applying tape correctly is only half the process; removing it properly is equally important to avoid damaging your fresh paint job or leaving sticky residue behind. Improper removal can ruin those crisp lines you worked so hard to create during painting prep. Here’s the correct way to remove painter’s tape:
- Timing is Crucial: The ideal time to remove painter’s tape is when the paint is dry to the touch, but not fully cured. This is typically within 1 to a few hours after applying the final coat, depending on the paint type and conditions.
- Why this timing? If you remove the tape when the paint is still very wet, it can ooze or create a messy edge. If you wait until the paint is fully cured and hardened (days later), the paint film can become brittle and may form a strong bond with the tape. Pulling the tape off at this point can crack the paint edge or even pull chunks of the newly dried paint off the wall along with the tape.
- Check the paint can for specific recommendations, but generally, waiting until it’s dry to the touch but still slightly pliable is best. Some tapes (like FrogTape) often recommend removal while the paint is still wet, but this requires care – test in an inconspicuous area if unsure. Standard blue tape is usually best removed when dry to the touch. This is a vital piece of painting prep tips.
- Score the Edge (Optional but Recommended): If you’ve applied multiple coats of paint or if the paint has dried longer than ideal, it’s a good safety measure to lightly score the edge where the tape meets the fresh paint. Use a sharp utility knife or a razor blade held at a low angle. Apply very light pressure – just enough to break the paint film’s surface bond with the tape. This prevents the paint from peeling off with the tape. Be extremely careful not to cut into the wall or the surface under the tape.
- Pull at an Angle: Slowly pull the tape back on itself at a 45-degree angle away from the painted surface. Avoid pulling it straight out (90 degrees) from the wall, as this increases the chance of pulling paint off.
- Slow and Steady: Pull the tape slowly and consistently. Jerking or pulling too quickly can tear the tape or the paint edge. If you see paint starting to lift, stop immediately. You may need to score the edge more carefully or adjust your angle.
- Dispose Properly: Ball up the used tape as you remove it to avoid getting wet paint on other surfaces.
- Touch-Ups: Even with careful technique, minor imperfections or small areas where paint bled slightly can occur. Have a small artist’s brush and a small amount of your wall paint (and trim paint, if necessary) ready for tiny touch-ups after the tape is removed and the paint is fully dry. Addressing these small fixes is part of the final prep walls for painting stage.
Proper tape removal technique ensures your meticulous paint preparation efforts result in the sharp, clean lines desired.
Step 4: Applying Primer for Optimal Adhesion
After all the cleaning, patching, sanding, caulking, and taping, you might be tempted to jump straight to applying your chosen paint color. However, in many situations, skipping the primer step is a mistake that can compromise the entire project. Primer is a preparatory undercoat applied before the finish paint. It serves several crucial functions that contribute significantly to the quality, appearance, and longevity of your paint job. Applying primer is often the final, critical step in how to prep walls for painting before the color coats go on. It ensures that the surface is perfectly conditioned to accept paint, leading to better adhesion, a more uniform finish, and truer color representation. Understanding when and why to use primer is essential for effective wall preparation for painting. It acts as a bridge between the prepared wall surface and the topcoat, solving potential problems before they arise. Think of it as the final seal of approval on your paint prep work, ensuring the best possible foundation for your paint. This step is integral to preparing walls for paint professionally.
When is Primer Absolutely Necessary?
While not *every* single repaint job requires a full coat of primer on all walls, there are specific situations where applying primer is not just recommended, but absolutely necessary for achieving good results during painting prep. Skipping primer in these cases often leads to problems later. Here’s when priming is essential:
- New Drywall: Unpainted drywall (gypsum board) and joint compound are very porous and will absorb paint unevenly, leading to a blotchy appearance (a phenomenon called “flashing” where patched areas or seams show through). A dedicated drywall primer-sealer (like PVA – polyvinyl acetate primer) is specifically designed to seal the porous surfaces of new drywall and joint compound, creating a uniform surface that accepts topcoats evenly. This is non-negotiable when prepping walls for painting new construction or renovations.
- Stain Blocking: If your walls have stains from water damage, smoke (nicotine), crayons, ink, grease, tannin bleed (from wood knots), or other persistent marks, regular paint often won’t cover them permanently. The stains will likely bleed through the new paint coats over time. A stain-blocking primer (often oil-based or shellac-based for tough stains, though high-quality water-based stain blockers exist) is required to seal these stains and prevent them from migrating through the topcoat. This is a crucial function of primer in wall prep.
- Drastic Color Changes:
- Dark to Light: If you are painting a light color over a previously dark or very vibrant color (like deep red, navy blue, or dark green), the old color can influence the new shade, requiring many extra coats of finish paint to achieve full coverage and true color. Applying a coat or two of primer (sometimes tinted grey for better hiding) helps neutralize the old color, reducing the number of topcoats needed and ensuring the new light color looks accurate.
- Light to Dark (Sometimes): While less critical than going dark-to-light, priming can still be beneficial when going from a very light color to a very deep or vibrant one. A tinted primer (grey or a shade similar to the topcoat) can enhance the richness and depth of the final color and potentially reduce the number of expensive topcoats needed. This is a consideration in paint preparation.
- Painting Over Glossy Surfaces: Finish paints, especially latex paints, have difficulty adhering properly to high-gloss or semi-gloss surfaces. The lack of porosity prevents a good mechanical bond. Applying a bonding primer designed for slick surfaces etches or grips the glossy finish, creating a surface the new paint can adhere to securely, preventing peeling or chipping. Lightly sanding the glossy surface first is also recommended, but primer adds extra insurance. This is key for surface preparation for painting walls with existing glossy paint.
- Repaired Areas: Even if the rest of the wall doesn’t strictly need priming, any areas repaired with spackle or joint compound should ideally be spot-primed. Although some lightweight spackles claim not to need priming, priming ensures these areas have the same porosity and texture as the rest of the wall, preventing “flashing” where the patches absorb the topcoat differently and appear as dull spots in the final finish. Spot priming patches is good practice in how to prep walls.
- Bare Wood: If you are painting bare wood trim or paneling, a wood primer is essential to seal the wood grain, prevent tannin bleed (especially from woods like cedar or redwood), and ensure good adhesion.
- Problem Surfaces: For surfaces like masonry (brick, concrete), metal, or plastic, specific types of primers are required to ensure adhesion and durability.
In summary, if you encounter any of these situations during your prep walls for painting, using the appropriate primer is a necessary step for a successful outcome.
Choosing Between Oil-Based and Water-Based Primer
Once you’ve determined that priming is necessary for your painting prep, the next decision is what type of primer to use. The two main categories for interior use are oil-based (alkyd) and water-based (latex) primers. Each has its own set of characteristics, advantages, and disadvantages. Shellac-based primers are a third, more specialized option.
Water-Based (Latex) Primers:
- Pros:
- Low Odor
- Low VOCs
- Easy Cleanup
- Fast Drying
- Flexible
- Good Adhesion
- Good for Drywall
- Cons:
- Stain Blocking (limited on severe stains)
- Grain Raising (on wood)
- Adhesion to Glossy Surfaces (needs specific type)
Oil-Based (Alkyd) Primers:
- Pros:
- Excellent Stain Blocking
- Superior Adhesion
- Penetration
- Smooth Finish
- Cons:
- Strong Odor
- High VOCs
- Difficult Cleanup
- Slow Drying
- Brittleness / Yellowing
Shellac-Based Primers:
- Pros: Extremely effective stain blocking, dries very quickly, excellent adhesion.
- Cons: Very strong odor, high VOCs, requires denatured alcohol for cleanup, can be brittle.
Which to Choose for Your Wall Prep?
- General Purpose / New Drywall / Minor Color Change: Water-based (latex) primer.
- Severe Stains (Water, Smoke, Tannin): Oil-based or shellac-based stain-blocking primer.
- Painting Over Glossy Paint: Water-based bonding primer or oil-based primer (sand first).
- Bare Wood (especially prone to bleeding): Oil-based or shellac-based primer.
Always read the primer manufacturer’s instructions carefully to ensure compatibility with your surface and your chosen topcoat paint. Choosing the right primer is a critical decision in how to prep walls for painting.
Final Checks Before You Paint Walls
You’ve diligently cleaned, patched, sanded, caulked, taped, and primed. The finish line is in sight! Before you crack open that can of beautiful finish paint, however, taking a few moments for some final checks is crucial. This last stage of wall prep ensures that all your hard work isn’t undermined by overlooked details. These final steps guarantee the surface is immaculately clean, the environment is suitable for painting, and you’ve caught any last-minute imperfections. It’s the final quality control step in the how to prep walls for painting process. Skipping these checks can lead to frustrating issues like dust nibs in the paint, poor airflow affecting drying, or noticing a flaw only after the first coat of expensive paint is applied. Consider this the final polish in your preparing walls for painting routine.
Using a Tack Cloth for Final Dust Removal
Even after vacuuming and wiping down post-sanding, microscopic dust particles can remain on the surface or settle from the air. These tiny particles, if painted over, create small bumps or “nibs” in the final paint finish, detracting from its smoothness. This is especially noticeable with glossier paint sheens. The solution is a final wipe-down with a tack cloth immediately before applying primer (if you haven’t already primed) or your first coat of finish paint.
- What is a Tack Cloth? A tack cloth is typically a piece of cheesecloth or similar open-weave fabric lightly impregnated with a sticky substance (usually a varnish or oil-based resin, though water-based versions exist). This stickiness allows it to pick up and hold fine dust, lint, and sanding residue without leaving a significant film behind (when used correctly).
- How to Use It:
- Unfold the tack cloth completely, then loosely fold or bunch it up into a pad that fits comfortably in your hand.
- Wipe the surface very gently. Use light, long, overlapping strokes. Do not press hard or scrub. The goal is simply to let the cloth’s tackiness lift the fine dust off the surface. Excessive pressure can potentially transfer some of the sticky resin onto the wall, which could interfere with paint adhesion (though this is less common with modern tack cloths).
- Wipe down all surfaces to be painted: walls, trim, etc. Pay attention to corners and edges where dust might collect.
- Refold the cloth frequently to expose a fresh tacky surface as it picks up dust.
- Discard the cloth when it becomes heavily soiled or loses its tackiness.
- Timing: Use the tack cloth as the very last step before you dip your brush or roller into the paint or primer. Don’t wipe down hours in advance, as more dust can settle. This is the final act of paint prep for walls cleanliness.
Using a tack cloth is a simple, quick step that adds a level of refinement to your painting prep, ensuring the smoothest possible finish.
Room Ventilation Before Painting Walls Prep
Proper ventilation is important throughout the wall prep process (especially during cleaning with strong chemicals and sanding), but it’s also crucial right before and during painting itself. Good airflow serves multiple purposes:
- Health and Safety: Paint, even low-VOC latex paint, releases fumes as it dries and cures. Primer, especially oil-based or shellac-based, releases much stronger fumes containing VOCs. Good ventilation helps dissipate these fumes, reducing your exposure and making the environment safer and more comfortable to work in. Always wear a respirator if using oil-based or shellac products, even with ventilation.
- Drying and Curing: Air circulation helps paint and primer dry and cure properly. Moving air helps the water (in latex paints) or solvents (in oil paints) evaporate more efficiently. Stagnant, humid air can significantly slow down drying times, potentially leading to issues like sagging, uneven sheen, or prolonged tackiness.
- Dust Reduction: While you’ve meticulously removed dust, some airborne particles might remain. Ventilation can help exchange the air in the room, potentially reducing the amount of airborne dust that could settle onto your wet paint.
How to Ventilate:
- Open Windows and Doors: If weather permits, open windows and doors in the room you’re painting and potentially in adjacent rooms to create cross-ventilation. Ensure window screens are in place to keep insects out.
- Use Fans: Place a box fan or oscillating fan in a window facing outwards to help exhaust fumes from the room. Don’t point a fan directly at the wall you are painting, as this can cause the paint to dry too quickly and unevenly, potentially leaving brush or roller marks. The goal is general air exchange, not direct airflow on the wet paint.
- HVAC System: You can run your home’s HVAC fan (set to “On” instead of “Auto” at the thermostat) to help circulate air, but ensure your filter is clean. If using strong solvent-based products, you might consider temporarily blocking the return air vent in the room being painted to avoid circulating heavy fumes throughout the house, relying instead on window ventilation.
- Timing: Ensure the room is ventilating *before* you start painting and continue ventilation during the painting process and for a period afterwards as the paint cures (check paint can recommendations, often 24-72 hours).
Setting up proper ventilation is a key safety and quality step in the final phase of preparing walls for paint.
Prepping Walls for Paint: Final Inspection
Before loading your roller or dipping your brush, take one last critical look over all the surfaces you’ve prepared. This final inspection is your last chance to catch any minor flaws or missed spots from the previous wall prep stages. It’s much easier to fix something now than after you’ve started applying the finish coat.
- What to Look For:
- Missed Imperfections: Run your hand lightly over the walls again. Do you feel any bumps, ridges, or unsanded patches from repairs? Are there any tiny nail holes or cracks you overlooked?
- Dust or Debris: Look closely at the surface, especially under good lighting or with a light held at a low angle (raking light). Are there any remaining dust patches, hairs, or bits of debris? If so, use the tack cloth again.
- Tape Adhesion: Double-check that all edges of your painter’s tape are still firmly sealed, especially if some time has passed since application. Press down any lifting edges.
- Primer Coverage (If Primed): If you’ve primed, ensure the primer coat is dry, smooth, and uniform. Are there any areas where stains bled through the primer? (If so, they may need another spot-prime with a stain blocker). Are there any heavy primer drips or ridges that need light sanding (followed by dust removal)?
- Caulk Lines: Check your caulk lines. Are they smooth and fully cured?
- Cleanliness: Glance around the room. Are drop cloths securely in place? Are tools and materials organized and out of the way?
- Use Good Lighting: Conduct your final inspection under good lighting conditions, similar to those the room will normally have, or use a portable work light to scan the walls. Different lighting angles can reveal different imperfections.
- Take Your Time: Don’t rush this final check. A few extra minutes spent inspecting now can save hours of corrective work later.
This final inspection is the culmination of your how to prep walls for painting efforts. Once you’re satisfied that the walls are as clean, smooth, and perfectly prepared as possible, you can finally proceed to the rewarding step of applying your chosen paint color, confident that your meticulous painting prep has laid the foundation for a beautiful, professional, and long-lasting finish.