How to Refinish Hardwood Floors: The Ultimate DIY Guide for Floor Restoration
Embarking on the journey of learning how to refinish hardwood floors can feel like a monumental task, but the rewards—gleaming, revitalized floors that breathe new life into your home—are well worth the effort. This comprehensive guide is designed to be your ultimate resource for DIY refinishing hardwood floors, transforming worn, scratched, or dull hardwood into a stunning feature. Whether you’re tackling minor imperfections or undertaking a full hardwood floor restoration, understanding the process, tools, and techniques is crucial for success. We’ll delve deep into every aspect, from recognizing when your hardwood flooring needs attention to the final steps of hardwood maintenance post-refinish. Consider this your roadmap to achieving professional-looking results, covering the best way to refinish hardwood floors, essential floor care, and advanced hardwood restoration tips. Prepare to uncover the secrets behind successful wood floor refinishing and gain the confidence to restore the natural beauty of your hardwood floors. This isn’t just about how to refinish hardwood floor surfaces; it’s about preserving an investment and enhancing the very soul of your living space through meticulous hardwood floor care.
Why Refinish Hardwood Floors? Understanding the Need for Hardwood Care
Before diving into the practical steps of how to refinish hardwood floors, it’s essential to understand why this process is so beneficial and often necessary. Hardwood floors are a significant investment and a desirable feature in any home, known for their durability and timeless appeal. However, even the toughest hardwood is susceptible to wear and tear over time. Daily foot traffic, furniture movement, spills, pet claws, and sunlight exposure can gradually degrade the protective finish and even damage the wood itself. Refinishing hardwood floors is more than just a cosmetic fix; it’s a vital aspect of hardwood floor care and hardwood maintenance that protects the wood, restores its beauty, and extends its lifespan significantly. Neglecting necessary floor refinishing can lead to more extensive damage, potentially requiring costly floor restoration or even replacement down the line. Understanding the reasons behind refinishing hardwood empowers homeowners to take proactive steps in preserving their valuable flooring.
Key Benefits of Hardwood Floor Refinishing
The decision to refinish hardwood floors brings a multitude of advantages beyond simply improving appearance. Firstly, it dramatically enhances the aesthetic appeal of your home. Refinishing hardwood removes scratches, scuffs, stains, and dullness, revealing the rich color and grain of the wood beneath. This process essentially gives you brand-new looking floors without the cost and hassle of replacement. Secondly, hardwood floor refinishing significantly increases your home’s value. Beautifully maintained hardwood flooring is a major selling point, often providing a substantial return on investment. Thirdly, it extends the life of your hardwood floors. The sanding process removes the damaged top layer, and the application of new stain and protective finish shields the wood from future wear, moisture, and damage. This act of hardwood care can add decades to the lifespan of your flooring. Fourthly, refinishing hardwood floors offers an opportunity to update the look of your space. You can choose a new stain color to match evolving décor styles or opt for a different finish sheen. Finally, it improves indoor air quality. Old finishes can trap dust, allergens, and dirt. Sanding removes this buildup, and a fresh seal creates a smoother, easier-to-clean surface, contributing to a healthier home environment. Undertaking floor restoration through refinishing is truly an investment in your home’s beauty, value, and longevity.
Telltale Signs Your Hardwood Needs Restoration
Knowing when to refinish hardwood floors is crucial for effective hardwood maintenance. Waiting too long can lead to damage penetrating deep into the wood, making hardwood restoration more complex and expensive. Look out for these telltale signs:
- Numerous Surface Scratches: While minor scratches are normal, an abundance of them across the hardwood flooring, especially those that catch your fingernail, indicates the protective finish is compromised. This is a prime candidate for refinishing hardwood floors.
- Dullness and Lack of Shine: If your floors have lost their luster and cleaning no longer restores their shine, the top finish layer is likely worn out. This is often most noticeable in high-traffic areas. Floor refinishing is needed to bring back the gleam.
- Worn-Through Finish (Graying Wood): If you see patches where the finish is completely gone, exposing bare wood that looks gray or weathered, immediate attention is required. This often happens in pathways and indicates the wood itself is now unprotected and absorbing dirt and moisture. This signals an urgent need for how to restore hardwood floors.
- Deep Gouges or Dents: While refinishing primarily addresses the surface, significant gouges might require filling or board replacement, often done in conjunction with a full refinish.
- Water Damage or Stains: Dark stains from water or pet accidents that haven’t been removed by cleaning often penetrate the finish and stain the wood. Hardwood floor refinishing, including sanding, is usually the only way to remove these. Severe water damage might necessitate board replacement before restoring floors.
- Discoloration or Fading: Uneven color, often caused by sun exposure through windows or wear patterns, can be corrected by sanding and applying a fresh, even coat of stain and finish during the hardwood floor restoration process.
- Splintering or Cracking: Minor splinters can sometimes be addressed during sanding, but widespread splintering suggests the wood is overly dry or damaged and requires careful assessment before attempting DIY refinishing hardwood floors.
Recognizing these signs early allows you to plan your floor refinishing project before the damage becomes too severe, ensuring a smoother and more successful hardwood restoration.
Considering DIY Refinishing Hardwood Floors vs. Professional Services
One of the biggest decisions when faced with worn hardwood floors is whether to tackle the refinish yourself (DIY refinishing hardwood floors) or hire professionals. Both options have pros and cons.
DIY Refinishing Hardwood Floors:
- Pros: Significant cost savings on labor (often the largest expense), immense satisfaction from completing the project yourself, flexibility to work on your own schedule. Learning how to refinish hardwood floors is a valuable skill.
- Cons: Physically demanding work involving heavy machinery (sanders), steep learning curve (mistakes like uneven sanding or finish application can be costly and difficult to fix), significant time commitment (often several days, including drying times), dust creation (requires thorough containment and cleanup), potential for equipment rental costs adding up. Requires careful research on the best way to refinish hardwood floors.
Professional Floor Refinishing Services:
- Pros: Expertise and experience ensure high-quality results, access to professional-grade equipment and materials, faster completion time, less disruption and mess (professionals usually have better dust containment systems), guaranteed work (often). They know the intricacies of hardwood restoration and floor care.
- Cons: Significantly higher cost due to labor, scheduling constraints based on the contractor’s availability, less personal involvement in the process.
Considerations: Your budget, available time, physical ability, project complexity (e.g., intricate patterns, very old floors, extensive repairs), and tolerance for potential mistakes should guide your decision. For small, straightforward areas or if you have relevant experience, DIY refinishing hardwood floors can be a rewarding option. For large areas, valuable antique flooring, or if you desire guaranteed perfect results with minimal hassle, professional hardwood refinishing is often the better choice. Understanding the demands of how to refinish hardwood is key before committing to DIY.
The Impact of Refinishing on Hardwood Flooring Value
Investing in hardwood floor refinishing is not just about aesthetics; it’s a strategic move that can significantly enhance your property’s value. Hardwood flooring is consistently ranked by real estate agents and buyers as a highly desirable feature. However, worn, scratched, or outdated hardwood floors can detract from a home’s appeal and even lower its perceived value.
Refinishing hardwood floors reverses this negative impression. The process restores the flooring to a like-new condition, showcasing its natural beauty and warmth. This immediate visual improvement makes a powerful first impression on potential buyers or appraisers. Freshly refinished hardwood floors suggest that the home has been well-maintained, instilling confidence.
Furthermore, hardwood floor restoration offers a high return on investment (ROI). Compared to the cost of installing new hardwood flooring, refinishing is significantly more affordable yet yields similar aesthetic results in many cases. Studies often show that homeowners can recoup a large percentage, sometimes even more than 100%, of the cost of refinishing hardwood upon selling their home.
The ability to choose a new stain color during the refinish process also allows homeowners to update the floors to match current design trends, further boosting appeal. Whether you’re planning to sell soon or simply want to enjoy your home more, understanding how to refinish hardwood floors and undertaking the project (or hiring pros) is a value-adding endeavor. It preserves the integrity of a key architectural element and elevates the overall marketability and perceived worth of your property. Proper hardwood care through refinishing pays dividends.
Essential Tools and Materials for Successful Floor Refinishing Projects
Successfully learning and executing how to refinish hardwood floors relies heavily on having the right tools and materials. Attempting DIY refinishing hardwood floors without the proper equipment can lead to frustrating results, potential damage to your floors, and even safety hazards. Careful planning and gathering of supplies are critical first steps in any floor refinishing project. From heavy-duty sanders to the final coat of protective finish, each item plays a vital role in achieving a professional-quality hardwood restoration. Don’t underestimate the importance of safety gear; hardwood refinishing generates significant dust and involves chemicals that require protection. Investing in or renting quality tools will make the demanding process of refinishing hardwood smoother and more effective, contributing significantly to the best way to refinish hardwood floors.
Must-Have Safety Gear for Hardwood Refinishing
Safety should be your top priority when undertaking a hardwood floor refinishing project. The process involves airborne dust particles and chemical fumes that can be harmful. Equipping yourself with the right personal protective equipment (PPE) is non-negotiable for safe DIY refinishing hardwood floors.
- Respirator/Dust Mask: This is arguably the most critical piece of safety gear. Sanding hardwood floors creates vast amounts of fine wood dust. Inhaling this dust can cause respiratory problems. Use a NIOSH-approved respirator with cartridges rated for both particulates (P100) and organic vapors (OV), especially when working with stains and finishes. A simple paper mask is insufficient for the fine dust generated during how to sand hardwood floors or the fumes from oil-based products.
- Safety Glasses or Goggles: Protect your eyes from flying debris during sanding and scraping, as well as potential splashes from stains and finishes. Goggles offer more complete protection, sealing around the eyes.
- Hearing Protection: Floor sanders, especially drum sanders, are extremely loud. Prolonged exposure can damage your hearing. Use earplugs or earmuffs, particularly during the sanding stages of floor refinishing.
- Gloves: Wear sturdy work gloves during sanding to protect against splinters and abrasion. Switch to chemical-resistant gloves (like nitrile) when applying stains and polyurethane finishes to protect your skin from irritation and absorption. Proper hardwood care includes caring for yourself during the process.
- Knee Pads: You’ll spend considerable time kneeling, especially during edging, detail sanding, staining, and finishing. Quality knee pads will save your joints and make the hardwood restoration process much more comfortable.
- Appropriate Clothing: Wear long sleeves and pants to protect your skin from dust and chemicals. Avoid loose clothing that could get caught in machinery. Consider disposable coveralls for easier cleanup.
Investing in proper safety gear is a small price to pay for protecting your health while learning how to refinish hardwood floor surfaces effectively.
Choosing the Right Sander for Your Hardwood Floors
The choice of sander is pivotal in the how to refinish hardwood floors process. Using the wrong type can lead to uneven results or even permanently damage your hardwood flooring. Several types of sanders are typically used in floor refinishing:
- Drum Sander: This is the workhorse for removing old finish and leveling uneven floors. It’s a large, powerful, walk-behind machine that uses sanding belts wrapped around a drum.
- Pros: Highly efficient at removing material quickly, essential for heavily worn or damaged hardwood floors.
- Cons: Very aggressive, steep learning curve. If not kept constantly moving or handled correctly, it can easily gouge or create dips in the wood floors. Generally recommended for those with some experience or after careful study of how to sand hardwood floors with this machine. Often available at rental stores.
- Orbital Sander (Random Orbital Sander): These sanders move in a random oscillating pattern, making them less aggressive than drum sanders. Large, square buff-style orbital sanders are available for rent and are often considered more beginner-friendly for DIY refinishing hardwood floors. Handheld random orbital sanders are used for detail work.
- Pros: Easier to control, less likely to cause deep scratches or gouges, good for lighter refinish jobs or smoothing after drum sanding.
- Cons: Slower at removing heavy finish or deep scratches, may require more sanding passes and time. Might not be sufficient for heavily damaged floors.
- Edger Sander: A powerful, disc-shaped sander used for sanding along baseboards, in corners, and in areas the drum or large orbital sander can’t reach. It’s essential for achieving a uniform refinish across the entire hardwood floor.
- Pros: Reaches edges and tight spots effectively.
- Cons: Can be aggressive and requires careful handling to avoid swirl marks or unevenness compared to the main field of the floor. Requires practice for smooth blending.
- Detail Sander/Corner Sander: Small, often triangular-shaped handheld sanders designed for getting into tight corners and awkward spots where even the edger can’t reach. Sometimes a sharp paint scraper is also needed for corners.
For most full hardwood floor restoration projects involving finish removal, you will likely need to rent a drum sander (or large orbital sander) and an edger. Understanding their operation is key to how to refinish hardwood successfully.
Selecting the Best Hardwood Stain Colors
Choosing a stain color is one of the more exciting parts of how to refinish hardwood floors, as it dramatically impacts the final look of your flooring. However, it requires careful consideration.
- Consider Your Wood Type: Different hardwood species absorb stain differently. Oak is porous and takes stain well, showing grain prominently. Maple is denser and can be blotchy if not conditioned properly. Pine is soft and prone to blotching. Research how your specific wood type reacts to stains before deciding. This is crucial for successful hardwood floor refinishing.
- Test, Test, Test: Never choose a stain based solely on a sample chip or online picture. Obtain small samples of potential colors and test them directly on a sanded, inconspicuous area of your actual hardwood floor (like inside a closet) or on a spare piece of the same wood flooring. Apply the stain and a coat of the intended finish, as the finish can alter the final color slightly (oil-based poly adds amber, water-based stays clear).
- Match Your Decor: Consider the overall style of your home, furniture colors, wall paint, and lighting. Dark stains (ebony, jacobean, dark walnut) offer drama and sophistication but can show dust and scratches more easily and make small rooms feel smaller. Light or natural stains (natural, golden oak, provincial) create an airy, spacious feel and hide imperfections better. Gray tones are trendy but ensure they complement your existing elements.
- Oil-Based vs. Water-Based Stains:
- Oil-based: Deeper penetration, richer color, longer drying time (allows more working time), stronger odor, requires mineral spirits for cleanup. Often considered easier for beginners learning how to stain hardwood floors.
- Water-based: Lower odor, faster drying time (can be challenging to avoid lap marks), environmentally friendlier, cleans up with water. Color options might differ.
- Trend vs. Timeless: While trendy colors like gray or whitewash can look great, consider if they will stand the test of time. Classic hardwood stain colors often have broader appeal and longevity.
Taking the time to select the right stain is a vital step in refinishing hardwood floors to achieve a look you’ll love for years. It’s a key part of the floor restoration process.
Understanding Different Polyurethane Finishes for Floors
The final step in how to refinish hardwood floors is applying a protective topcoat, typically polyurethane. This finish seals the wood and stain, protects against wear and tear, and provides the desired sheen. Understanding the options is crucial for durability and appearance.
- Oil-Based Polyurethane:
- Pros: Highly durable and scratch-resistant, relatively inexpensive, flows out well (self-leveling), forgiving application. Considered a traditional choice for hardwood floor refinishing.
- Cons: Strong odor during application and curing (requires excellent ventilation), longer drying and curing times (days to weeks), imparts an amber hue that yellows over time (can enhance warm woods but alter light stains/natural looks). Cleanup requires mineral spirits.
- Water-Based Polyurethane:
- Pros: Low odor, dries much faster (allows multiple coats per day), crystal clear finish (doesn’t yellow), environmentally friendlier, cleans up with soap and water. Preferred when maintaining the true color of the wood or light stain is desired during refinish hardwood flooring.
- Cons: Generally less durable than oil-based (though high-quality formulations are improving), can be more expensive, faster drying time can make smooth application trickier (risk of lap marks), may raise the wood grain slightly on the first coat.
- Finish Sheen Levels: Polyurethane comes in various sheens, affecting the final look and practicality:
- Matte: Very low reflection, hides imperfections well, modern look.
- Satin: Most popular choice; offers a soft, low-medium luster, hides minor scratches and dust better than glossier options, provides a warm, inviting look. A safe bet for most hardwood floor care.
- Semi-Gloss: Noticeable shine, reflects more light, easier to clean than matte/satin, but shows imperfections more readily.
- Gloss/High-Gloss: Very shiny and reflective, creates a formal, dramatic look, highly durable surface, but highlights every speck of dust, footprint, and scratch.
When refinishing hardwood floors, choose the finish type (oil vs. water) based on your priorities (durability, drying time, odor, color impact) and the sheen based on your aesthetic preference and lifestyle (e.g., satin is practical for homes with kids/pets). Applying the finish correctly is a critical part of how to refinish hardwood floor surfaces for lasting protection.
Renting vs. Buying Floor Refinishing Equipment
For the average homeowner undertaking a one-time DIY refinishing hardwood floors project, renting the necessary heavy equipment—specifically the drum sander (or large orbital sander) and the edger—is almost always the most practical and cost-effective option.
Renting:
- Pros: Significantly lower upfront cost compared to purchasing, access to professional-grade, powerful machines designed for floor refinishing, no need for long-term storage, maintenance is handled by the rental company. Ideal for infrequent hardwood restoration tasks.
- Cons: Daily or hourly rental fees can add up if the project takes longer than expected, requires transportation to and from the rental store, equipment availability might be limited, quality and condition of rental machines can vary (inspect carefully before renting). You need to learn how to operate potentially unfamiliar equipment quickly.
Buying:
- Pros: Equipment is readily available whenever needed (good for multiple projects or very large homes done in stages), you become familiar with your own tools, potentially higher quality or specific features if you invest significantly. Might be economical if you plan frequent wood floor refinishing.
- Cons: Very high initial cost (professional floor sanders are expensive), requires significant storage space, you are responsible for maintenance and repairs, consumer-grade models may lack the power of rental units. Generally not practical for a single how to refinish hardwood floors project.
Recommendation: For most homeowners, renting is the clear choice for the main sanders. Ensure you rent from a reputable supplier, get clear instructions on operating the machines safely and effectively, and rent all necessary grits of sandpaper at the same time (most rental places allow returns of unused paper). Budget for at least a full day or two of rental time for sanding, depending on the size of your floors. Smaller tools like handheld orbital sanders or detail sanders might be worth purchasing if you anticipate other DIY uses, but for the heavy-duty machines central to refinishing hardwood, renting is usually the best way to refinish hardwood floors for DIYers.
Steps to Refinish Hardwood Floors: A Detailed Walkthrough
Now we arrive at the core of how to refinish hardwood floors: the step-by-step process. This detailed walkthrough will guide you through each critical phase, from initial preparation to the final coat of finish. Successfully refinishing hardwood floors requires patience, attention to detail, and adherence to proper techniques. Rushing any step, especially sanding or cleaning, can compromise the final result of your hardwood floor restoration. Follow these instructions carefully for a smooth, durable, and beautiful refinish. Remember that DIY refinishing hardwood floors is labor-intensive but achievable with the right approach. We’ll cover everything from clearing the room to understanding cure times, ensuring your hardwood floor care starts on the right foot.
Step 1: Preparing the Room for Hardwood Refinishing Work
Proper preparation is the foundation of any successful floor refinishing project. Skipping or rushing this stage will inevitably lead to problems later, primarily contamination of your finish with dust or damage to surrounding areas. This initial phase of how to refinish hardwood floors sets the stage for everything that follows.
Clearing Furniture and Protecting Adjacent Areas
Before any sanding begins, the room must be completely empty.
- Remove Everything: All furniture, rugs, curtains, wall hangings, and any other items must be removed from the room where you’ll be refinishing hardwood floors. Don’t just push things to one side; the entire floor area needs to be accessible.
- Protect Built-ins: If there are built-in cabinets or shelves, empty them and consider covering them with plastic sheeting, secured with painter’s tape.
- Seal Openings: Hardwood floor refinishing, especially sanding, creates an enormous amount of fine dust that can travel throughout your house. Use plastic sheeting and painter’s tape to seal off doorways, vents (HVAC supply and return), fireplaces, and any other openings connecting to other parts of the house. Overlap plastic sheets and tape all edges securely. Create a “zip door” or overlapping flap if you need to enter/exit the room during the process.
- Protect Baseboards and Walls: While some prefer to remove shoe molding (the small trim at the base of the baseboard) for easier sanding right to the edge, you can also protect baseboards carefully with wide painter’s tape. Be aware that sanders can still scuff tape and potentially the baseboard, so removal is often cleaner. Protect the lower part of walls near the floor with tape or plastic as well, especially before staining or finishing. This meticulous prep is key for clean hardwood restoration.
Initial Hardwood Floor Care: Cleaning Before You Start
Once the room is empty and sealed, a thorough initial cleaning is necessary before you begin the more intensive steps of how to refinish hardwood floors. Sanding a dirty floor will grind the dirt into the wood and wear out your sandpaper faster.
- Sweep Thoroughly: Use a soft-bristled broom to sweep up all loose debris, paying attention to corners and edges.
- Vacuum Meticulously: Vacuum the entire hardwood floor surface using a vacuum cleaner with a soft floor brush attachment. Go over the area multiple times, including along baseboards and in corners, to pick up finer particles the broom might have missed. A shop vacuum is often useful here.
- Check for Protrusions: Carefully inspect the floors for any protruding nails or staples. Use a nail set to countersink any nails slightly below the surface to avoid damaging the sanding equipment and tearing sandpaper. Address any loose boards at this stage if possible (this might fall under repairs discussed later).
- Light Cleaning (Optional/Caution): If the floor is particularly grimy, you might consider a very light cleaning with a cleaner specifically designed for hardwood floors and approved for use before refinishing (check labels carefully). Ensure the floor is completely dry before sanding begins. Avoid water or cleaners that leave residue, as this can interfere with sanding and finish adhesion. Often, thorough sweeping and vacuuming are sufficient initial hardwood floor care.
This preparatory work ensures a clean slate for the sanding process, a critical part of refinishing hardwood.
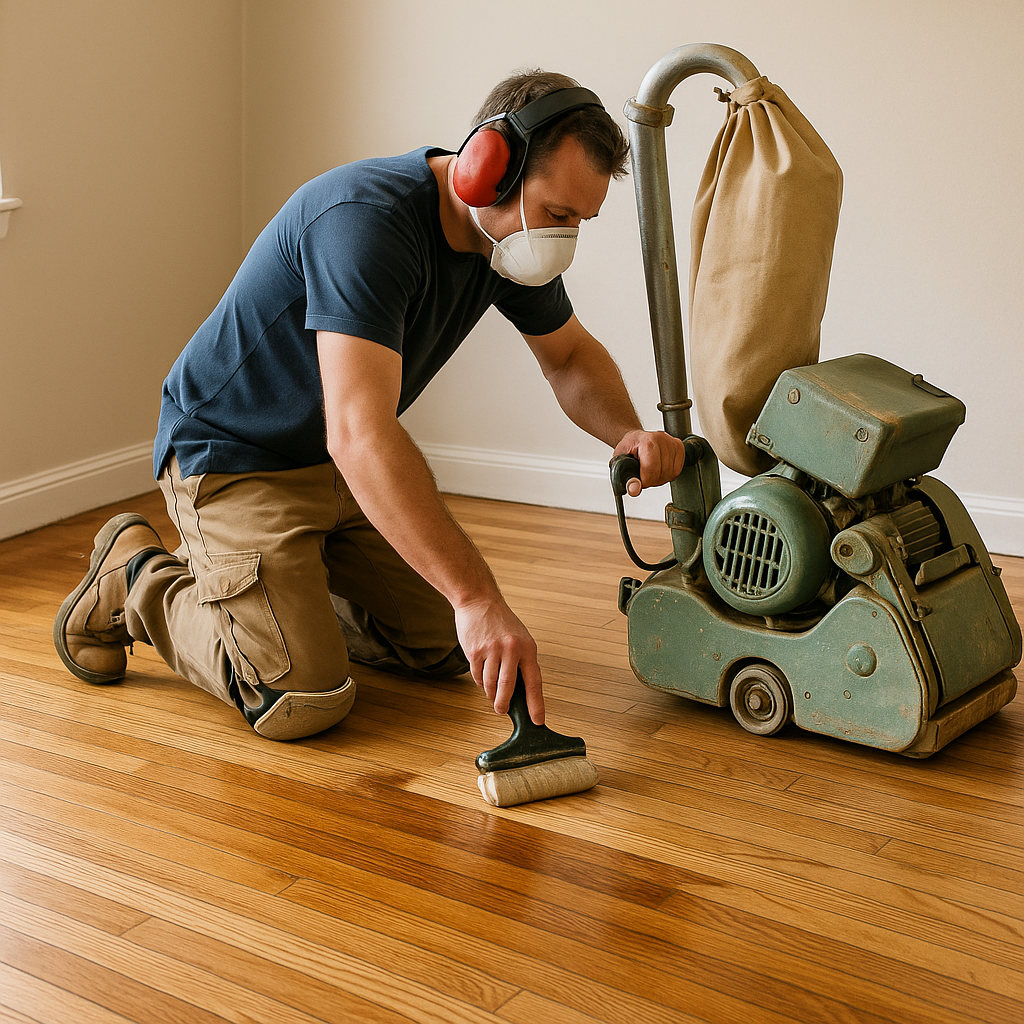
Step 2: How to Sand Hardwood Floors for a Smooth Surface
Sanding is the most labor-intensive and arguably the most critical stage of how to refinish hardwood floors. Its purpose is to remove the old finish, eliminate scratches and imperfections, and create a smooth, porous surface that will accept stain evenly and allow the new finish to bond properly. Proper technique is essential for achieving professional results in your hardwood floor restoration.
Proper Use of a Drum Sander on Hardwood
The drum sander tackles the main field of the hardwood floor. Operating it correctly is crucial to avoid damaging the wood floors.
- Start with Coarse Grit: Begin with the coarsest grit sandpaper recommended for your floor’s condition (e.g., 36 or 40 grit for heavy finish or damage, perhaps 60 grit for less worn floors). Consult the rental shop for advice.
- Load Sandpaper: Ensure the machine is unplugged. Load the sandpaper belt securely onto the drum according to the machine’s instructions, ensuring it’s taut and correctly oriented.
- Sanding Direction: Always sand with the grain of the hardwood. Going across the grain will leave deep, difficult-to-remove scratches. If flooring runs in multiple directions or patterns (like parquet), specific techniques are needed – research these or consult a pro.
- Technique: Position the sander along one wall, ready to move forward with the grain. Start the motor while tilting the sander back so the drum is off the floor. Gently lower the drum onto the floor while simultaneously walking forward at a slow, steady pace.
- Constant Motion: Never stop moving while the drum is in contact with the floor. Pausing, even for a second, will create a depression.
- Lifting at the End: As you approach the opposite wall, begin tilting the sander back to lift the drum before you stop walking.
- Overlapping Passes: Overlap each pass by about one-third to one-half the width of the drum to ensure even sanding and avoid ridges. Work systematically across the room.
- Multiple Directions (If Needed): For the first, most aggressive cut with coarse grit, some professionals make diagonal passes first (e.g., 15 degrees off parallel with the grain) in two directions before finishing with passes parallel to the grain. This helps flatten uneven floors. Subsequent grits should only be done parallel to the grain. This is an advanced technique in how to sand hardwood floors.
Techniques for Edging and Detail Sanding Hardwood
The drum sander cannot reach the edges and corners of the room. This is where the edger sander and detail sanders come in.
- Edger Sander Use: Use the edger sander with the same grit sandpaper you just used on the drum sander for the main field. Work systematically around the perimeter of the room.
- Edger Technique: The edger is also powerful and can leave swirl marks if not handled correctly. Keep it moving constantly in smooth, sweeping arcs or back-and-forth motions, feathering the sanded edge into the main field sanded by the drum sander. Avoid pressing down too hard. Consistent pressure and movement are key.
- Matching Grits: It is crucial to use the same sequence of grits on the edger as you use on the drum sander to ensure a uniform texture and appearance across the entire hardwood floor.
- Corners and Details: Use a small detail sander (corner cat) or even a sharp paint scraper (held at a low angle) to carefully remove the old finish from tight corners and awkward spots where the edger cannot reach. Hand sanding with sandpaper wrapped around a block might also be necessary. This meticulous work is vital for a complete refinish.
Achieving Perfectly Smooth Floors Through Sanding Stages
Refinishing hardwood floors properly involves sanding the floor multiple times with progressively finer grits of sandpaper. Skipping grits will result in visible scratches from the coarser paper remaining on the final surface.
- Grit Progression: A typical progression might be 36 grit -> 60 grit -> 100 or 120 grit. The exact grits depend on the initial condition of your hardwood floors and the wood type. Always follow the sequence for both the drum sander and the edger.
- Sanding Each Grit: Complete the entire floor (field and edges) with one grit before moving to the next finer grit. Each subsequent grit removes the scratches left by the previous one.
- Check for Imperfections: After each sanding stage, vacuum the floor and inspect it closely under good lighting (especially low-angle light) for any remaining old finish, deep scratches, or unevenness. Address these before moving to the next grit.
- Final Sanding: The final sanding pass (e.g., 100 or 120 grit) should leave the wood floors feeling silky smooth to the touch. This prepares the wood optimally for staining (if desired) and finishing. Some professionals perform a final pass with a buffer/orbital sander fitted with a fine-grit screen (e.g., 120 or 150 grit) to blend everything perfectly – this is part of the best way to refinish hardwood floors.
- Vacuum Between Grits: Thoroughly vacuum the floor between each change of sandpaper grit to remove the coarser particles, preventing them from causing unwanted scratches during the next stage. This is essential hardwood care during the sanding process.
Mastering how to sand hardwood floors is demanding but yields the smooth canvas necessary for a stunning hardwood floor restoration.
Step 3: Critical Cleaning After Sanding Wood Floors
You might think the hardest part is over after sanding, but the cleaning phase is just as critical in the how to refinish hardwood floors process. Any dust left behind will become permanently embedded in your stain or finish, creating a rough, gritty, and unprofessional look. Achieving a pristine surface is paramount before applying any liquids. This step is central to successful hardwood restoration prep.
Effective Dust Removal Using a Tack Cloth
A tack cloth is a specialized, sticky cheesecloth designed to pick up very fine dust particles that vacuuming alone might miss.
- Initial Wipe-Down: After the final vacuuming (see next section), gently wipe the entire hardwood floor surface with tack cloths. Work systematically, moving with the grain.
- Technique: Use light pressure. Don’t scrub, as this can leave residue. Fold the cloth frequently to expose a clean, sticky surface. Change cloths as they become loaded with dust.
- Edges and Corners: Pay special attention to edges, corners, and any crevices where dust tends to accumulate.
- Check for Stickiness: Ensure the tack cloth isn’t leaving a sticky residue, which could interfere with finish adhesion. Choose quality tack cloths designed for wood floor refinishing. Some professionals prefer using a clean microfiber cloth lightly dampened with mineral spirits (if using oil-based products) or water (if using water-based products), ensuring it’s almost dry (tack-damp) to pick up dust without wetting the wood excessively. This final wipe-down is crucial before refinishing hardwood floors.
Vacuuming Strategies for Pristine Hardwood Restoration Prep
Thorough vacuuming after the final sanding stage is non-negotiable. Fine wood dust settles everywhere, not just on the floors.
- Multiple Passes: Vacuum the entire hardwood floor meticulously using a shop vacuum equipped with a HEPA filter (to capture fine particles) and a soft floor brush attachment. Make overlapping passes in multiple directions (first across the grain, then with the grain).
- Edges and Corners Focus: Use the crevice tool attachment to vacuum thoroughly along all baseboards, in corners, around door jambs, and any other nooks and crannies.
- Vacuum Walls and Surfaces: Dust doesn’t just settle downwards; it clings to vertical surfaces too. Vacuum the walls (starting from the top down), window sills, door frames, and any remaining fixtures within the sealed room. Dust falling from these surfaces later can ruin your finish.
- Wait and Repeat: Allow any remaining airborne dust to settle for an hour or two (or even overnight if possible, keeping the room sealed). Then, perform another complete vacuuming of the floor and potentially a quick wipe of horizontal surfaces. This level of cleaning is essential when learning how to refinish hardwood floor surfaces properly.
- Final Check: Wear clean socks or shoe covers if you need to walk on the floor after the final cleaning. Run your hand lightly over the surface; it should feel perfectly smooth and dust-free before proceeding to staining or finishing. This ensures a flawless base for your refinished hardwood flooring.
Step 4: How to Stain Hardwood Floors Professionally
Applying stain enhances the natural beauty of the hardwood, adds color, and evens out tone variations. While optional (you can apply clear finish directly to natural sanded wood), staining is a popular part of how to refinish hardwood floors. Achieving an even, blotch-free result requires careful application and management of drying times.
Applying Wood Stain Evenly Across Hardwood
Consistency is key when learning how to stain hardwood floors. Lap marks (darker areas where wet stain overlaps dried stain) are a common issue.
- Choose Your Applicator: Common applicators include clean, lint-free rags (like old t-shirts), staining pads, or foam brushes. Rags offer good control for wiping off excess. Avoid bristle brushes which can leave marks.
- Plan Your Attack: Work in manageable sections, typically rows running the length of the room following the grain of the hardwood flooring. Aim to maintain a “wet edge” – always applying new stain next to the still-wet edge of the previously stained section to prevent lap marks.
- Application Technique (Rag Method): Dip the rag lightly into the stain (don’t saturate it). Apply the stain liberally but evenly, working it into the wood with the grain. Work fairly quickly across your chosen section (e.g., a few boards wide, the length of the room).
- Wipe Off Excess: After letting the stain penetrate for the manufacturer-recommended time (usually 5-15 minutes), use a clean, dry, lint-free rag to wipe off all excess stain, again moving with the grain. The final color comes from the stain absorbed by the wood, not the stain sitting on top. Leaving excess stain will result in a sticky, uneven finish that won’t dry properly. Apply consistent pressure when wiping.
- Work Systematically: Complete one section (apply and wipe) before moving to the next, always maintaining that wet edge between sections. Have plenty of clean rags on hand for wiping.
- Edges and Corners: Apply stain carefully along edges and in corners using a smaller rag or foam brush, ensuring even coverage and thorough wiping of excess.
- Ventilation: Ensure good ventilation during staining, especially with oil-based products, but avoid strong drafts that could dry the stain too quickly or blow dust onto the wet surface. Follow safety precautions (respirator). This is crucial for safe wood floor refinishing.
Managing Drying Times for Hardwood Stains
Proper drying is essential before applying the protective polyurethane finish. Applying finish over stain that isn’t fully dry can lead to adhesion problems, cloudy finish, or a sticky mess.
- Follow Manufacturer Instructions: Always adhere strictly to the drying times specified on the stain container. These times are usually based on ideal temperature and humidity conditions (e.g., 70°F/21°C and 50% relative humidity).
- Factor in Conditions: Drying times can be significantly longer in cool or humid conditions. If your environment is cold or damp, allow extra drying time – potentially double the recommended time or more. Good air circulation (gentle fan, not blowing directly on the floor) can help, but avoid strong drafts.
- Oil vs. Water-Based: Oil-based stains generally require much longer drying times (often 24-72 hours) than water-based stains (often 2-4 hours). Never rush this step in your hardwood floor refinishing project.
- Check for Dryness: The stain should feel completely dry to the touch, with no tackiness or smell. A common test is to press a clean white rag firmly onto the stained surface in an inconspicuous area; if any color transfers to the rag, it’s not dry enough.
- Avoid Walking On It: Stay off the stained floor until it is completely dry and ready for the first coat of finish. Walking on it can leave marks or transfer oils.
Patience during the drying phase is critical for achieving a durable and beautiful result when refinishing hardwood floors. Rushing this part of the floor restoration process is a common mistake.
Step 5: Applying Protective Finish to Your Refinished Hardwood Flooring
Applying the polyurethane topcoat is the final stage in how to refinish hardwood floors. This clear coat protects the wood (and stain, if used) from scratches, spills, and wear, while also providing the desired sheen. Proper application technique, buffing between coats, and allowing adequate cure time are essential for a long-lasting, beautiful finish.
Best Practices for How to Apply Polyurethane Smoothly
Achieving a smooth, bubble-free, and lap-mark-free finish requires care and the right tools.
- Choose Your Applicator: A lambswool applicator (for oil-based poly), a synthetic T-bar applicator, or a high-quality natural bristle brush (for edges/cut-in) are common choices. Some water-based finishes recommend specific synthetic applicators. Avoid rollers, as they tend to create bubbles.
- Preparation: Ensure the floor is impeccably clean (vacuumed and tack-clothed again if necessary). Stir the polyurethane gently but thoroughly – never shake it, as this introduces bubbles. Pour some finish into a paint tray.
- Cutting In: Using a brush, apply a strip of finish around the perimeter of the room (2-3 inches wide), working out from the corners.
- Application Technique: Start at the wall opposite the exit. Apply the finish in smooth, even, overlapping strokes, always moving with the grain of the hardwood flooring. Maintain a wet edge to avoid lap marks, similar to staining. Apply a thin, even coat – thick coats take longer to dry and are more prone to issues.
- Applicator Method: If using a T-bar or lambswool applicator, pour a line of finish near the starting wall and use the applicator to pull the finish smoothly across the floor towards you, moving with the grain. Overlap passes slightly. Work your way systematically across the room towards the exit.
- Avoid Overworking: Apply the finish and move on. Don’t go back over areas that have started to dry, as this can create marks or dull spots. Let the finish self-level.
- Lighting and Ventilation: Ensure good lighting to see coverage and spot imperfections. Maintain good ventilation for fumes, but avoid strong drafts that can cause rapid drying or blow dust into the wet finish. This is key for safe and effective refinish hardwood flooring.
The Importance of Buffing Between Finish Coats on Hardwood Floors
Most hardwood floor refinishing projects require multiple coats of polyurethane (typically 2-3 coats) for adequate protection. Lightly sanding or “buffing” (also called screening) the floor between coats (except the final one) is crucial for two reasons:
- Adhesion: Buffing slightly roughens the surface of the dried polyurethane coat, creating a better “tooth” for the next coat to adhere to. This prevents peeling or premature wear.
- Smoothness: It knocks down any minor imperfections, dust nibs, or bubbles that may have occurred in the previous coat, leading to a smoother final finish.
- Technique: Use very fine grit sandpaper (e.g., 220 grit) or a sanding screen (e.g., 180 or 220 grit) attached to a pole sander or a buffer (if you rented one). Apply light, even pressure, moving with the grain. The goal is just to dull the surface slightly and create a fine white powder, not to sand through the finish layer.
- Cleaning After Buffing: After buffing, it is absolutely essential to thoroughly vacuum up all the fine dust generated and then wipe the floor with a tack cloth or a cloth dampened with the appropriate solvent (mineral spirits for oil-based, water for water-based) before applying the next coat. Any remaining dust will be trapped in the subsequent layer. This cleaning step is vital hardwood care during finishing.
- Timing: Buff only after the previous coat is fully dry according to the manufacturer’s instructions (often 12-24 hours for oil-based, less for water-based). Do not buff the final coat of finish.
Understanding Cure Time for Newly Refinished Floors
It’s crucial to distinguish between drying time and curing time when refinishing hardwood floors.
- Drying Time: This is the time it takes for the finish to feel dry to the touch and typically allow for light foot traffic (usually in socks only). This varies greatly between oil-based (often 24 hours per coat) and water-based (often 2-4 hours per coat) finishes. You can usually apply subsequent coats after the recommended drying time (plus buffing time).
- Curing Time: This is the time it takes for the finish to fully harden and achieve maximum durability. During this period, the finish is still relatively soft and vulnerable to scratches, scuffs, and damage from furniture or heavy traffic.
- Oil-Based: Full cure can take 2-4 weeks, sometimes longer depending on conditions.
- Water-Based: Full cure is typically faster, often 3-7 days, but check manufacturer specifics.
- Post-Refinishing Care During Curing:
- Foot Traffic: Allow light foot traffic (socks only) after 24 hours (check manufacturer guidance). Avoid shoes for several days.
- Furniture: Wait as long as possible before placing furniture back, ideally for the full cure time. If you must place furniture sooner (e.g., after 3-7 days), lift it into place – never drag it. Use felt pads under all furniture legs immediately.
- Rugs: Do not place area rugs on the floor for at least 2-4 weeks (or the full cure time). Rugs can trap solvents and prevent the finish from curing properly underneath, potentially discoloring or damaging the refinished hardwood flooring.
- Cleaning: Avoid damp mopping or using cleaning products for the first few weeks (or full cure time). Stick to dry dust mopping or vacuuming with a soft brush attachment.
Understanding and respecting the cure time is the final, critical step in ensuring your hard work results in durable, long-lasting, beautifully restored hardwood floors. Patience here protects your investment in floor restoration.
The Best Way to Refinish Hardwood Floors: Expert Tips and Tricks
Beyond the basic steps of how to refinish hardwood floors, incorporating expert tips and tricks can elevate your results from good to great. Knowing the nuances, potential shortcuts (where appropriate), and common pitfalls can save you time, money, and frustration. This section focuses on refining your technique, offering alternative approaches like screen and recoat, and providing specific advice for challenging situations. Whether you’re aiming for budget-friendly DIY refinishing hardwood floors or tackling very old wood floors, these insights represent the collective wisdom of experienced floor refinishing professionals, helping you achieve the best way to refinish hardwood floors in your specific situation.
Tips to Refinish Hardwood Floors Without Major Sanding (Screen and Recoat)
If your hardwood floors are structurally sound but the finish is merely dull or lightly scratched, without deep gouges or areas worn down to bare wood, you might be able to avoid the intense dust and labor of full sanding. A “screen and recoat” (also called buff and coat) is a less invasive method of hardwood floor care.
- What It Is: This process involves lightly abrading (screening or buffing) the existing top layer of finish to create a surface the new finish can adhere to, then applying one or two fresh coats of compatible polyurethane. It doesn’t remove deep scratches or change the stain color but revitalizes the protective layer and restores sheen.
- When It Works: Suitable only if the existing finish is intact (no bare wood showing) and hasn’t been contaminated with waxes, oils (like oil soap cleaners), or silicone-based products, which prevent adhesion. Test adhesion in an inconspicuous spot first: apply a little new finish, let it dry, and see if it scratches off easily with a fingernail or coin. If it does, a full sanding refinish is necessary.
- The Process:
- Thoroughly clean the hardwood floor with a recommended hardwood floor cleaner designed for prepping before recoating (check polyurethane manufacturer recommendations).
- Rent a floor buffer machine and use a sanding screen (typically 150-180 grit).
- Buff the entire floor evenly to lightly scuff the existing finish, creating a uniform dull appearance. Hand sand edges and corners with fine-grit sandpaper.
- Vacuum meticulously and tack the floor clean, just as you would after full sanding.
- Apply one or two coats of compatible polyurethane (water-based over water-based, oil-based over oil-based is safest, though some modern water-based polys bond to existing oil-based after proper prep – research carefully).
- Benefits: Much faster, less dusty, and less expensive than a full hardwood floor refinishing. A great hardwood maintenance task to perform periodically (every few years in high-traffic homes) to prolong the life of the finish before a full sanding becomes necessary. This is often considered one of the tips to refinish hardwood floors most efficiently for minor wear.
Avoiding Common Mistakes During Hardwood Floor Refinishing
Many DIY attempts at how to refinish hardwood floors fall short due to avoidable errors. Being aware of these common pitfalls can save your project:
- Uneven Sanding: The most frequent and damaging mistake. Caused by stopping the drum sander while it’s contacting the floor, applying uneven pressure with the edger, or not overlapping passes correctly. Results in visible dips, gouges, or swirl marks. Practice and constant motion are key.
- Skipping Sanding Grits: Trying to save time by skipping grits (e.g., going from 36 to 100) leaves deep scratches from the coarser grit that the finer grit cannot remove, becoming glaringly obvious after staining or finishing. Follow the progression.
- Insufficient Dust Removal: Leaving dust behind guarantees a gritty, rough finish. Be obsessive about vacuuming and tacking everything before staining and between finish coats. This is crucial for quality floor restoration.
- Lap Marks in Stain/Finish: Caused by allowing an edge to dry before applying the next section. Work in manageable sections, maintain a wet edge, and apply finish evenly without overworking it. Follow how to stain hardwood floors and apply finish guidelines carefully.
- Applying Finish Too Thickly: Leads to prolonged drying times, potential bubbles, and a less durable surface. Thin, even coats are better.
- Ignoring Drying/Curing Times: Rushing the process by applying coats too soon or placing furniture/rugs back too early can ruin the finish. Patience is vital in refinishing hardwood floors.
- Poor Ventilation/Safety: Failing to use proper respiratory protection or ensure adequate ventilation can lead to health issues. Not using safety glasses or hearing protection invites injury. Prioritize safety in DIY refinishing hardwood floors.
- Incompatible Products: Using stain and finish types that aren’t compatible, or applying new finish over contaminants like wax, can cause adhesion failure, peeling, or discoloration. Always test and follow manufacturer instructions.
Avoiding these errors is central to achieving the best way to refinish hardwood floors and ensuring your hardwood care efforts pay off.
Refinishing Hardwood Floors Efficiently on a Budget
While professional hardwood floor refinishing can be costly, DIY refinishing hardwood floors can be done affordably with smart planning.
- DIY Labor: The biggest saving comes from doing the work yourself. Factor in your time as sweat equity.
- Rent, Don’t Buy: Rent the expensive machines (drum sander, edger, buffer) instead of buying. Compare rental rates from different suppliers.
- Material Costs:
- Sandpaper: Buy in bulk or look for deals. Return unused, unopened sandpaper if the rental store allows.
- Stain: While tempting to go cheap, quality stain applies more evenly. However, staining is optional; a natural finish is cheaper (saves cost of stain) and timeless. Consider how to refinish hardwood floor surfaces without stain.
- Polyurethane: This is not the place to skimp excessively. The finish protects your floors. While oil-based is often cheaper per gallon than water-based, factor in the cost of mineral spirits for cleanup and potentially longer rental times due to slower drying. Compare coverage rates (sq ft per gallon) when pricing. Mid-range quality products often offer the best balance of cost and performance for hardwood floor care.
- Borrow Tools: Ask friends or neighbors if they have smaller tools you might need (shop vac, detail sander, brushes, knee pads).
- Minimize Waste: Measure your room accurately to buy the right amount of stain and finish. Follow application guidelines to avoid wasting material.
- Screen and Recoat Option: If your floors qualify (see previous tip), this is significantly cheaper than a full sand-and-refinish.
Budgeting carefully and making smart choices on materials and equipment rental allows effective hardwood restoration without breaking the bank.
Pro Tips for Restoring Very Old Hardwood Floors
Restoring floors in older homes presents unique challenges and rewards. Antique hardwood floors often have immense character but may require special handling during hardwood floor refinishing.
- Assess Condition Carefully: Check for loose boards, significant gaps between planks, deep stains, water damage, or previous poor repairs. Some issues might need addressing before sanding.
- Identify Wood Species: Old floors might be softer woods like pine or fir, or less common hardwoods. Identify the wood to choose appropriate sanding grits and techniques (softer woods sand faster).
- Lead Paint/Old Finishes: Floors installed before 1978 might have finishes containing lead. Sanding creates hazardous lead dust. Test for lead before sanding. If positive, use lead-safe work practices (HEPA vacuums, proper PPE, containment) or hire certified professionals. This is a critical safety aspect of how to restore hardwood floors in older homes.
- Embrace Imperfections: Part of the charm of old hardwood is its history – minor dings, variations in color, or slight gaps. Aim for restoration, not necessarily modern perfection. Aggressive sanding to remove every flaw might thin the wood too much, especially if it’s been refinished before. Discuss your goals before starting the refinish hardwood process.
- Dealing with Gaps: Small gaps are normal due to seasonal humidity changes. For larger gaps in old floors, some professionals fill them with wood strips (slivers) glued in place before sanding, or use tinted wood filler after sanding (though filler can sometimes crack or look unnatural). Consult experts for the best approach for your specific flooring.
- Sanding Technique: Be extra cautious with drum sanders on potentially thinner old wood. Consider starting with a finer grit than usual if the finish isn’t extremely thick. Ensure sanding is perfectly even.
- Finish Choice: An oil-based polyurethane often complements the warm tones of older wood floors, but a water-based finish might be chosen if preserving the natural, possibly lighter, aged color is desired. A satin sheen is often preferred to minimize the appearance of imperfections common in restoring old hardwood floors.
How to Refinish Hardwood Floor Areas with High Traffic
Areas like hallways, entryways, and kitchens receive significantly more wear and tear. Special considerations are needed when refinishing hardwood floors in these zones to ensure longevity.
- Thorough Sanding: Ensure the old finish is completely removed in high-traffic paths, as these areas are often the most worn. Don’t skimp on sanding stages here.
- Durable Finish Choice: Opt for a high-quality, durable polyurethane. While oil-based is traditionally known for toughness, modern high-end two-component water-based finishes offer excellent wear resistance with faster curing and less yellowing. Consider commercial-grade finishes specifically designed for high traffic. This is key for long-term hardwood floor care.
- Extra Coats: Apply an additional coat of polyurethane in high-traffic areas compared to lower-traffic rooms (e.g., 3-4 coats instead of 2-3). Allow proper drying time between each coat.
- Respect Cure Time: Be extra patient with the curing time in these areas. Keep traffic extremely light (socks only) for as long as possible, and delay placing furniture or rugs according to the manufacturer’s full cure recommendations.
- Protective Measures Post-Cure: Once fully cured, use high-quality area rugs or runners with breathable backing pads in main pathways and entry zones to absorb the brunt of the foot traffic. Place mats outside and inside entry doors to trap dirt and grit. Implement a strict “shoes off” policy if possible. These hardwood maintenance habits are crucial.
- Regular Maintenance: Clean high-traffic areas more frequently (dust mopping daily, appropriate cleaning as needed) to prevent abrasive grit from accumulating and dulling the refinished hardwood flooring.
By taking these extra steps during and after refinishing hardwood, you can significantly extend the life and beauty of the finish in the most demanding areas of your home.
Post-Refinishing Hardwood Floor Care and Maintenance
Congratulations, you’ve successfully navigated how to refinish hardwood floors! Your floors look stunning, but the work isn’t entirely over. Implementing a consistent hardwood floor care and hardwood maintenance routine is crucial to protect your newly refinished hardwood flooring and keep it looking beautiful for years to come. Proper care prevents premature wear, scratches, and damage, extending the time until the next refinish is needed. Neglecting maintenance can quickly undo all your hard work. This section outlines daily habits, long-term strategies, protective measures, and recommended products for optimal hardwood care after floor restoration.
Establishing Daily Hardwood Maintenance Routines
Simple, consistent daily actions make a huge difference in preserving your refinished hardwood floors. The primary goal is to keep abrasive grit and dirt off the floor surface.
- Dust Mopping or Sweeping: Use a soft microfiber dust mop or a broom with soft, fine bristles daily, especially in high-traffic areas. This removes dust, pet hair, and small particles that can act like sandpaper underfoot, dulling the finish over time. Microfiber pads are excellent as they trap dust effectively.
- Vacuuming (Carefully): Vacuuming a couple of times a week (or more if needed) is also effective. Crucially, use a vacuum cleaner with a soft floor brush attachment specifically designed for hardwood floors. Never use a vacuum with a beater bar or stiff rotating brushes, as these can scratch and damage the finish. Ensure the vacuum wheels are clean and roll smoothly. Pay attention to edges and corners.
- Immediate Spill Cleanup: Wipe up any spills immediately with a soft, slightly damp cloth. Do not let liquids sit on the hardwood flooring, as they can seep between boards or damage the finish, potentially leading to stains or warping. Blot spills rather than rubbing. Dry the area thoroughly afterwards. This immediate response is vital hardwood floor care.
- Entrance Mats: Place mats both outside and inside all exterior doors to trap dirt, grit, sand, and moisture before they reach your hardwood floors. Shake out or vacuum these mats regularly.
These simple daily habits significantly reduce the abrasive wear that dulls floors and are the foundation of good hardwood maintenance.
Long-Term Floor Care Strategies for Lasting Beauty
Beyond daily cleaning, periodic tasks and mindful practices contribute to the long-term health and appearance of your restored hardwood floors.
- Periodic Deeper Cleaning: Depending on traffic and household conditions, your floors will benefit from occasional deeper cleaning. Use only a pH-neutral cleaner specifically recommended by your finish manufacturer or designated as safe for polyurethane-finished hardwood floors. Avoid harsh detergents, ammonia, vinegar (which can dull the finish over time), oil soaps (which can leave residue hindering future recoats), waxes (unless you have a specific wax finish), or excessive water.
- Proper Mopping Technique: When deeper cleaning is needed, use a microfiber mop lightly dampened with the recommended cleaner (or just water if the cleaner instructions allow). The mop should be barely wet, not soaking. Mop with the grain. Avoid pouring liquid directly onto the floor. Ensure the floor dries quickly. Never use a steam mop on hardwood flooring, as the heat and moisture can damage the finish and the wood. This is a critical aspect of floor care.
- Furniture Protection: Place high-quality felt pads or glides under the legs of all furniture (chairs, tables, sofas, cabinets). Check these pads periodically and replace them when they become worn or embedded with grit. Lift furniture when moving it; never drag it across the hardwood floors.
- Pet Care: Keep pets’ nails trimmed regularly to minimize scratches on the refinished hardwood flooring. Place mats under pet food and water bowls to catch spills.
- Sunlight Control: Prolonged exposure to direct sunlight can cause fading or discoloration over time. Use curtains, blinds, or UV-protective window film to mitigate sun damage, especially during peak hours. Rotate rugs and furniture occasionally to help the floor age more evenly.
- Consider Recoating: Even with excellent hardwood care, the top finish layer will eventually show wear, particularly in high-traffic areas. Consider a screen and recoat (buff and coat) every 3-7 years (depending on wear) to refresh the protective layer before wear reaches the stain or wood. This proactive hardwood maintenance can significantly delay the need for a full refinish.
Protecting Your Newly Restored Hardwood Floors from Damage
Prevention is key to keeping your refinished hardwood floors looking their best. Anticipating potential sources of damage allows you to take proactive steps.
- Furniture Movement: As mentioned, always use felt pads and lift, don’t drag. For heavy items like refrigerators or pianos, use specialized appliance sliders or place protective sheets (like hardboard, smooth side down) on the floor before moving.
- High Heels and Cleats: Stiletto heels concentrate immense pressure on a small point and can easily dent hardwood floors. Avoid wearing them on your floors. Similarly, athletic cleats or damaged shoe soles with embedded rocks can cause significant scratches. Encourage a “shoes off” policy indoors if practical.
- Rolling Chairs: Office chairs with standard plastic casters can severely scratch and wear down the finish. Use a protective chair mat specifically designed for hardwood floors or replace the standard casters with softer, rubbery wheels made for wood surfaces.
- Rugs and Mats: Use rugs in high-wear areas (entryways, hallways, in front of kitchen sink) but ensure they have a breathable backing or use a breathable rug pad designed for hardwood. Non-breathable rubber or vinyl backings can trap moisture and discolor the finish or wood over time. Avoid rugs completely during the initial curing period (several weeks) after refinishing hardwood floors.
- Plant Pots: Never place potted plants directly on the hardwood floor, even with a saucer. Moisture can get trapped underneath or spills/overflows can occur. Use plant stands with solid bases or waterproof trays underneath.
- Construction/Moving: If undertaking other renovations or moving heavy items, protect the floors thoroughly with rosin paper, cardboard, or hardboard sheets, taped securely at the seams.
Being mindful of these potential hazards is essential hardwood floor care for maintaining the integrity of your floor restoration.
Recommended Cleaning Products for Refinished Hardwood Care
Using the wrong cleaning products is one of the fastest ways to damage your newly refinished hardwood floors. Stick to products specifically designed for polyurethane-finished hardwood.
- pH-Neutral Cleaners: Look for cleaners explicitly labeled as safe for polyurethane-finished hardwood floors and having a neutral pH. Harsh, acidic, or alkaline cleaners can strip or dull the finish over time. Bona, Pallmann, and Loba are examples of brands often recommended by floor refinishing professionals, but always check compatibility with your specific finish if possible.
- Microfiber Mops/Pads: Microfiber is ideal for both dry dusting and damp mopping hardwood. It effectively traps dirt and requires minimal moisture. Have separate pads for dusting and damp cleaning. Wash pads regularly without fabric softener (which can cause streaking).
- Water (Sparingly): For light cleaning, often a microfiber mop lightly dampened with plain water is sufficient. Remember, “lightly dampened” means almost dry to the touch.
- What to AVOID:
- Vinegar and Water: Too acidic, can dull the finish over time.
- Ammonia or Harsh Detergents: Can strip the finish.
- Oil Soaps (e.g., Murphy Oil Soap): Can leave a residue that dulls the finish and, more importantly, can cause adhesion problems if you ever need to screen and recoat the floor.
- Wax Products: Unless your floor has a specific wax finish (uncommon with modern polyurethane), avoid waxes as they build up, attract dirt, and interfere with recoating.
- Steam Cleaners: Inject heat and moisture into the wood, potentially damaging both the finish and the wood itself.
- Abrasive Cleaners or Steel Wool: Will scratch the finish.
Choosing the right products is a cornerstone of effective hardwood maintenance and protects the investment you made in refinishing hardwood.
Hardwood Maintenance Schedule Post-Restoration
Having a general schedule can help ensure consistent hardwood floor care after your hardwood floor restoration. Adjust based on your household’s traffic levels.
- Daily:
- Dust mop or sweep high-traffic areas.
- Wipe up spills immediately.
- Check entrance mats for excessive dirt.
- Weekly:
- Vacuum entire floor area with a soft brush attachment, including edges and under furniture if possible.
- Spot clean any sticky spots with a recommended cleaner and microfiber cloth.
- Monthly (or as needed):
- Damp mop the floor with a lightly dampened microfiber mop and a recommended pH-neutral hardwood floor cleaner, only if necessary based on appearance. Many floors only need damp mopping occasionally if daily/weekly routines are followed.
- Quarterly/Annually:
- Inspect furniture pads and replace if worn.
- Check for any new scratches or wear patterns.
- Consider rotating area rugs slightly.
- Every 3-7 Years (depending on wear):
- Assess the condition of the finish, especially in high-traffic areas.
- Consider a professional assessment for a screen and recoat (buff and coat) to refresh the protective layer before wear becomes severe. This proactive floor care step can greatly extend the life of your refinished hardwood floors and postpone the need for another full refinish.
Adhering to a schedule helps maintain the beauty and durability achieved through refinishing hardwood floors.
Advanced Hardwood Restoration and Troubleshooting
While the standard how to refinish hardwood floors process addresses common wear and tear, sometimes you encounter more significant issues requiring advanced hardwood restoration techniques or troubleshooting. Deep scratches, board damage, water stains, or dealing with specific materials like engineered hardwood demand specialized knowledge. This section covers common advanced scenarios you might face before or during a floor refinishing project, providing insights into tackling tougher challenges and ensuring the best possible outcome for your flooring. Understanding these techniques can be crucial when standard refinishing hardwood methods aren’t enough.
Techniques for Dealing with Deep Scratches in Hardwood
Surface scratches are typically removed during the sanding phase of hardwood floor refinishing. However, deep gouges or scratches that penetrate well below the old finish require specific attention.
- Assessment: Determine the depth. If the scratch is deep but hasn’t splintered the wood badly, it might be minimized or removed by the initial coarse sanding passes. However, very deep gouges might remain visible even after aggressive sanding.
- Wood Filler/Putty: For isolated deep scratches or gouges that remain after initial sanding, you can use wood filler or putty.
- Timing: It’s often best applied after sanding is complete but before staining (if using stainable filler) or before the final coat of finish (if using color-matched putty).
- Type: Choose a filler designed for hardwood floors. Stainable fillers accept stain somewhat, but rarely exactly like the surrounding wood. Color-matched putties are applied after staining (or on natural wood) and are designed to match common wood tones or stain colors. Test in an inconspicuous area.
- Application: Overfill the scratch slightly, as filler can shrink. Once dry, sand it flush with the surrounding wood floor using fine-grit sandpaper. Be careful not to sand the surrounding area excessively, which could create a slight depression (halo effect).
- Board Replacement: For extremely deep or wide damage, or numerous deep scratches concentrated in one area, replacing the affected board(s) might be the best hardwood restoration solution. This is a more advanced repair requiring careful cutting, removal of the damaged board without harming adjacent ones, and fitting a new, matching board. This is often best left to professionals unless you have woodworking experience.
- Acceptance: Sometimes, especially with older floors, minor deep scratches that remain after sanding can be considered part of the floor’s character. Trying to completely eliminate every deep flaw might not be feasible or desirable.
Addressing deep scratches appropriately is part of thorough restoring floors.
How to Repair Damaged Wood Floors Before Refinishing
Beyond scratches, you might encounter other types of damage that need repair before you start the main refinish hardwood floors process.
- Loose Boards: Squeaky or shifting boards can sometimes be secured by driving finish nails or trim-head screws at an angle through the tongue of the board into the subfloor (if accessible) or by using specialized screw systems designed to pull boards down from below. Ensure any fasteners are countersunk well below the surface before sanding.
- Cracked or Split Boards: Minor cracks might be stabilized with wood glue injected into the crack, then clamped until dry. More significant splits usually warrant board replacement.
- Board Replacement: As mentioned for deep scratches, replacing severely damaged boards (due to rot, deep burns, large holes, or irreparable splits) is often necessary.
- Sourcing Matching Wood: Finding replacement hardwood flooring that matches the species, grade, width, thickness, and even milling profile (tongue and groove) of your existing floor can be challenging, especially with older floors. Check salvage yards, specialty flooring suppliers, or consider taking boards from an inconspicuous area (like a closet) to use for visible repairs, replacing the closet boards with the closest match available.
- Technique: Replacing a board mid-floor involves carefully cutting out the damaged section (often starting by drilling holes and using an oscillating tool or circular saw set to the correct depth), cleaning the opening, potentially trimming the bottom groove off the replacement board’s groove side for easier installation, gluing it in place, and face-nailing or weighting it until the glue sets. This requires precision.
- Professional Help: Complex repairs, especially board replacement, often benefit from professional expertise to ensure a seamless integration with the rest of the hardwood floor before proceeding with floor refinishing.
Addressing these damages ensures a stable and uniform surface for sanding and finishing, leading to a better overall hardwood restoration.
Addressing Water Damage in Hardwood Restoration Projects
Water is a major enemy of hardwood floors. Addressing water damage is a common challenge in hardwood restoration.
- Assess Severity:
- Surface Stains: Light stains or discoloration often sit within the finish or the very top layer of wood and can usually be sanded out during the refinish hardwood floors process.
- Dark Stains: Black or deep gray stains indicate water has penetrated deeper, potentially reacting with tannins in the wood or causing mold/mildew growth. These are harder to sand out completely.
- Cupping/Warping: When boards absorb moisture unevenly, the edges can rise higher than the center (cupping) or the board can warp along its length. Minor cupping might flatten as the wood dries thoroughly or during sanding, but severe warping often requires board replacement.
- Buckling: In severe cases, hardwood flooring can lift significantly off the subfloor. This usually requires removal of the affected area, addressing the subfloor, and replacing the flooring.
- Ensure Thorough Drying: Before attempting any refinish or repair, the hardwood and subfloor must be completely dry. This can take weeks or even months, potentially requiring dehumidifiers and fans. Sanding wet wood is ineffective and can damage equipment. Attempting floor refinishing before drying is complete risks trapping moisture.
- Sanding Stains: Attempt sanding (starting with coarse grits) to remove stains. Success depends on penetration depth. Sometimes, even after sanding, a faint shadow might remain.
- Treating Mildew/Mold: If mold or mildew (often indicated by black stains and musty odor) is present, treat the affected area with appropriate wood-safe cleaning solutions after sanding (following safety protocols) and ensure it’s fully dry before proceeding. Deep mold might necessitate board replacement.
- Board Replacement: For persistent dark stains, severe warping, or buckling, replacing the damaged boards is typically the only effective solution in restoring floors affected by significant water damage.
- Identify and Fix Source: Crucially, identify and repair the source of the water leak (plumbing, appliance, roof, foundation) before undertaking hardwood floor restoration to prevent recurrence.
Water damage repair requires patience and realistic expectations about what sanding alone can achieve during how to refinish hardwood floor projects.
Special Considerations for Refinishing Engineered Hardwood Flooring
Engineered hardwood flooring is constructed differently from solid hardwood. It has a top layer (veneer) of real hardwood bonded to multiple layers of plywood or HDF. This construction affects how to refinish hardwood floors of this type.
- Limited Sanding: The biggest constraint is the thickness of the top hardwood veneer. This layer can range from very thin (less than 1mm) to relatively thick (4mm or more). Thin veneers (typically under 2mm) cannot be sanded and refinished at all – attempting to do so will expose the core layers. Thicker veneers might allow for one, possibly two, careful refinishing cycles over the floor’s lifetime.
- Check Manufacturer Specs: Before attempting floor refinishing, determine the thickness of your engineered floor’s wear layer. Check manufacturer documentation or consult a flooring professional if unsure.
- Sanding Technique: If refinishing is possible, sanding must be done much more cautiously than with solid hardwood. Use less aggressive sanding equipment (an orbital sander might be preferred over a drum sander) and finer grit sandpaper. The goal is to remove only the existing finish without sanding through the veneer. Extreme care is needed, making professional help often advisable for refinishing engineered hardwood flooring.
- Screen and Recoat: Often, a screen and recoat (buff and coat) is a safer and more appropriate method for refreshing the finish on engineered hardwood floors, provided the wear hasn’t penetrated the finish and the veneer is thick enough to withstand light abrasion.
- Deep Scratches/Damage: Deep scratches that go through the veneer are generally not repairable by sanding. Options might include using color-matched putty pens or potentially board replacement if matching planks are available.
Understanding the limitations of engineered flooring is crucial before embarking on a refinish project. Aggressive hardwood restoration techniques suitable for solid wood can permanently ruin engineered floors.
Restoring Floors with Unique Hardwood Types
While oak, maple, and pine are common, you might encounter less typical hardwood species, each with characteristics affecting the how to refinish hardwood floors process.
- Softwoods (Pine, Fir): These woods are much softer than hardwoods like oak. They dent and scratch more easily and sand down much faster.
- Sanding: Use finer grit sandpaper to start (e.g., 60 or 80 grit instead of 36/40 unless the finish is very thick) and be extremely careful with the drum sander to avoid gouging. Hand sanding or using an orbital sander might be preferable for better control.
- Staining: Softwoods are prone to blotching. Using a pre-stain wood conditioner before applying stain is highly recommended for more even color absorption during wood floor refinishing.
- Exotic Hardwoods (Brazilian Cherry, Teak, Ipe): Many exotic woods are very dense and hard, which can make sanding more time-consuming. They may require sharper sandpaper grits.
- Oily Woods: Some exotics (like Teak) are naturally oily. This can sometimes interfere with the adhesion or drying of certain finishes (especially oil-based poly). Consult finish manufacturers for compatibility or use recommended sealers. Thorough cleaning after sanding (potentially with denatured alcohol, test first) might be needed.
- Color Changes: Be aware that many exotic woods change color significantly over time with exposure to light (some darken, some lighten). Sanding will reveal the original color, which will then begin its aging process anew.
- Antique or Reclaimed Wood: Often has significant character (nail holes, saw marks, color variation). The goal of hardwood restoration here is usually to enhance this character, not erase it. Sanding might be done more lightly to preserve patina. Finish choices often lean towards matte or satin to keep the rustic look.
- Parquet Floors: Sanding parquet requires specific techniques as the grain runs in multiple directions. Often, sanding is done progressively straight, then diagonally, or using specialized orbital/buffing machines to avoid cross-grain scratching. Research specific parquet sanding methods or hire professionals experienced in restoring floors with patterns.
Researching the specific properties of your unique hardwood type before starting hardwood floor refinishing allows you to tailor your approach for the best results, ensuring proper hardwood care for less common materials.