How to Build a Compost Bin
Welcome to the ultimate guide on how to make a compost bin. Whether you’re a seasoned gardener looking to enrich your soil or a beginner eager to reduce household waste, creating your own composting system is a rewarding and environmentally friendly project. Composting transforms kitchen scraps and yard trimmings into nutrient-rich humus, often called “black gold,” which significantly improves soil health and plant growth. This comprehensive guide will walk you through everything from understanding the basics of composting to detailed instructions on how to build a compost bin using different methods. We’ll explore various compost bin ideas, discuss the pros and cons of different styles, and provide essential composting tips for success. Get ready to embark on your journey towards sustainable living and discover the satisfaction of making a compost bin right in your backyard.
Learning how to make compost is simpler than you might think. It’s a natural process of decomposition, and providing the right environment in a dedicated compost container speeds it up significantly. This guide focuses specifically on building a compost bin, offering practical, step-by-step instructions suitable for various skill levels and budgets. From simple wire mesh enclosures to sturdy pallet bins, we cover popular DIY options. We’ll also delve into setting up your composting bin, managing the composting process effectively, troubleshooting common issues, and even exploring advanced techniques. By the end, you’ll have the knowledge and confidence to create a compost bin perfectly suited to your needs and start reaping the benefits of homemade compost.
Understanding Composting Basics
Before diving into building a compost bin, it’s crucial to grasp the fundamentals of the composting process. Composting is essentially nature’s recycling program. It involves the decomposition of organic matter—things like fruit and vegetable scraps, coffee grounds, eggshells, grass clippings, leaves, and small twigs—by microorganisms such as bacteria, fungi, and actinomycetes, as well as larger organisms like earthworms and insects. These decomposers break down the raw materials into a stable, dark, crumbly substance called compost. This finished product is incredibly beneficial for soil, acting as a conditioner, adding essential nutrients, improving drainage in clay soils, and enhancing water retention in sandy soils. Understanding this natural cycle is the first step towards successful composting at home and knowing how to make compost effectively in your chosen bin for making compost.
Benefits of Composting at Home
Engaging in composting at home offers a multitude of advantages, extending beyond just producing free soil amendment. Firstly, it significantly reduces household waste. Organic materials like food scraps and yard waste can constitute a large portion of the waste sent to landfills. In landfills, this organic matter decomposes anaerobically (without oxygen), producing methane, a potent greenhouse gas contributing to climate change. By composting these materials in your own compost container, you divert them from the landfill, reducing your environmental footprint. Secondly, the resulting compost is a powerhouse for your garden. It improves soil structure, aeration, and drainage, reducing soil compaction. It increases the soil’s ability to hold water, meaning you’ll need to water less often. Compost provides a slow release of essential plant nutrients, reducing the need for synthetic chemical fertilizers, which can harm beneficial soil organisms and potentially pollute waterways. Using homemade compost fosters healthier plants that are more resistant to pests and diseases. Furthermore, making a compost bin and tending to it connects you more closely to natural cycles and promotes a sense of self-sufficiency and environmental stewardship. It’s a tangible way to contribute positively to the environment while enhancing your own garden’s productivity. The process of how to make a compost bin itself can be a fulfilling DIY project.
Key Composting Ingredients: Greens, Browns, Carbon, Nitrogen
Successful composting relies on balancing four key elements, often simplified into two categories: “Greens” and “Browns.” These correspond to materials rich in Nitrogen (Greens) and Carbon (Browns). Achieving the right Carbon-to-Nitrogen (C:N) ratio is fundamental to understanding how to make compost efficiently in your bin for compost. Microorganisms need both carbon for energy and nitrogen for protein synthesis to thrive and break down organic matter effectively. The ideal C:N ratio for composting is generally considered to be around 25-30 parts carbon to 1 part nitrogen by weight.
Greens (Nitrogen-Rich Materials): These materials are typically moist and provide the necessary nitrogen for the decomposing organisms. Think of them as the “activators” in your compost pile. Examples include:
- Fruit and vegetable scraps (peels, cores, rinds)
- Coffee grounds and used tea bags
- Grass clippings (add in thin layers to avoid matting)
- Plant trimmings (non-woody)
- Eggshells (crushed)
- Seaweed and kelp
- Manure from herbivores (cow, horse, chicken, rabbit – avoid pet waste)
- Weeds (ideally before they go to seed)
Browns (Carbon-Rich Materials): These materials are usually dry and provide carbon, which serves as the energy source for the microbes. They also add bulk and help aerate the pile, preventing compaction and unpleasant odors. Examples include:
- Dry leaves
- Straw or hay
- Wood chips or sawdust (use sparingly, especially from treated wood)
- Shredded cardboard (uncoated)
- Shredded newspaper (avoid glossy inserts)
- Twigs and small branches (chopped)
- Pine needles (can make compost acidic, use moderately)
- Dried grass
- Paper towels and napkins (uncontaminated)
- Corn stalks
When adding materials to your composting bin, aim for a mix of roughly 2-3 parts Browns to 1 part Greens by volume (though the ideal ratio is by weight, volume is easier to estimate). Layering these materials or mixing them as you add them helps ensure a good balance. Too many greens can lead to a slimy, smelly pile, while too many browns will slow down decomposition significantly. Getting this balance right is a core part of the composting instructions for creating high-quality compost quickly.
Choosing Your Compost Bin Style
Once you understand the basics, the next step is selecting the right type of compost bin for your needs. The best choice depends on factors like the amount of organic waste you generate, the space you have available, your budget, how quickly you want compost, and how much effort you’re willing to put in. There are numerous compost bin ideas, ranging from simple piles to sophisticated tumblers, and deciding whether to opt for a DIY build a compost bin project or purchase a ready-made one is a key consideration. Exploring different bins for composting will help you find the perfect fit for your composting at home setup.
Different Compost Bin Ideas
The world of compost bin ideas is vast. At its simplest, composting can be done in an open pile, requiring no structure at all, though this can be less tidy and potentially attract pests. Enclosed bins offer better control, aesthetics, and often faster decomposition. Common options include:
- Pallet Bins: A popular DIY choice, using readily available wooden pallets to create a sturdy, affordable bin for making compost. Often built as single or multi-chamber systems.
- Wire Mesh Bins: Another simple and cost-effective DIY option. A cylinder or square made from hardware cloth or chicken wire provides good aeration. Easy to make a bin like this quickly.
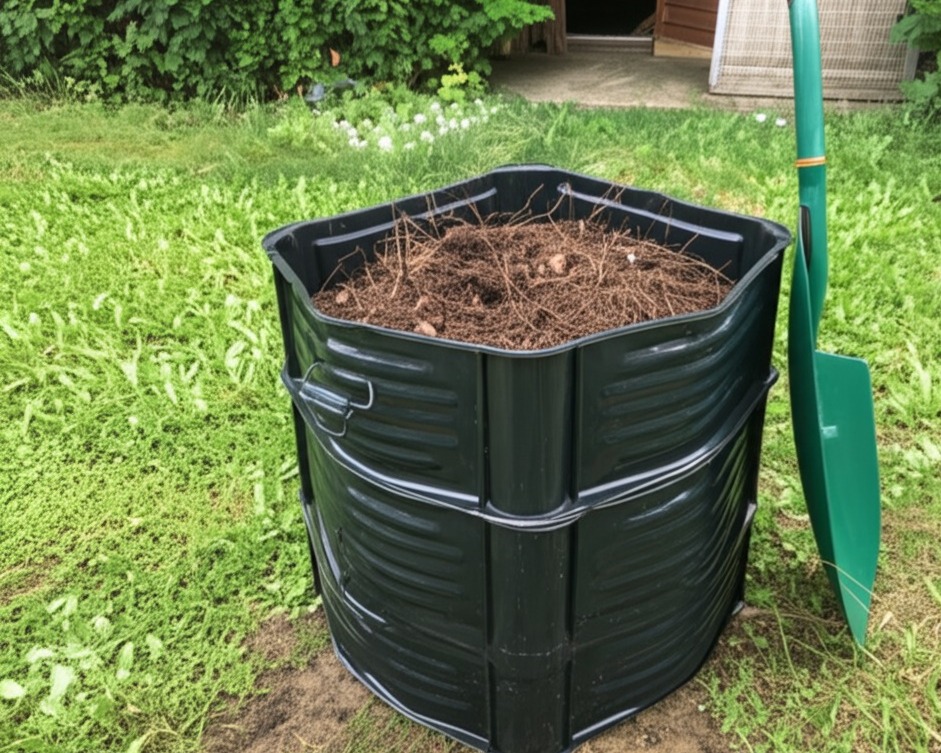
- Plastic Stationary Bins: Commercially available, often black plastic bins with lids and access doors at the bottom. They retain heat well but may require manual turning for aeration. A common type of compost container.
- Wooden Stationary Bins: Can be bought or built using lumber. Often aesthetically pleasing and durable. Kits are available for those who want to build a compost bin with pre-cut pieces.
- Compost Tumblers: Sealed drums mounted on an axle or base, allowing easy turning to mix and aerate the contents. They can speed up composting and deter pests but often have smaller capacities and can be heavy to turn when full.
- Vermicomposting Bins (Worm Bins): Specifically designed for composting with worms (usually red wigglers). Ideal for apartment dwellers or those with limited space, primarily processing kitchen scraps. This is a different approach than typical how to make a compost bin methods for yard waste.
- Multi-Chamber Bins: These systems, often DIY using pallets or wood, have multiple compartments. One chamber holds fresh material, another holds actively composting material, and a third holds finished compost. Excellent for continuous composting.
- In-Ground Composters: Options like trench composting or burying digester bins directly in the garden bed.
Consider your local climate, pest pressures, aesthetic preferences, and the volume of waste you produce when weighing these different compost bin ideas. The goal is to find a system that makes composting convenient and effective for you.
Stationary Bins for Composting: Wood, Plastic, Wire Types
Stationary bins for composting are systems that remain in one place. They are typically open at the bottom to allow direct contact with the soil, facilitating drainage and access for beneficial organisms like worms. They come in various materials:
Wooden Bins: Often considered aesthetically pleasing, wooden bins can blend well into a garden setting. You can build a compost bin from scratch using rot-resistant lumber like cedar or redwood, or purchase pre-fabricated kits. Pallet bins fall into this category and are a very popular DIY project. Wood provides some insulation. Downsides include eventual rotting (unless using treated wood, which has chemical concerns) and potentially higher cost or effort if building from scratch. Proper instructions for compost bin construction are key for longevity.
Plastic Bins: These are widely available commercially and are a common choice for beginners starting composting at home. They are typically made from recycled plastic, are durable, lightweight, and relatively inexpensive. The dark color absorbs heat, potentially speeding up decomposition in cooler climates. Most have lids to keep out rain and pests, and often feature a door at the bottom for harvesting finished compost. However, aeration can be limited unless they have built-in vents or you manually turn the contents. They represent a straightforward type of compost container.
Wire Mesh Bins: This is one of the simplest and cheapest ways to make a compost bin. A length of hardware cloth or chicken wire is formed into a cylinder or square and secured. These bins offer excellent aeration, which is crucial for aerobic decomposition. They are easy to set up and move if needed. To harvest compost, you can simply lift the entire wire structure off the pile. Downsides include potentially drying out faster in hot climates and offering less protection from pests compared to enclosed bins. They are a basic but effective bin for compost.
When choosing a stationary composting bin, consider the balance between cost, ease of use, aesthetics, durability, and aeration needs based on your climate and the materials you’ll be composting.
Tumbler Compost Container: Batch vs. Continuous Types
A tumbler compost container is designed to make turning the compost pile easier, which is essential for aeration and speeding up decomposition. These are sealed drums or barrels mounted on a frame that allows them to be rotated.
Advantages of Tumblers:
- Ease of Turning: Eliminates the need for manual turning with a fork or shovel.
- Faster Composting: Regular turning and heat retention can produce finished compost more quickly, sometimes in a matter of weeks under ideal conditions.
- Pest Resistance: Being enclosed and often elevated, they are generally more resistant to rodents and other pests.
- Neatness: They keep the composting process contained and tidy.
Disadvantages of Tumblers:
- Capacity: Often have a smaller capacity than large stationary bins.
- Weight: Can become very heavy and difficult to turn when full, especially larger models.
- Moisture Control: Can sometimes become too wet (requiring added browns) or too dry (requiring added water), as they are sealed.
- Cost: Generally more expensive than basic stationary bins or DIY options.
- Batch Limitation: Many tumblers work best using a batch method.
There are two main types of tumblers:
Batch Tumblers: These are designed to be filled all at once (or over a short period) with a balanced mix of greens and browns. Once full, no more material is added. The batch is then tumbled regularly until it’s finished compost. This produces a consistent end product but means you need somewhere else to put new scraps while the batch is processing. Some batch tumblers have two chambers, allowing one side to ‘cook’ while the other is being filled – a good solution for continuous waste generation.
Continuous Tumblers: These allow you to add materials continuously, similar to a stationary bin. Finished compost is harvested from an access door, while newer material continues to decompose. However, the output may be less uniform, containing a mix of finished and partially decomposed material. They offer more flexibility for ongoing waste addition.
Choosing between a batch or continuous tumbler depends on how much waste you generate and whether you prefer periodic batches of finished compost or continuous access. Tumblers are a distinct alternative to learning how to build a compost bin from simpler materials.
DIY Compost Bin vs. Store-Bought
A significant decision is whether to embark on a DIY compost bin project or purchase a pre-made unit. Both approaches have merits.
DIY Compost Bin:
- Pros: Often significantly cheaper, especially if using reclaimed materials like pallets or leftover wire mesh. Allows for customization in size, shape, and features (e.g., multi-chamber systems). Can be a satisfying project, teaching practical skills. You have full control over the materials used (e.g., avoiding treated wood). The process of building a compost bin can be rewarding in itself.
- Cons: Requires time, effort, and some basic tools and skills. May not look as polished as commercial bins (depending on craftsmanship). Durability depends on the materials and construction quality. Finding suitable free materials like pallets might take effort. Following clear instructions for compost bin creation is important.
Store-Bought Compost Bin:
- Pros: Convenient and ready to use almost immediately. Often designed with features like easy access doors, lids, and ventilation. Can offer a neater appearance. Usually comes with instructions and potentially a warranty. Wide variety of styles (plastic stationary, tumblers, etc.) readily available.
- Cons: Generally more expensive than DIY options. May offer less flexibility in size or features. Plastic bins, while often made from recycled content, still contribute to plastic consumption. Tumblers can be particularly pricey. You might be paying for features you don’t necessarily need.
Ultimately, the choice between DIY compost bin and store-bought depends on your budget, time availability, DIY skills and inclination, aesthetic preferences, and specific composting needs. If you enjoy hands-on projects and want to save money, learning how to make a compost bin is an excellent option. If convenience and a ready-made solution are priorities, a store-bought compost container might be better.
How to Build a Compost Bin: Pallet Method
One of the most popular and resource-efficient DIY methods involves building a compost bin using wooden pallets. Pallets are often available for free from local businesses, warehouses, or garden centers (always ask permission before taking them). This method creates a sturdy, large-capacity bin for making compost with excellent aeration. It’s a fantastic way to upcycle materials and create a compost bin on a budget.
Materials Needed for Building a Compost Bin: Pallets, Screws, Tools
Before you start making a compost bin from pallets, gather the necessary materials and tools. Precision isn’t paramount, but having the right items makes the job easier.
Materials:
- Pallets: You’ll need 4 or 5 identical (or very similar) sized pallets. Four pallets create a simple cube; five allows for a front gate or a divider for a two-bin system.
- Choosing Pallets: Look for pallets in good condition, without broken slats or signs of rot. Avoid pallets marked “HT” (Heat Treated) rather than “MB” (Methyl Bromide treated), as MB treatment uses chemicals you don’t want leaching into your compost. HT pallets are safe. Ensure the slats are close enough together to contain the compost material, or be prepared to line the inside with wire mesh or landscape fabric.
- Fasteners:
- Screws: Deck screws or exterior-grade wood screws are ideal, as they resist rust. Choose a length sufficient to securely join the pallet blocks/frames (e.g., 3-4 inches). You’ll need approximately 16-24 screws for a basic 4-pallet bin.
- Wire/Zip Ties (Optional): Heavy-duty wire or strong zip ties can be used as an alternative or supplement to screws for joining pallets, especially for a less permanent setup.
- Hinges and Latch (Optional): If making a front gate (using the fifth pallet or part of one), you’ll need 2-3 sturdy exterior-grade hinges and a simple latch mechanism.
- Wire Mesh/Hardware Cloth (Optional): If the pallet slats are too far apart, you might want to line the inside walls with wire mesh (e.g., 1/2-inch hardware cloth) to prevent compost from falling out. Staple it securely to the inside of the pallets.
- Wood Sealant (Optional): Applying a non-toxic wood sealant (like linseed oil or a specialized eco-friendly sealant) to the pallets can extend their lifespan, though it’s not strictly necessary. Avoid conventional wood preservatives containing harmful chemicals.
Tools:
- Safety Gear: Work gloves, safety glasses are essential. A dust mask is advisable if sanding or sawing.
- Measuring Tape: To ensure pallets are similar in size.
- Drill/Driver: With bits for pre-drilling holes (recommended to prevent wood splitting) and driving screws.
- Level (Optional): To ensure the bin sits relatively level.
- Hand Saw or Power Saw (Optional): If you need to modify pallets (e.g., cut one down for a front gate).
- Pry Bar or Hammer (Optional): May be needed to remove unwanted boards or nails from pallets.
- Staple Gun (if using wire mesh lining): Heavy-duty type.
- Wire Cutters (if using wire for fastening or lining):
Having these items ready before you start the how to build a compost bin process will streamline the construction.
Step-by-Step Instructions for Compost Bin Construction: Frame & Sides
Now let’s get into the specifics of building a compost bin using your prepared pallets. This guide assumes a basic 4-pallet square bin.
- Prepare the Site: Choose a level, well-drained spot for your compost bin (more on location later). Clear an area slightly larger than the footprint of the four pallets arranged in a square. Ensure the ground is relatively flat.
- Position the First Pallet: Stand one pallet upright on its long edge. This will form the back wall of your bin for compost.
- Attach the Side Walls:
- Place a second pallet upright at a 90-degree angle to the first pallet, forming one side wall. Align the edges where they meet.
- Secure the second pallet to the first. The strongest connection points are usually the thicker wooden blocks or stringers at the corners and middle of the pallets. Pre-drill holes slightly smaller than your screw diameter to prevent the wood from splitting, especially if the wood is dry or old.
- Drive 2-3 long deck screws through the edge/blocks of the side pallet into the edge/blocks of the back pallet. Ensure a tight, stable connection.
- Repeat the process with the third pallet on the other side of the back pallet, forming the second side wall. Ensure it’s also at a 90-degree angle and securely screwed to the back pallet. You should now have a ‘U’ shape.
- Attach the Front Wall:
- Position the fourth pallet across the front, completing the square.
- Align it with the edges of the two side pallets.
- Secure the front pallet to both side pallets using screws, again focusing on the block/stringer connection points. Pre-drill and drive 2-3 screws into each side connection.
- Check Stability: Once all four pallets are joined, check the structure for stability. It should feel solid and reasonably square. If it feels wobbly, you may need to add more screws or consider adding diagonal bracing pieces (scrap wood) across the corners for extra rigidity, although this is often unnecessary.
- Lining (Optional): If you decided the pallet slats are too wide, now is the time to line the inside walls. Cut wire mesh or hardware cloth to size for each of the four walls. Staple it securely to the inside face of the pallets, covering the gaps. This helps contain finer compost materials.
Congratulations! You have successfully completed the basic frame and sides for your DIY compost bin. This structure provides an excellent framework for making a compost bin that is both functional and sustainable.
Making a Compost Bin Lid
While not strictly essential, adding a lid to your pallet compost bin offers several benefits: it helps regulate moisture (keeping excess rain out and reducing evaporation), deters pests, retains heat (speeding up decomposition), and gives a tidier appearance. Here are a few options for making a compost bin lid:
- Simple Tarp Cover: The easiest solution is to cover the top with a heavy-duty tarp, weighted down with bricks or wood scraps. This is cheap and effective at shedding rain but doesn’t provide a rigid structure.
- Scrap Wood Lid:
- Measure the top opening of your pallet bin.
- Construct a simple square or rectangular frame using scrap lumber (e.g., 1x4s or 2x4s) slightly larger than the opening.
- Cover the frame with exterior-grade plywood, corrugated plastic sheeting, old metal roofing panels, or even additional pallet slats nailed or screwed across the frame.
- You can simply place this lid on top, or attach handles for easier lifting.
- For a hinged lid, attach two or three sturdy exterior hinges along one edge of the lid and the corresponding top edge of one of the bin’s pallet walls. You might need to add a supporting piece of wood across the top of the pallet wall for a solid hinge connection point. Add a handle to the front edge for lifting.
- Pallet Lid: If you have a fifth pallet (or part of one) that’s roughly the right size, you might be able to use it directly as a lid. It will be heavy but provides good coverage. You could potentially hinge it as described above, though the weight might require very strong hinges and potentially a prop stick to hold it open safely.
- Wire Mesh Frame Lid: Build a wooden frame similar to option 2, but instead of solid sheeting, cover it with hardware cloth or chicken wire. This allows some rain through but keeps out larger pests and debris like blowing leaves. It’s a compromise if you want some moisture ingress but also coverage.
Choose the lid option that best suits your materials, skills, and needs for controlling moisture and access in your how to make a compost bin project. Even a simple cover significantly improves the composting process.
Build a Compost Bin: Wire Mesh Option
If the pallet bin seems too involved or you prefer a simpler, quicker DIY compost bin, using wire mesh is an excellent alternative. This method requires minimal tools and materials and results in a bin for making compost with superior aeration. It’s perfect for smaller yards or as a first foray into building a compost bin.
Gathering Supplies to Make a Bin
To make a bin from wire mesh, you’ll need only a few items:
Materials:
- Wire Mesh: The key component. Options include:
- Hardware Cloth: Usually galvanized steel mesh with small square openings (e.g., 1/4-inch or 1/2-inch). This is sturdy, holds compost well, and offers good pest resistance (especially against rodents if the mesh is small enough). A 3-foot or 4-foot height is common. You’ll need a length sufficient to form the desired diameter (circumference = π × diameter). A typical bin might be 3 feet in diameter, requiring about 9.5 feet of mesh (π ≈ 3.14). A 10-foot length is often convenient.
- Chicken Wire (Poultry Netting): Less expensive but also less rigid and durable than hardware cloth. The hexagonal openings are larger, so finer materials might fall out. It’s easier to bend and shape but may require support stakes.
- Welded Wire Fencing: Often comes with larger rectangular openings (e.g., 2×4 inches). Sturdier than chicken wire but less containing than hardware cloth.
Choose galvanized wire for rust resistance. The gauge (thickness) of the wire will affect rigidity – thicker is better.
- Fasteners: To connect the ends of the mesh roll to form a cylinder. Options include:
- Heavy-duty Zip Ties: Quick and easy. Use UV-resistant ties for longevity outdoors.
- Wire: Short lengths of pliable wire (e.g., baling wire) can be twisted to secure the ends.
- Small Bolt Snaps or Carabiners: Allow for easy opening and closing if you want to unhook the bin to access the pile.
- Support Stakes (Optional): Especially if using less rigid wire like chicken wire, or if building a larger diameter bin, 3-4 wooden or metal stakes (e.g., garden stakes, rebar) driven into the ground inside or outside the cylinder can provide extra stability.
Tools:
- Safety Gear: Heavy-duty work gloves (cut wire edges are sharp!), safety glasses.
- Wire Cutters or Tin Snips: To cut the mesh to the desired length.
- Measuring Tape: To measure the mesh length.
- Pliers (Optional): Useful for twisting wire fasteners tightly.
- Hammer or Mallet (if using stakes): To drive stakes into the ground.
Having these supplies ready makes the process to create a compost bin from wire mesh very straightforward.
How to Create a Compost Bin from Wire
The process to create a compost bin using wire mesh is remarkably simple:
- Determine Size: Decide on the diameter of your bin. A diameter of at least 3 feet is generally recommended to achieve a sufficient mass for effective heating (thermophilic composting). Calculate the required length (circumference) of mesh: Length = 3.14 × Diameter. For a 3-foot diameter bin, you need about 9.5 feet of mesh. Add a few extra inches for overlap where you’ll fasten the ends.
- Cut the Mesh: Roll out the wire mesh on a flat surface (like a lawn or driveway). Measure the calculated length plus overlap. Wearing heavy gloves and safety glasses, carefully cut the mesh using wire cutters or tin snips. Be mindful of sharp edges.
- Form the Cylinder: Stand the cut piece of mesh on its edge and carefully bend it into a cylinder shape. Overlap the two cut ends by a few inches (e.g., 3-6 inches).
- Secure the Ends: Fasten the overlapped ends together securely.
- Using Zip Ties: Thread heavy-duty zip ties through the mesh openings at the top, middle, and bottom of the seam (and possibly a few points in between). Pull them tight and snip off the excess tail.
- Using Wire: Cut several short pieces of pliable wire. Thread them through the mesh on both sides of the overlap and twist the ends tightly together using pliers. Repeat at several points along the seam.
- Using Clips: Attach bolt snaps or carabiners through the mesh openings along the seam, allowing you to easily open the bin later.
Ensure the seam is held together firmly along its entire height.
- Check Shape and Stability: Stand the cylinder up. It should hold its shape reasonably well, especially if using hardware cloth. If it seems flimsy or you used chicken wire, consider adding support stakes.
You have now successfully learned how to make a bin for composting using wire mesh – a quick, affordable, and effective solution.
Securing Your Bin for Making Compost
Once your wire mesh cylinder is formed, you need to place and potentially secure your new bin for making compost.
- Site Selection: Choose an appropriate location (detailed in the next section). Ensure the ground is relatively level.
- Placement: Position the wire cylinder in the chosen spot. The open bottom should sit directly on the soil or lawn. This allows beneficial microorganisms and worms from the soil to enter the pile and helps with drainage.
- Securing (Optional but Recommended):
- Stakes: If the bin feels unstable, or if you live in a windy area, drive 3-4 stakes into the ground just inside or outside the wire wall. Space them evenly around the circumference. You can attach the mesh to the stakes using wire or zip ties for extra security. This is particularly helpful for taller bins or those made with less rigid mesh.
- Anchoring Flap (Alternative): When cutting the mesh, you could leave extra wire strands at the bottom edge. Bend these outwards and use landscape staples or rocks to anchor them to the ground.
- Initial Layer: Consider adding a base layer of coarse “brown” material inside the bin, such as twigs or wood chips (a few inches deep). This improves aeration from the bottom and helps with drainage.
Your wire mesh compost bin is now ready to be filled! Its simplicity and excellent airflow make it a great choice for efficient aerobic composting, truly embodying the ease of making a compost bin.
Setting Up Your Compost Bin
Whether you’ve just finished building a compost bin from pallets, assembled a wire mesh cylinder, or purchased a commercial unit, proper setup is key to successful composting. This involves choosing the right location and starting the pile correctly.
Where to Place Your Composting Bin
The location of your composting bin can significantly impact its performance and your convenience. Consider these factors:
- Convenience: Place the bin where it’s easily accessible from both your kitchen (for adding scraps) and your garden (for using the finished compost). Avoid putting it so far away that adding materials becomes a chore. A balance between visibility and accessibility is key.
- Sunlight/Shade: There are differing opinions here. Full sun can help heat the pile, potentially speeding decomposition, but it can also cause it to dry out quickly, especially in hot climates or with open bins like wire mesh. Partial shade is often ideal, providing some warmth while minimizing excessive moisture loss. In very hot, dry climates, more shade might be preferable. In cool, damp climates, more sun might be beneficial. Consider the type of bin for compost you have; enclosed plastic bins retain heat better than open wire ones.
- Drainage: The site should be well-drained. Avoid low spots where water collects, as a waterlogged pile will become anaerobic and smelly. Placing the bin directly on bare soil or lawn is ideal, allowing excess moisture to drain away and beneficial soil organisms to enter. Avoid placing it directly on concrete or pavement unless the bin design specifically allows for drainage collection.
- Water Access: You’ll occasionally need to add water to keep the pile moist. Having a hose or water source nearby is helpful.
- Space: Allow enough room around the bin to comfortably add materials, turn the pile (if necessary), and harvest the finished compost. If you built a pallet bin, ensure you have space to potentially remove the front panel or access the contents easily. For tumblers, ensure enough clearance for rotation.
- Neighbors and Aesthetics: While a well-managed compost pile shouldn’t smell bad, consider placing it where it won’t be visually obtrusive or too close to neighboring property lines or outdoor living areas, just as a courtesy. Some homeowners associations may have rules regarding compost bin placement.
- Avoid Tree Roots: Don’t place the bin directly over the roots of trees or large shrubs, as they may grow up into the nutrient-rich compost, making harvesting difficult.
Choosing the right spot for your how to make a compost bin creation sets the stage for easier management and better results.
How to Start a Compost Bin Correctly
Now that your compost bin is built and placed, it’s time to start the composting process. Getting the initial layers right helps establish a healthy environment for decomposers.
- Base Layer (Aeration): Start with a layer (4-6 inches) of coarse “brown” materials at the bottom of the bin. This could be small twigs, chopped branches, wood chips, straw, or crumpled cardboard. This layer promotes airflow from underneath and helps prevent the bottom of the pile from becoming compacted and waterlogged. This is a crucial first step in using your newly created bin for making compost.
- Add Greens and Browns: Begin adding your collected kitchen scraps (greens) and yard waste (browns). Aim for the ideal ratio discussed earlier (roughly 2-3 parts browns to 1 part greens by volume). It’s best to layer these materials or mix them as you add them, rather than adding large amounts of one type all at once.
- Example First Layers: After the twiggy base, add a layer of fruit/vegetable scraps, then cover with a layer of dry leaves or shredded paper, then add some grass clippings, followed by more leaves, etc.
- Chop Materials: Smaller pieces decompose faster. Chop up large vegetable scraps, twigs, and cardboard before adding them.
- Introduce Moisture: Compost microbes need moisture to thrive. The pile should be damp, like a wrung-out sponge. If your initial materials are very dry (like piles of autumn leaves), sprinkle them lightly with water as you build the layers. Rain will often provide sufficient moisture, but you may need to water periodically, especially during dry spells or if using a covered bin.
- Add an Activator (Optional): While not strictly necessary, you can kickstart the process by adding a “compost activator.” This could be a shovel-full of finished compost from another pile (rich in microbes), a layer of rich garden soil, or commercially available compost activators (often containing nitrogen and dormant microbes). Manure (from herbivores) also acts as an excellent activator.
- Build Volume: Ideally, try to build up a decent volume of material relatively quickly (aiming for a pile at least 3 feet high and wide if possible). This critical mass helps the pile heat up effectively (thermophilic composting), which speeds decomposition and kills weed seeds and pathogens. This is easier to achieve in larger bins like those made from pallets or wire mesh.
- Cover (If Applicable): If your compost container has a lid or you’re using a tarp, place it on top once you have a good starting volume. This helps retain heat and moisture.
Following these steps provides a solid foundation for how to make compost efficiently in your new bin. Patience is key; it takes time for the microbial community to establish and get to work.
The Composting Process: How to Make Compost
With your compost bin set up and the initial materials added, the focus shifts to managing the ongoing process of decomposition. Understanding how to make compost involves actively maintaining the right conditions within your bin.
Adding Materials to Your Bin for Compost
Consistency is important when adding new materials to your active bin for compost.
- Maintain the Ratio: Continue to balance “green” (nitrogen-rich) and “brown” (carbon-rich) materials. A common practice is to keep a pile or container of brown materials (like dry leaves, shredded cardboard, or straw) next to your compost bin. Whenever you add kitchen scraps (greens), cover them with a layer of browns. This helps maintain the C:N ratio, prevents odors, and deters pests like fruit flies.
- Bury Kitchen Scraps: When adding food scraps, especially items that might attract pests (though avoid meat/dairy – see troubleshooting), try to bury them within the center of the pile rather than leaving them exposed on top. Dig a small hole, deposit the scraps, and cover them well with existing compost material or fresh browns.
- Chop Large Items: Remember that smaller pieces break down much faster. Chop or shred large items like cabbage cores, broccoli stalks, branches, or large amounts of cardboard before adding them to the composting bin. A lawn mower can be used to shred leaves or small twigs.
- Avoid Overloading: Don’t add huge quantities of one type of material all at once, especially grass clippings. Large layers of grass can compact, blocking airflow and leading to anaerobic conditions (smelly!). Add grass clippings in thin layers (a few inches) interspersed with plenty of brown materials.
- Know What to Add (and What Not To): Stick to approved compostable materials (fruits, vegetables, coffee grounds, eggshells, grass, leaves, paper, cardboard, etc.). Avoid meat, fish, dairy products, oily foods, diseased plants, persistent weeds (like bindweed or those gone to seed), treated wood, and pet waste (dog/cat feces), as these can cause odors, attract pests, or introduce harmful pathogens/chemicals. (More detail in the “What Not to Put In” section).
- Batch vs. Continuous Addition: If using a single stationary bin, you’ll likely be adding materials continuously. If you have a multi-bin system or a batch tumbler, you’ll fill one section/bin completely, then let it ‘cook’ while starting to fill the next one.
Regularly adding balanced materials keeps the decomposers fed and the process moving forward in your chosen compost container.
Maintaining Moisture and Aeration in the Compost
Two critical factors for successful aerobic composting are moisture and oxygen (aeration). Neglecting these is a common reason for slow or smelly compost.
Moisture Management:
- The Squeeze Test: The ideal moisture level is often described as feeling like a “wrung-out sponge.” Grab a handful of compost from the center of the pile (wear gloves!) and squeeze it. Only a few drops of water, or none, should come out. If it’s dripping wet, it’s too wet. If it feels dry and crumbly, it’s too dry.
- Adding Water: If the pile is too dry, decomposition will slow dramatically. Add water using a watering can or hose with a gentle spray. It’s best to water while turning the pile (see below) to distribute the moisture evenly. Aim the water towards the center, as the edges tend to dry out faster.
- Reducing Moisture: If the pile is too wet (often indicated by bad smells), add more dry “brown” materials (like shredded cardboard, dry leaves, or straw) and turn the pile thoroughly to incorporate them and improve airflow. Ensure the bin has good drainage and isn’t collecting rainwater excessively (a lid helps).
- Climate Considerations: Adjust watering based on your climate and rainfall. Covered bins and tumblers will need more manual watering than open bins exposed to rain. Hot, windy conditions increase evaporation.
Aeration Management:
- Why Aeration Matters: The beneficial microbes responsible for fast, odor-free composting are aerobic – they need oxygen. Without enough air, anaerobic microbes take over, leading to slow decomposition and unpleasant smells (like ammonia or rotten eggs).
- Turning the Pile: The most common way to aerate a stationary bin (pallet, wood, plastic, wire) is by turning the compost. This involves mixing the materials, moving material from the cooler edges to the hotter center, and incorporating air.
- How Often: For faster composting, turn the pile every 1-2 weeks. If you’re less concerned about speed (cold composting), turning every 4-6 weeks or even less frequently is acceptable, but decomposition will be slower.
- How to Turn: Use a pitchfork or compost aerator tool. Try to move the outer layers towards the center and the center core material towards the outside. Break up any clumps.
- Multi-Bin Systems: Turning often involves moving the contents from one bin to the next adjacent bin.
- Aeration in Tumblers: Compost tumblers are designed for easy aeration – simply rotate the drum according to the manufacturer’s instructions (e.g., several revolutions every few days).
- Passive Aeration: Wire mesh bins offer excellent passive aeration due to their open structure. Building aeration pipes (perforated PVC pipes) into larger piles can also help introduce air without frequent turning. Ensuring a good structure with bulky brown materials also aids passive airflow.
Regularly checking and adjusting moisture and providing adequate aeration are fundamental composting instructions for transforming waste into valuable compost efficiently.
Speeding Up the Composting Process
While composting happens naturally, several techniques can accelerate decomposition, giving you finished compost sooner.
- Optimal C:N Ratio: As emphasized before, getting the balance of greens (nitrogen) and browns (carbon) right (around 25-30:1 C:N by weight, or roughly 1 part green to 2-3 parts brown by volume) provides the ideal diet for microbes.
- Smaller Particle Size: Chopping or shredding materials dramatically increases the surface area available for microbes to work on. A chipper/shredder for yard waste or simply running over leaves with a lawn mower makes a big difference. Cut up kitchen scraps.
- Consistent Moisture: Maintaining that “damp sponge” moisture level is crucial. Check regularly and add water if dry.
- Frequent Aeration: Turning the pile regularly (e.g., weekly) introduces oxygen, mixes materials, and distributes heat and moisture, significantly speeding up the process. This is key for “hot composting.”
- Sufficient Pile Size (Critical Mass): A pile needs to be large enough (ideally at least 3x3x3 feet) to generate and retain heat. Smaller piles lose heat too quickly for rapid thermophilic decomposition. This is why building a compost bin of adequate size is important.
- Hot Composting: Actively managing the C:N ratio, moisture, aeration, and pile size to encourage high temperatures (130-160°F or 55-70°C) is the fastest method. This heat kills most weed seeds and pathogens. It requires more diligent management than slow/cold composting.
- Using Activators: Adding materials rich in nitrogen or microbes (finished compost, manure, comfrey leaves, commercial activators) can give the pile a boost, especially when starting or if it seems sluggish.
- Insulation: In cooler climates, insulating the bin (e.g., covering with a tarp, banking leaves around it, using insulated bin designs) can help retain heat and keep the process active for longer periods.
Implementing these composting tips can significantly shorten the time it takes to get usable compost from your how to make compost bin setup.
Knowing When Your Homemade Compost is Ready
Recognizing finished compost is essential before using it in your garden. Using immature compost can sometimes harm plants because the decomposition process might continue in the soil, robbing it of nitrogen.
Signs of Finished Compost:
- Appearance: Mature compost should be dark brown or black, resembling rich topsoil. It should be crumbly and relatively uniform in texture, although you might still find small identifiable bits like eggshells or tough twigs. The original materials should no longer be recognizable.
- Smell: Finished compost has a pleasant, earthy smell, like a forest floor after rain. It should not smell sour, ammonia-like, or like rotting garbage. A bad smell indicates the decomposition process is incomplete or went anaerobic.
- Temperature: A mature compost pile will no longer be hot in the center. It should be close to the ambient air temperature. If the pile is still steaming or warm/hot to the touch inside, the microbes are still actively working.
- Texture: It should feel moist but not soggy, and crumble easily when handled.
- Volume Reduction: The volume of the finished compost will be significantly less (often 50% or more) than the volume of the raw materials you added.
Testing for Maturity (Optional):
- Bag Test: Place a sample of moist compost in a sealed plastic bag for a few days at room temperature. Open it and smell. A foul or ammonia odor means it needs more curing time. An earthy smell indicates maturity.
- Germination Test: Plant a few fast-germinating seeds (like radish or cress) in a small pot filled with the compost. If the seeds sprout and grow healthily, the compost is likely ready. If they fail to germinate or look stunted/yellow, the compost may still be too active or contain phytotoxic compounds. Compare with seeds grown in potting soil as a control.
Once your compost exhibits these characteristics, it’s ready to be harvested from your compost bin and used to enrich your garden soil. Depending on the method (hot vs. cold composting) and management, this can take anywhere from a few months to a year or more.
Essential Tips and Troubleshooting
Even with careful planning and execution of your how to build a compost bin project and composting efforts, you might encounter issues. This section provides a composting guide to common problems and solutions, plus advanced tips.
Composting Guide: Common Problems and Solutions
Here’s how to troubleshoot frequent composting challenges:
- Problem: Bad Odor (Ammonia Smell)
- Cause: Too much nitrogen (“greens”) or excess moisture leading to anaerobic conditions.
- Solution: Add more carbon-rich “brown” materials (leaves, straw, shredded cardboard/paper). Turn the pile thoroughly to incorporate browns and introduce air. Ensure good drainage.
- Problem: Bad Odor (Rotten Egg/Garbage Smell)
- Cause: Pile is too wet and compacted, lacking oxygen (anaerobic decomposition). May also be caused by adding prohibited items like meat or dairy.
- Solution: Turn the pile immediately to introduce air. Add bulky “brown” materials (wood chips, straw, torn cardboard) to improve structure and absorb excess moisture. Check drainage. Remove any prohibited items if possible.
- Problem: Compost Pile Not Heating Up
- Cause: Pile too small, too dry, not enough nitrogen (“greens”), or insufficient aeration.
- Solution: Build a larger pile (aim for 3x3x3 ft minimum). Check moisture (should be damp) and add water if needed. Add more nitrogen-rich materials (grass clippings, kitchen scraps, manure). Turn the pile to aerate.
- Problem: Decomposition is Very Slow
- Cause: Similar to not heating up – often too dry, too many browns (lack of nitrogen), insufficient moisture, lack of aeration, or cold weather. Materials may be too large.
- Solution: Check and adjust moisture. Add more greens if the pile seems mostly brown. Turn more frequently. Chop materials into smaller pieces before adding. Insulate the bin in winter if attempting year-round hot composting. Be patient – cold composting is naturally slow.
- Problem: Pests (Rodents, Flies, Raccoons)
- Cause: Exposed food scraps, inclusion of meat/dairy/oily foods, bin design allows easy access.
- Solution: Bury kitchen scraps deep in the center of the pile and cover with browns. Avoid adding prohibited items (meat, dairy, fats). Choose or modify your compost bin for better pest resistance (e.g., use 1/2-inch hardware cloth lining on pallet bins, ensure lids fit snugly, switch to a tumbler). Maintain a hot pile, as high temperatures deter many pests. Keep the area around the bin clean.
- Problem: Compost is Too Wet/Soggy
- Cause: Poor drainage, too much rain (uncovered bin), excessive addition of wet greens.
- Solution: Turn the pile and mix in plenty of dry brown materials (shredded paper/cardboard, straw, sawdust). Ensure the bin location allows drainage. Cover the bin during heavy rain periods.
- Problem: Compost is Too Dry
- Cause: Insufficient water added, excessive sun/wind exposure, too many dry browns.
- Solution: Add water gradually while turning the pile until it reaches the “damp sponge” consistency. Add more green materials if the mix is overly brown. Consider partial shade for the bin location or use a lid/cover.
Addressing these issues promptly using these composting tips will keep your system healthy and productive.
What Not to Put in Your How to Make Compost Bin
Knowing what *not* to compost is as important as knowing what to add. Adding the wrong materials can lead to odors, pests, slow decomposition, or contaminated compost. Avoid adding these to your general home compost bin:
- Meat, Fish, and Bones: Attract pests (rodents, flies, pets) and can cause strong odors as they decay.
- Dairy Products (Milk, Cheese, Yogurt): Similar to meat, attract pests and cause odors.
- Fats, Grease, Oils: Coat materials, slowing decomposition by repelling water and blocking airflow. Attract pests and cause odors.
- Pet Waste (Dog and Cat Feces, Cat Litter): Can contain harmful pathogens (bacteria, parasites) that may not be killed by typical backyard composting temperatures. Use dedicated pet waste composters or disposal methods.
- Diseased Plants or Insect-Infested Plants: Pathogens and pests might survive the composting process (especially in cooler piles) and could be spread back into your garden when you use the compost.
- Persistent Weeds (e.g., Bindweed, Quackgrass) or Weeds Gone to Seed: Roots or seeds may survive composting (especially cold composting) and infest your garden later. Hot composting (reaching 140°F+) can kill many, but it’s often safer to exclude them.
- Treated Wood (Sawdust or Chips): Lumber treated with preservatives (like CCA – chromated copper arsenate, or creosote) contains toxic chemicals that can leach into your compost and harm plants or soil life. Only use sawdust/chips from untreated wood.
- Coal or Charcoal Ash: Contains sulfur and iron in amounts potentially harmful to plants. Wood ash from fireplaces or wood stoves is okay in small amounts (adds potassium and raises pH), but don’t overdo it.
- Glossy or Coated Paper/Cardboard: Magazines, catalogs, coated cardboard (shiny finish) often contain plastics or heavy metals in inks/coatings that don’t break down well and can contaminate compost. Stick to plain paper and uncoated cardboard.
- Synthetic Materials: Plastics, synthetic fibers (polyester, nylon), glass, metal – these do not decompose.
- Walnut Tree Debris (Leaves, Twigs): Contains juglone, a natural herbicide that can inhibit the growth of sensitive plants like tomatoes and peppers. While juglone breaks down during thorough composting, it’s often safer to avoid large quantities.
Adhering to this list helps ensure your finished product from your how to make a compost effort is safe and beneficial for your garden.
Advanced Composting Instructions
For those looking to refine their technique or tackle specific challenges, consider these advanced composting instructions:
- Monitoring Temperature: For serious hot composting, use a long-stemmed compost thermometer. Aim for the core temperature to reach 130-160°F (55-70°C) and stay there for several days to effectively kill pathogens and weed seeds. Turn the pile when the temperature starts to drop below this range or exceeds the upper limit (which can kill beneficial microbes).
- Fine-Tuning C:N Ratio: Instead of estimating by volume, you can research the approximate C:N ratios of common materials and calculate a more precise mix by weight for optimal performance. Charts are available online listing C:N values for various organic materials.
- Using Cover Crops as Green Manure: Grow specific plants (like clover, vetch, buckwheat) and then chop them down and add them directly to your compost pile as a potent nitrogen source (“green manure”).
- Compost Tea Brewing: Once you have finished compost, you can “brew” it in aerated water (often with added molasses or kelp) to create a liquid fertilizer (“compost tea”) teeming with beneficial microbes to spray on plants or use as a soil drench.
- Layering Techniques (Sheet Composting/Lasagna Gardening): Build garden beds directly by layering brown and green materials (like cardboard, leaves, grass clippings, kitchen scraps, manure) on the desired spot, topped with finished compost or soil. The layers decompose in place, creating rich soil over time without a traditional bin.
- Curing Compost: Even after the main decomposition phase is over and the pile cools, letting the compost sit and “cure” for another month or two allows it to stabilize further, improving its quality. Keep it moist and turn occasionally during curing.
- Sifting Compost: For a finer, more uniform product (ideal for seed starting mixes or top dressing lawns), sift the finished compost through a screen (e.g., 1/2-inch hardware cloth tacked onto a wooden frame). Return larger, uncomposted pieces back to the active bin.
These advanced techniques allow for greater control and optimization of the composting process.
Advanced Composting Techniques
Beyond the standard bin methods, several advanced techniques cater to specific needs or enhance the composting process. Learning how to make a compost bin is just the beginning; exploring these methods can take your composting to the next level.
Using Worms in Your How to Make a Bin Setup
Vermicomposting, or composting with worms, is a highly efficient way to process kitchen scraps, especially suitable for apartment dwellers or those with limited space. It doesn’t typically involve the same type of bin for making compost as hot composting systems for yard waste, but rather a dedicated worm bin.
- The Worms: The stars are specific composting worms, most commonly Red Wigglers (Eisenia fetida) or European Nightcrawlers (Eisenia hortensis). Regular garden earthworms are not suitable for bin conditions.
- The Bin: Worm bins are typically shallow containers (plastic totes, specialized stacked trays) with drainage holes and ventilation. They are filled with moist bedding material (shredded newspaper, cardboard, coco coir, aged leaves).
- The Process: Worms live in the bedding and consume food scraps buried within it. They process food quickly, producing nutrient-rich worm castings (vermicast).
- Feeding: Feed worms primarily fruit and vegetable scraps (chopped small), coffee grounds, tea bags, and crushed eggshells. Avoid citrus, onions, garlic in large amounts, and never add meat, dairy, or oily foods. Bury food under the bedding.
- Environment: Worms thrive in moderate temperatures (around 55-77°F or 13-25°C), consistent moisture (like a damp sponge), and darkness. Bins are often kept indoors, in garages, or shaded outdoor spots.
- Harvesting: Castings are harvested every few months by methods like migrating worms to one side with fresh food/bedding, dumping the contents onto a tarp and separating worms (they avoid light), or using stacking tray systems where worms move upwards.
- Benefits: Produces exceptionally high-quality fertilizer (worm castings). Processes kitchen scraps quickly with minimal odor if managed correctly. Ideal for small spaces.
While distinct from learning how to build a compost bin for hot composting, vermicomposting is a valuable complementary technique.
Create Compost Bin Additives for Better Results
While not essential, certain additives can enhance the composting process in your create compost bin project:
- Finished Compost or Soil: As mentioned, adding a shovel-full introduces beneficial microbes to kickstart a new pile.
- Herbivore Manure (Chicken, Rabbit, Cow, Horse): Excellent source of nitrogen and microbes, acting as a powerful activator. Ensure it’s from herbivores and ideally aged slightly, especially “hot” manures like chicken manure.
- Comfrey Leaves: Rich in nitrogen and other nutrients, comfrey acts as a great activator and enriches the final compost.
- Alfalfa Meal or Pellets: Provides nitrogen and stimulates microbial activity.
- Coffee Grounds: A readily available “green” material, high in nitrogen, loved by microbes (and worms!).
- Wood Ash (Sparingly): Adds potassium and calcium, and slightly raises pH (makes it more alkaline). Use only small amounts from untreated wood, as too much can harm microbes and make the compost overly alkaline.
- Crushed Eggshells: Add calcium and help moderate pH. Crush them well for faster breakdown.
- Seaweed/Kelp: Rich in trace minerals and growth hormones, beneficial for the final compost. Rinse off excess salt if collected directly from the beach.
- Commercial Compost Activators: Often contain nitrogen sources and dormant microbes. Can be helpful for starting a pile or reviving a sluggish one, but often unnecessary if the pile is well-managed with a good C:N balance.
- Biochar: Charcoal produced by pyrolysis (heating organic matter with limited oxygen). Adding small amounts of biochar can improve aeration, retain moisture and nutrients, and provide habitat for microbes, potentially enhancing the composting process and the final product’s soil-building capacity.
Use additives strategically to address specific needs (like low nitrogen) rather than routinely adding everything. The core principles of C:N balance, moisture, and aeration remain paramount when you make a compost bin work effectively.
How to Build a Compost Bin with Multiple Chambers
A multi-chamber system is highly efficient for continuous composting. It allows different stages of decomposition to occur simultaneously. A popular DIY approach uses pallets.
Concept: Typically involves 2 or 3 bins side-by-side, sharing internal walls.
- Bin 1 (Receiving): Actively add fresh materials here (greens and browns).
- Bin 2 (Active Composting): Once Bin 1 is full, its contents are turned into Bin 2 to actively decompose (“cook”). Bin 1 is then free to receive new materials.
- Bin 3 (Curing/Finished): Once Bin 2 has undergone significant decomposition (e.g., cooled down after heating), its contents are turned into Bin 3 to finish curing and mature. Finished compost is harvested from Bin 3.
Building with Pallets (Example for 3 Bins):
- Gather Materials: You’ll need 7 pallets (for back, sides, and two dividers). Plus screws, tools as before. Consider hardware cloth lining.
- Prepare Site: Choose a level spot large enough for three bins side-by-side (approx. 4ft deep x 12ft wide).
- Build Back Wall: Lay three pallets end-to-end and screw them together securely at the blocks/stringers to form the long back wall.
- Attach End Walls: Attach one pallet perpendicularly at each end of the back wall using screws, forming the outer side walls.
- Install Dividers: Position two more pallets inside the structure to act as dividing walls between the bins. Place them parallel to the end walls, roughly 4 feet apart (or dividing the space evenly). Secure these divider pallets firmly to the back wall pallet(s) and potentially to the ground with stakes or to front support posts if adding them.
- Front Access (Optional): You can leave the fronts open, or create removable front slats or hinged gates for each chamber using additional wood or parts of pallets. This makes turning and harvesting easier.
- Lining (Optional): Line the inside walls and dividers with hardware cloth if pallet slats are wide.
This multi-chamber build a compost bin design streamlines the composting instructions for continuous flow: fill Bin 1, turn to Bin 2, turn to Bin 3, harvest from Bin 3, repeat.
Build a Compost Bin for Specific Needs (e.g., Small Spaces)
Not everyone has space for a large pallet bin. Here’s how to build a compost bin or adapt methods for tight quarters:
- Compact Wire Bin: The simple wire mesh bin can be made smaller (e.g., 2-2.5 feet diameter). It won’t heat up as much (slower composting) but still works.
- Vertical/Stacked Bins: Some commercial designs stack composting layers vertically. DIY versions can be adapted from sturdy containers or wood, but ensuring aeration and moisture control throughout the layers is challenging.
- Small Wooden Bin: You can construct a smaller version of a standard wooden bin (e.g., 2x2x2 feet) using lumber. Ensure good ventilation holes.
- DIY Tumbler (Small Scale): Drill ventilation holes in a sturdy plastic garbage can with a tight-fitting lid. Place it on its side in a simple cradle made of wood, or just roll it on the ground every few days to mix contents. Ensure drainage holes are also present. This is a budget approach to a tumbler compost container.
- Vermicomposting (Worm Bin): As discussed, ideal for kitchen scraps in very small spaces, even indoors or on balconies.
- Bokashi Composting: An anaerobic pre-composting method using fermentation in a sealed bucket with specific microbes (Bokashi bran). It processes *all* food scraps (including meat/dairy). The fermented material still needs to be buried in soil or added to a traditional compost bin to fully decompose, but it reduces volume and odors quickly in the initial stage. Suitable for small kitchens.
- In-Garden Composting: Dig holes or trenches directly in garden beds, bury kitchen scraps, and cover with soil (trench composting). Or use small, bottomless bins placed directly where you want the nutrients.
Choosing the right method depends on the *type* and *volume* of waste and the available space when you decide to make compost bin setups for constrained areas.
Make Compost Bin Maintenance Easier
While composting requires some effort, certain choices and habits can simplify maintenance:
- Choose the Right Bin Style: Tumblers simplify turning but can be heavy. Wire bins require manual turning but are easy to lift off for harvesting. Pallet bins are sturdy but turning requires effort. Consider your physical ability and time commitment.
- Location Matters: Easy access to the bin and a nearby water source reduces hassle.
- Keep Browns Nearby: Having a stockpile of dry leaves, shredded cardboard, or straw right next to the bin makes it easy to cover greens immediately.
- Chop Materials Small: Smaller pieces break down faster, meaning less time waiting and potentially less turning needed for full decomposition.
- Use a Compost Aerator Tool: These tools (corkscrew or plunger types) help introduce air without the full effort of turning the entire pile with a pitchfork.
- Multi-Bin Systems: Reduce the need to separate finished from active compost within a single bin.
- Harvesting Doors: Bins with bottom access doors allow harvesting finished compost without disturbing the upper layers (though material doesn’t always flow down perfectly).
- Embrace Slow Composting: If speed isn’t critical, “cold” composting (less frequent turning, slower process) requires significantly less maintenance than active “hot” composting. Just layer materials and let nature take its time (might take 6 months to 2 years).
- Set a Routine: Check moisture/add materials on a regular schedule (e.g., weekly check, add scraps as generated) to make it a habit.
Thinking about ease of use when you build a compost bin or choose one can make the long-term commitment more enjoyable.
How to Compost Bin Rotation Schedules
For multi-bin systems or batch composting, establishing a rotation schedule is key:
Three-Bin System Example Schedule:
- Months 1-3 (Filling Phase): Add all new materials (balanced greens and browns) to Bin 1. Keep Bin 2 and Bin 3 empty or holding previously processed material.
- Month 4 (First Turn): Stop adding to Bin 1. Turn the entire contents of Bin 1 into Bin 2. Bin 2 now holds the actively composting (“hot”) material. Start adding new materials to the now-empty Bin 1.
- Months 4-6 (Active Phase): Continue adding new materials to Bin 1. Let Bin 2 ‘cook’. Turn Bin 2 occasionally (e.g., every 2-4 weeks) to maintain aeration and heat if hot composting.
- Month 7 (Second Turn): Stop adding to Bin 1 (it should be getting full again). Turn the contents of Bin 2 (now partially decomposed) into Bin 3 for curing. Turn the contents of Bin 1 (freshly filled) into Bin 2 to begin active composting. Start adding new materials to the now-empty Bin 1.
- Months 7+ (Continuous Cycle): Continue adding to Bin 1. Let Bin 2 actively compost (turn occasionally). Let Bin 3 cure (keep moist, turn infrequently). Harvest finished compost from Bin 3 as needed. When Bin 1 is full again, repeat the cycle: Bin 2 -> Bin 3, Bin 1 -> Bin 2, start filling Bin 1.
Batch Tumbler (Dual Chamber) Example:
- Phase 1 (Filling): Fill Chamber A with balanced materials over several weeks until full.
- Phase 2 (Composting): Stop adding to Chamber A. Start filling Chamber B with new materials. Regularly tumble the entire unit (aerating both chambers, but focusing on processing Chamber A).
- Phase 3 (Harvesting/Refilling): Once Chamber A contains finished compost (typically 1-3 months depending on management), empty it. Chamber B should now be full or nearing full. Stop adding to Chamber B, let it compost. Start refilling the now-empty Chamber A.
- Repeat Cycle.
Adjust timings based on your volume of waste, climate, and how actively you manage the process (hot vs. cold). A clear schedule makes managing multiple stages straightforward in your how to compost bin system.
Making Your Compost System Sustainable
Sustainability is often a core motivation for composting. Enhance the sustainability of your system:
- Use Reclaimed Materials: Opt for a DIY compost bin using reclaimed pallets, scrap wood, or leftover wire mesh. This reduces the need for new resources.
- Source Locally: If buying materials (wood, bins), try to source them locally to reduce transportation emissions.
- Conserve Water: Use rainwater harvested from roofs to moisten your compost pile instead of tap water. Cover bins to prevent excessive drying (reducing watering needs) and also to prevent waterlogging from heavy rain.
- Compost Everything Possible: Maximize waste diversion by composting all suitable kitchen scraps and yard waste. Explore Bokashi or vermicomposting for items not ideal for a standard bin.
- Avoid Peat Moss: Don’t use peat moss as a “brown” material. Peat bog harvesting is unsustainable and destroys valuable ecosystems. Use fallen leaves, straw, or shredded paper/cardboard instead.
- Close the Loop: Use your finished compost in your own garden to grow food or nourish plants, reducing the need for store-bought fertilizers and soil amendments (which have their own environmental footprints from production and transport).
- Longevity: Build or choose a durable compost container that will last many years. Use naturally rot-resistant wood (like cedar, if affordable and sustainably sourced) or maintain wood bins with non-toxic sealants (linseed oil) to extend their life.
- Share Excess Compost: If you produce more compost than you need, share it with neighbors, community gardens, or schools.
Making conscious choices throughout the process, from building a compost bin to using the end product, enhances its environmental benefits.
Making a Composting Bin Blend In
While function is primary, aesthetics matter to many gardeners. Here’s how to make your composting bin less of an eyesore:
- Material Choice: Wooden bins (especially those made from attractive lumber like cedar or stained pine) often blend better into garden settings than black plastic bins or simple wire mesh. A well-crafted pallet bin can also look rustic and fitting.
- Painting or Staining: Paint or stain a wooden bin (using non-toxic, plant-safe products) to match fences, sheds, or other garden structures. Darker colors (browns, greens) tend to recede visually.
- Screening: Plant shrubs, tall ornamental grasses, or climbing vines on a trellis around the compost bin area to screen it from view. Choose plants appropriate for the site’s light conditions. Leave adequate space for access.
- Strategic Placement: Tuck the bin behind a shed, garage, or dense hedge, or in a less visible corner of the yard, while still ensuring reasonable convenience.
- Incorporate into Garden Design: Build raised beds or other garden features around the compost area to integrate it more deliberately into the landscape design.
- Lids and Tidiness: Using a lid keeps the contents hidden and looks neater. Keep the area around the bin tidy, free from spilled materials or stray tools.
- Choose Attractive Commercial Bins: Some store-bought bins are designed with aesthetics in mind, featuring wood-grain textures or more decorative shapes.
- Living Wall Effect: For sturdy bins (like pallet bins), you could potentially attach small planters or wire mesh to the outside faces and grow shallow-rooted plants (like succulents or herbs) directly on the bin itself, though this requires careful watering.
With a little planning, your hard-working bin for compost doesn’t have to detract from the beauty of your garden.